
Xamarin.iOS Build Improvements
One of the biggest improvements in the Xamarin release last week is significantly faster build time for Xamarin.iOS apps. We thoroughly analyzed the build process and identified several areas of improvement. Here are the results.
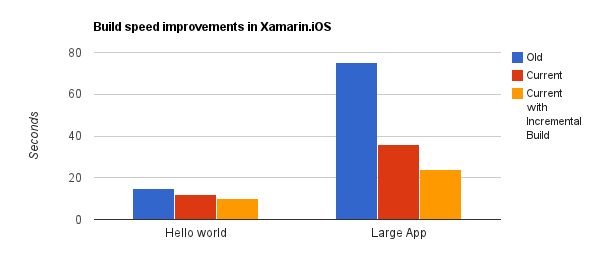
We tested these changes both with Hello World and a large application made up of 160,000 lines of code, and these are the results after making a one line change:
-
Hello World, build, deploy and starts in 10 seconds (vs 15 seconds before)
-
Large solution, build, deploys and starts in 24 seconds (vs 75 seconds before).
This is the result of a series of optimizations. This blog post explains those optimizations and what steps you need to take to enable this mode.
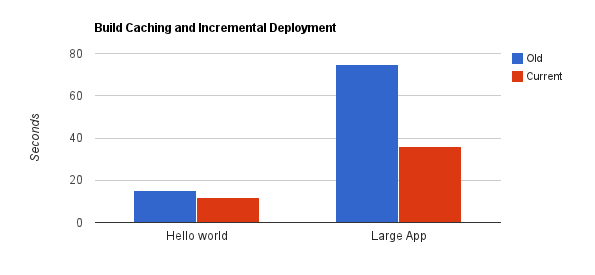
Build Caching
We are now caching every partial build file, which makes it possible to only rebuild the parts of your project that has been modified.
Incremental Deployment
Instead of uploading your entire application on every build to your device, only the modified bits of it are sent to the device. If you have many rarely modified resources in your app, we will not deploy those resources to the device every time the app is rebuilt, only the first time. The savings here are project dependent, but the minimum deploy time can now be as small as one second.
Incremental Builds
Usually in iOS all the native code is contained within one file, the main executable. This means that no matter how small your change was, we would always rebuild, relink and end up with a new executable that must be uploaded.
For big projects with a lot of code this posed a problem – the size of the native executable caused deploy time to suffer significantly, even with the incremental deploys mentioned above.
So in the next version of Xamarin.iOS we’re introducing incremental builds and deployments – this is a compilation mode where each assembly is compiled into a separate shared library. When this is enabled, a change in one assembly will only require the native code for that assembly to be uploaded, which will significantly reduce the amount of data that has to be deployed to a device for each build.

To use incremental builds effectively, you must:
-
Enable incremental builds
-
Update your linker settings
We discuss these next:
Enabling incremental build: This setting is not on by default, it has to be enabled first. This is because it is only possible to start the app using Xamarin Studio or Visual Studio when you use this feature. If you try running it by tapping on it, it will crash. This means that you should not compile your apps with incremental builds when you want to demo your app.
The next version of Xamarin Studio or the Visual Studio plugin will include a UI to enable this, in the meantime it can be enabled by passing the “–fastdev” to the additional mtouch arguments in the project’s iOS Build properties. Only set this for your iPhone targets, and not the AppStore targets.
Update Linker Settings: In previous versions of Xamarin.iOS we’ve recommended you enable the managed linker (either set “Linker behavior” to “Link all assemblies” or “Link SDK only” in the project’s iOS Build options) to get the best build times. The extra time it takes to execute the manager linker far outweighed the time gained by having less managed code to AOT-compile and then less native code to deploy to the device.
With this new build mode, it is best to avoid the linker during development, since this will ensure that your core assemblies remain the same, and reduce the amount of code that needs to be uploaded every time. So you should disable the managed linker, by setting your linker value for development to “Don’t link”. The first build will be slower, but then rebuilds will be faster than with the managed linker enabled.
 Light
Light Dark
Dark