
Add Push Notifications to iOS Apps with Azure Notification Hubs
Push Notifications have become ubiquitous in mobile apps since they were first introduced. One of the major advantages of push notifications is being able to deliver a contextual notification without having the app manually check (or poll) a server; this saves a lot of battery life due to reduced CPU usage. Another key advantage of push notifications is the ability to keep users engaged with the app when it’s not running in the foreground.
Azure Notification Hubs allow you to send push notifications to any platform from any backend service in a scalable manner. Unlike setting up a custom delivery system, combining Azure with Xamarin.iOS is simple.
In this blog post, we’ll run through all the steps required to set up and configure a Notification Hub on Azure and implement the code required in a Xamarin.iOS app.
To complete this tutorial, you must have an active Azure account. If you don’t have an account, you can create a free trial account in only a couple of minutes. You can sign up for an Azure Free Trial here.
Signing and Provisioning
Unlike local notifications, you must register your App ID with Apple and enable Push Notifications in order for them to work; this is also the case even when just running a debug build.
To set up the certificates and provisioning profiles required, follow this part of our guide on the Apple Push Notification System.
Follow the guide to the end until you have a Personal Information Exchange (PKCS12) certificate (.p12 file). You will need this to set up the Azure Notification Hub in the next step.
Azure Set Up
Head over to the Azure Portal and sign in. Once logged in, click on “+ New” and search for “Notification Hub”. Next, we need to fill out some information, such as the name for the hub, a unique namespace, server location, and a name for your resource group. Once done, click create and wait for the hub to be set up by Azure; this normally takes no longer than a couple of minutes.

Once the Notification Hub is ready, go to “Manage” then choose “Notification Services”, and then “Apple (APNS)”. Here, we need to upload the .p12 file that we created earlier; make sure Authentication Mode is set to “Certificate”, select the file, enter the password for the certificate (if set), and choose “Sandbox” for the Application Mode. Click “Save” and that’s it! The Notification Hub is set up and ready to use for development!

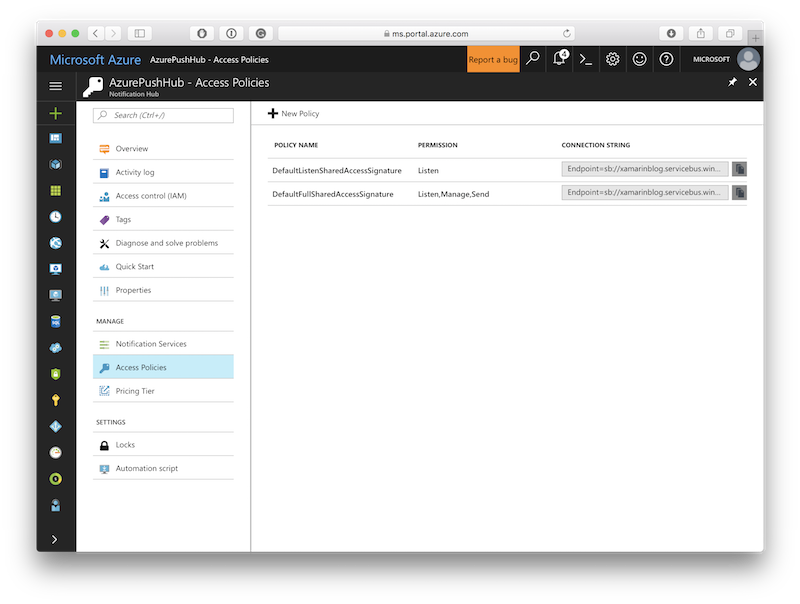
While still in the Azure portal, we need to grab the EndPoint string for use later on. You can find this under “Manage” > “Access Policies” and copy the connection string for the DefaultListenSharedAccessSignature policy.
The Code
Now we need to add some code to our app so we can receive push notification from the Notification Hub. With Xamarin.iOS, this is really simple; start by adding the Xamarin.Azure.NotificationHubs.iOS NuGet package to your project by right-clicking the “Packages” folder and selecting “Add Packages…”
Following this, we need to add some code to AppDelegate.cs to register for notifications and handle them when received. At the top of the file add:
using WindowsAzure.Messaging;
Next, we need to declare a SBNotificationHub and the connection parameters at the class level:
private SBNotificationHub Hub { get; set; }


public const string ConnectionString = "Endpoint=sb://…";

public const string NotificationHubPath = "AzurePushHub";
The ConnectionString is the string we copied from Azure previously and the NotificationHubPath is simply the name of your Notification Hub.
Now we need to register our preferred notification settings for the app and register to receive push notifications. Add the following code in FinishedLaunching.
var settings =  UIUserNotificationSettings.GetSettingsForTypes( UIUserNotificationType.Alert |  UIUserNotificationType.Badge | UIUserNotificationType.Sound, new NSSet());


UIApplication.SharedApplication.RegisterUserNotificationSettings(settings);

UIApplication.SharedApplication.RegisterForRemoteNotifications();
Here, we’re specifying that by default, unless overrided by the user, we want to display alerts, a badge on the app icon, and play a sound when a notification is received.
iOS will now go ahead and register the app for remote push notifications. It will let us know this is complete by calling RegisteredForRemoteNotifications; we need to override this to handle the result and register the device with our Azure Notification Hub.
public override void RegisteredForRemoteNotifications(UIApplication application, NSData deviceToken)
{
  // Create a new notification hub with the connection string and hub path
  Hub = new SBNotificationHub(ConnectionString, NotificationHubPath);

  // Unregister any previous instances using the device token
  Hub.UnregisterAllAsync(deviceToken, (error) =>
  {
    if (error != null)
    {
      // Error unregistering
      return;
    }

    // Register this device with the notification hub
    Hub.RegisterNativeAsync(deviceToken, null, (registerError) =>
    {
      if (registerError != null)
      {
        // Error registering
      }
    });
  });
}
Once this is done, iOS will automatically display received alerts for your app when the app is backgrounded. If we want to handle alerts when the app receives a push notification, we can use ReceivedRemoteNotification:
public override void ReceivedRemoteNotification(UIApplication application, NSDictionary userInfo)
{

  // This method is called when a remote notification is received and the

  // App is in the foreground - i.e., not backgrounded


  // We need to check that the notification has a payload (userInfo) and the payload

  // has the root "aps" key in the dictionary - this "aps" dictionary contains defined

  // keys by Apple which allows the system to determine how to handle the alert


  if (null != userInfo && userInfo.ContainsKey(new NSString("aps")))
  {

    // Get the aps dictionary from the alert payload

    NSDictionary aps = userInfo.ObjectForKey(new NSString("aps")) as NSDictionary;


    // Here we can do any additional processing upon receiving the notification


    // As the app is in the foreground, we can handle this alert manually

    // here by creating a UIAlert for example

  }


}
If you want to run code when a notification is received while the app is backgrounded, you can do so by using DidReceiveRemoteNotification
Testing
Deploy your app to your iOS device from Visual Studio. Once deployed, hit the home button to send it to the background. Next, go to the Azure Portal, open your Notification Hub, and go to “Support + Troubleshooting” > “Test Send”.
From here we can send a test notification to our app, so set the platform to “Apple” and click “Send”. It may take up to a minute to see the notification appear on your device, depending on connectivity, but usually it will be received in a matter of seconds. The result should look like this:
Summary
Whether it’s sending updates, reminders, messages or more, using remote notifications in your apps is a powerful way to keep users engaged. Using an Azure Notification Hub with Xamarin.iOS makes this a simple task and allows you to leverage all the other benefits provided by Azure. Azure is able to scale with your app, can quickly send millions of messages, and can be integrated into almost any back-end service, whether it’s Microsoft .NET, PHP, Java, or Node.js (to name just a few).
As well as the standard use cases, you can also use push notifications to update your app in the background by using silent notifications. Find out more about this by reading our documentation.
The full code for this blog post can be found on the GitHub repo for this post.
 Light
Light Dark
Dark
0 comments