
Getting Started with the iOS 10 Notification Framework
 iOS 10 includes some significant changes to notifications for developers, with the addition of a brand new framework for dealing with notifications that supports the delivery and handling of both local and remote notifications. In this blog post, we’ll look at the changes and cover how to ensure your app continues to work perfectly with the release of iOS.
Why a new API?
Before iOS 10, we would need to register our notifications in the UIApplication class, and define how these should be triggered. The problem with this approach is that local and remote notifications would be handled differently and require some duplication of code. Another advantage of the new API is having a unified API across all Apple’s platforms such as iOS, tvOS, and watchOS.
Although the API is entirely new, it should be familiar to any developers who have used the existing notifications API. The API includes feature parity with the previous API making it easy to migrate existing apps to support the new features of UserNotifications.
Local Notifications
Local notifications are notifications that come from the device rather than from a notification service such as Azure Notification Hub. The local notifications can be configured to fire using both location based triggers or task reminder alert. Some examples of local notifications might include:
- Calendar alerts
- Reminder alerts
- Location aware triggers (such as arriving home).
Remote Notifications
Remote notifications are a little more complex than local notifications as these require a service-side component to function. There is a huge array of notification providers, including Notification Hub, Firebase, and AWS notification service, but the client side implementation doesn’t change massively between the providers.
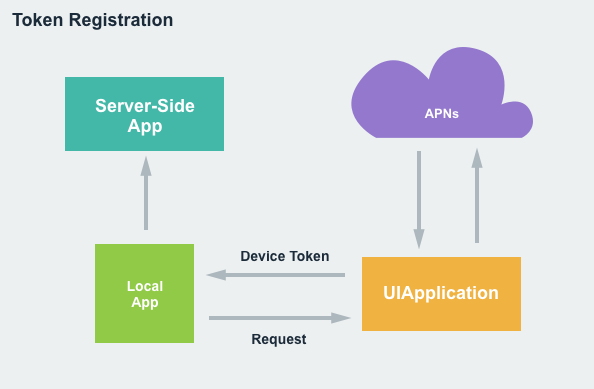
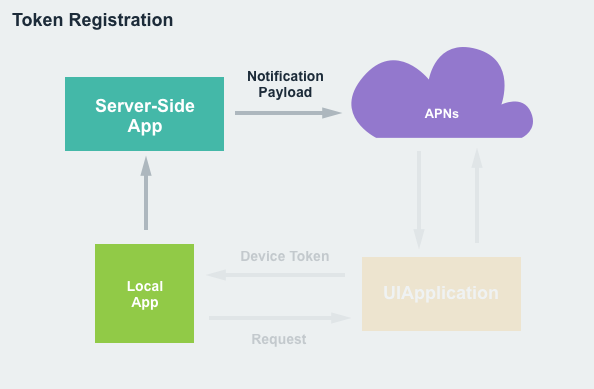
Once you’ve found a notification provider, it will be responsible for sending the notification payload to Apple’s Push Notification (APN) system to transmit it to the users’ devices. In order for Apple to know where to send the notification, your app will initially register the device with Apple so that they can keep track of its IP Address.
Preparing for Notification Delivery
As mentioned above, you must register your app with Apple to support notifications, in part so that the user can opt out of notifications, but also to provide Apple with the device IP. As part of the approval process, the user can opt to approve the following notification styles:
- Banners
- Sound Alerts
- Badges
To register your app, you’ll need to add the following code to the FinishedLaunching method of the AppDelegate class.
using UserNotifications;
...

public override bool FinishedLaunching (UIApplication application, NSDictionary launchOptions)
{
    // Request notification permissions from the user
    UNUserNotificationCenter.Current.RequestAuthorization (UNAuthorizationOptions.Alert, (approved, err) => {
        // Handle approval
    });

    return true;
}
Once you’ve registered your app, it’s a straightforward process to make adjustments to the notifications privileges using the Settings app on the device.
Configuring Remote Notifications
With iOS 10, you must now inform iOS which environment your push notifications are running in as either Development or Production. If you do not provide this information, your app will be rejected upon submission for App Store review.
To set the environment property, you should open the Entitlements.plist file in the Solution Explorer and add aps-environment with the type as String. You will then need to enter either development or production.
Tokens
If your app will be sending or receiving push notifications, you’ll need to request a registration token from the UIApplication class. The registration process naturally requires the device to be connected to the internet in order to communicate with APNs. Once the token has been generated, it will be sent to the app and can be forwarded to your push provider service.
The following code should be used to initialize the required registrations:
UIApplication.SharedApplication.RegisterForRemoteNotifications ();
The token that we receive and send onto our notification provider will need to be included as part of the notification payload that is sent to APNs when sending a notification.
Notification Scheduling & Delivery
Now that we’ve registered our app for notifications, we can go ahead and deal with sending and receiving notifications. Lets go ahead and configure a local notification to be triggered using a timed interval.
using UserNotifications;
...

var content = new UNMutableNotificationContent ();
content.Title = "Notification Title";
content.Subtitle = "Notification Subtitle";
content.Body = "This is the message body of the notification.";
content.Badge = 1;

var trigger =  UNTimeIntervalNotificationTrigger.CreateTrigger (5, false);

var requestID = "sampleRequest";
var request = UNNotificationRequest.FromIdentifier (requestID, content, trigger);

UNUserNotificationCenter.Current.AddNotificationRequest (request, (err) => {
    if (err != null) {
        // Do something with error...
    }
});
Wrapping up
Notifications in any application are incredibly important for driving app usage and engagement. iOS 10 sees a number of improvements to increase our productivity when adding Notification support to our existing apps. If you’d like to learn more about notifications in iOS 10, I check out our extensive documentation which covers the topic in detail.
 Light
Light Dark
Dark
0 comments