
Exploring New iOS 12 ARKit Capabilities With Xamarin
It’s summertime, which for Xamarin developers means new iOS betas to explore and learn. ARKit, which debuted last year in iOS 11, has matured over the past year and in iOS 12 is much more flexible than it was previously.
New iOS 12 ARKit
If you haven’t looked at ARKit in a year, the truly big change came from a point-release in the spring, when Apple added the capability to detect vertical and horizontal planes. Detected planes are the major junction between computer-generated geometry and the real world. Most often, you’ll position your computer imagery relative to such planes.
Working With Point Clouds
These planes are built upon a lower-level feature; a “point cloud” generated by the system using “visual inertial odometry.”
Fun fact: the ‘inertial’ part of that includes exploiting the slight shifts inevitable from holding the device in your hand, so ARKit doesn’t work as well if you put the device on a tripod.
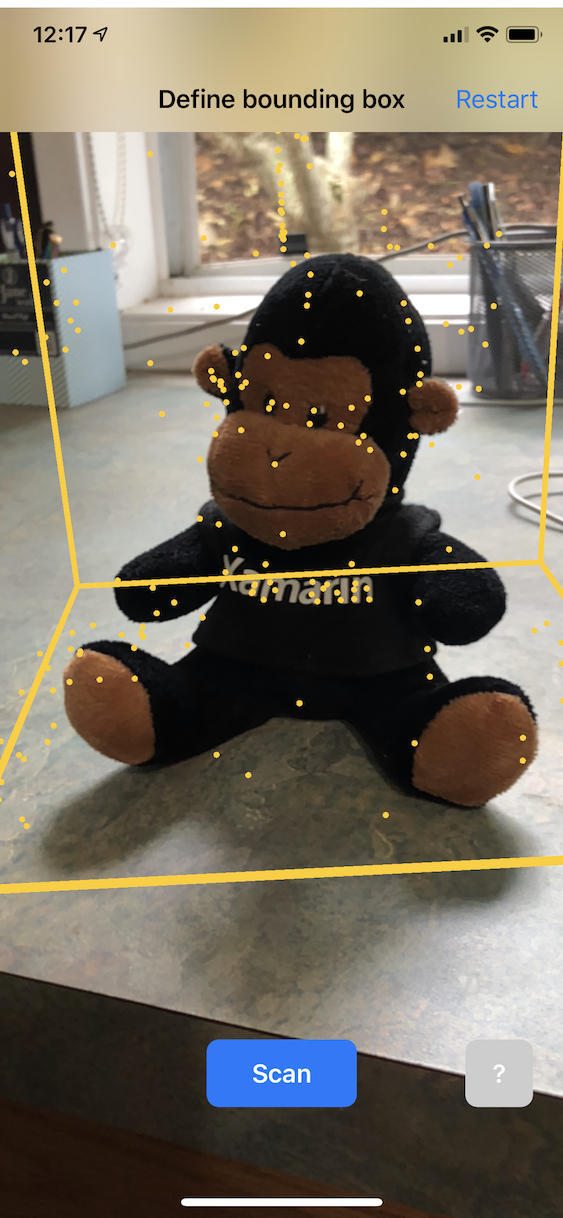
This point cloud is available to developers in the ARFrame.RawFeaturePoints property. The Scanning and Detecting 3D Objects sample shows how the point cloud can be used to create and save an ARReferenceObject for use in other ARKit apps. For instance, you could create an ARReferenceObject of a sculpture for use in a museum app or an engine part for use in a DIY car-repair app.
Three-Part Performance Strategy
Visualizing the point cloud efficiently can be a tricky problem. Iterating over the points, then creating and placing a new SceneKit node for each point would kill the frame rate. Alternatively, if done asynchronously there would be a lag. The sample maintains performance with a three-part strategy:
- Using
unsafecode to pin the data in place and interpret the data as a raw buffer of bytes. - Converting that raw buffer into an
SCNGeometrySourceand creating a “template”SCNGeometryElementobject. - Rapidly “stitching together” the raw data and the template using
SCNGeometry.Create(SCNGeometrySource[], SCNGeometryElement[])
internal static SCNGeometry CreateVisualization(NVector3[] points, UIColor color, float size)
{
  if (points.Length == 0)
  {
    return null;
  }

  unsafe
  {
    var stride = sizeof(float) * 3;

    // Pin the data down so that it doesn't move
    fixed (NVector3* pPoints = &points[0])
    {
      // Important: Don't unpin until after `SCNGeometry.Create`, because geometry creation is lazy

      // Grab a pointer to the data and treat it as a byte buffer of the appropriate length
      var intPtr = new IntPtr(pPoints);
      var pointData = NSData.FromBytes(intPtr, (System.nuint) (stride * points.Length));

      // Create a geometry source (factory) configured properly for the data (3 vertices)
      var source = SCNGeometrySource.FromData(
        pointData,
        SCNGeometrySourceSemantics.Vertex,
        points.Length,
        true,
        3,
        sizeof(float),
        0,
        stride
      );

      // Create geometry element
      // The null and bytesPerElement = 0 look odd, but this is just a template object
      var template = SCNGeometryElement.FromData(null, SCNGeometryPrimitiveType.Point, points.Length, 0);
      template.PointSize = 0.001F;
      template.MinimumPointScreenSpaceRadius = size;
      template.MaximumPointScreenSpaceRadius = size;

      // Stitch the data (source) together with the template to create the new object
      var pointsGeometry = SCNGeometry.Create(new[] { source }, new[] { template });
      pointsGeometry.Materials = new[] { Utilities.Material(color) };
      return pointsGeometry;
    }
  }
}
Advanced iOS Gestures
Another tricky challenge relates to using gestures to manipulate AR objects. The app allows the user to drag, rotate, scale, and extrude sides of the bounding box that surrounds the object being scanned. First, the gestures are threshold-aware and only activate after the user has moved a certain amount of pixels — the code in the Gesture_Recognizers subdirectory is highly reusable and makes a nice addition to your catalog.
Dragging
Even more interesting is the challenge of dragging the bounding box along a real-world plane. Such as the surface on which the scanned object sits. In order to constrain the drag to a specific axis (say the X-axis), the easiest way is to construct a new plane that is:
- Aligned to the drag axis.
- Orthogonal to the vector from the camera to the object.
This situation for dragging along the X-axis is shown in the following illustration. To drag along the red X-axis, while viewing the bounding box from the vector shown by the yellow arrow, we need to construct the yellow plane:
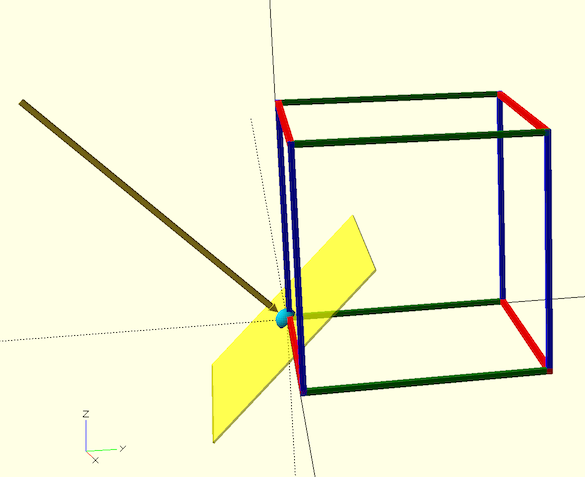
-
- The dark yellow arrow is
camRayToOrigin = Origin - cameraPos - The X-axis is
xVector = new SCNVector3(1, 0, 0) - The Z-axis for the yellow plane is
SCNVector3.Cross(xVector, camRayToOrigin) - The Y-axis for the yellow plane is
SCNVector3.Cross(xVector, zVector) - Normalize the axes.
- Construct the transform as an NMatrix4:
 This transform can be used to map the position of the user’s moving finger to slide the bounding box along the chosen drag axis (in this case, the X-axis)
Contructing the Proper Transform
The constructor for
NMatrix4isNMatrix4(Vector4 row0, Vector4 row1, Vector4 row2, Vector4 row3), which takes as its argument the values of the rows, not the columns. So the code to construct the proper transform is:var transformBasedOnColumnVectors = Utilities.NMatrix4Create(new[] { Utilities.SCNVector4Create(xVector, 0), Utilities.SCNVector4Create(yVector, 0), Utilities.SCNVector4Create(zVector, 0), Utilities.SCNVector4Create(Origin, 1) }); // But we created it with row-vectors, so we need to: transformBasedOnColumnVectors.Transpose();Another option would be to extract the 4 component values of each of the 4 vectors and use the
NMatrix4constructor that takes its arguments using theM{row}{col}notation.You can find the code above in the sample at
Ray.DragPlaneTransform(SCNVector3). The transform shown above is based on column-vectors and column-major matrices, that is:
Column- and Row-
This tends to be a common source of difficulties when dealing with Swift 3D graphics! Most of the Swift sample code uses row-major transform matrices. Both column- and row- major interpretations are valid. Column-major is more common in mathematical texts while row-major may be a better fit for optimizing performance. In vector-matrix multiplication, for instance, the nth element in the vector is multiplied by the nth row of the matrix. Having the row data adjacent in memory can be a performance boost with SIMD operations or from cache issues with large matrices. It has been said that “column-major is developer-friendly, while row-major is hardware-friendly.”
Transpose Your Matrix
In Swift example code, most transforms are based on SIMD such as
simd.float4x4. These matrices are transposed compared to those based on column-vectors. Thus, in much Swift code, you’d find the translation component in M41, M42, and M43, rather than M14, M24, and M34. And of course, the shear and rotation components would be transposed, as well. If you have a situation where your SceneKit geometry nodes jitter, fly away, or are “stuck to the origin”, you probably need toTranspose()your matrix.This sample demonstrates several other techniques helpful in more advanced Augmented Reality applications. Techniques such as various forms of hit-testing, serializing reference objects, and leveraging non-visible SceneKit objects for reference positioning. In addition, it demonstrates an interesting nested state-machine architecture that uses
NSNotificationCenterto coordinate transitions.Sources and Documentation
- The Xamarin Scanning and Detecting 3D Objects sample is a port of Apple’s Swift-based sample.
- Additional samples are available in Xamarin’s iOS Samples repository.
- The Introduction to ARKit in Xamarin.iOS article is a good starting point for developers interested in Augmented Reality.
- The Xamarin.iOS API documentation provides a reference to all available types and methods.
Discuss this post in the Xamarin forums.

Larry O'Brien Senior Content Production Manager, Xamarin Docs
- The dark yellow arrow is
 This transform can be used to map the position of the user’s moving finger to slide the bounding box along the chosen drag axis (in this case, the X-axis)
 Light
Light Dark
Dark
0 comments