
Demystifying Build Configurations
Most developers are familiar with the Debug and Release configurations in most solution templates in use. It seems obvious to use the Debug configuration when building your project for debugging and to use the Release configuration when building your project for release. What may be less clear, though, is what’s actually happening when you switch configurations, or how to add your own custom configurations. Today, we’re going to dive a little deeper into the world of build configurations to see how they can greatly improve your build times and productivity.


What Are Configurations?
Simply stated, configurations are a set of project properties. In the default Debug configuration, for instance, debugging will be enabled, while in a Release configuration it will not be. You can set what linker options to use in each configuration, what architectures (CPUs) to build for, etc. You can also further define platforms so that you can have separate project settings depending on whether you are building for a device or emulator. In other words, you can set separate project settings for each Configuration|Platform combination that you have available in your project.
How Can I Edit a Configuration?
To illustrate how to edit, and later add, a configuration we’ll start with a template Android project:
In VS for Mac create a new “Android App”: New Project > Android > App > Android App.
In VS for Windows create a “Single-View App (Android)”: Create new project… > Android > Single-View App (Android).
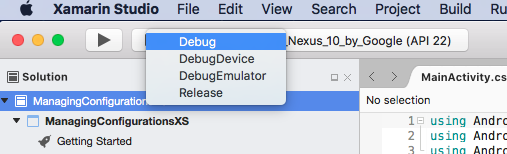
The template creates a simple Android app with a button that counts clicks. It has two configurations set up by default, Debug and Release, and one platform, AnyCPU. These are simply names that don’t have any inherent meaning, except being reflective of when the configuration should be used. We’re going to add two new configurations named DebugDevice and DebugEmulator later on. These will allow us to quickly set the desired project options/properties when debugging to a device (ARM) or an emulator (x86). Each will only build for the architectures needed for a device or an emulator, reducing build time during development.
First, let’s see what’s different between the two default Debug and Release configurations. To do so, open the project properties by right-clicking on the project in the solution explorer and selecting “Options” (VS for Mac) or “Properties” (VS for Windows). Once the project options/properties are open, you’ll see configuration and platform fields towards the top with drop-down lists to select which configuration and platform you want to see the property settings for.
The drop-down may not be there (VS for Mac) or disabled (VS for Windows), which means that the settings on the settings page you have selected are global, i.e. they will apply to all configurations and platforms. You can see this for the Build > General settings page in VS for Mac and in the Application settings page in VS for Windows.
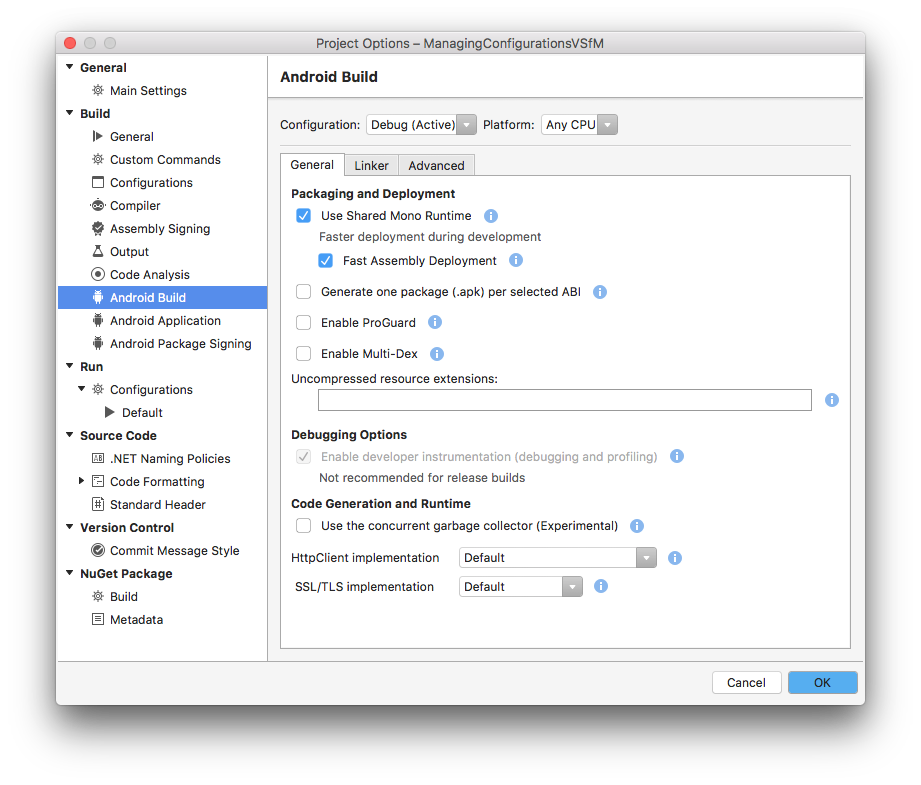
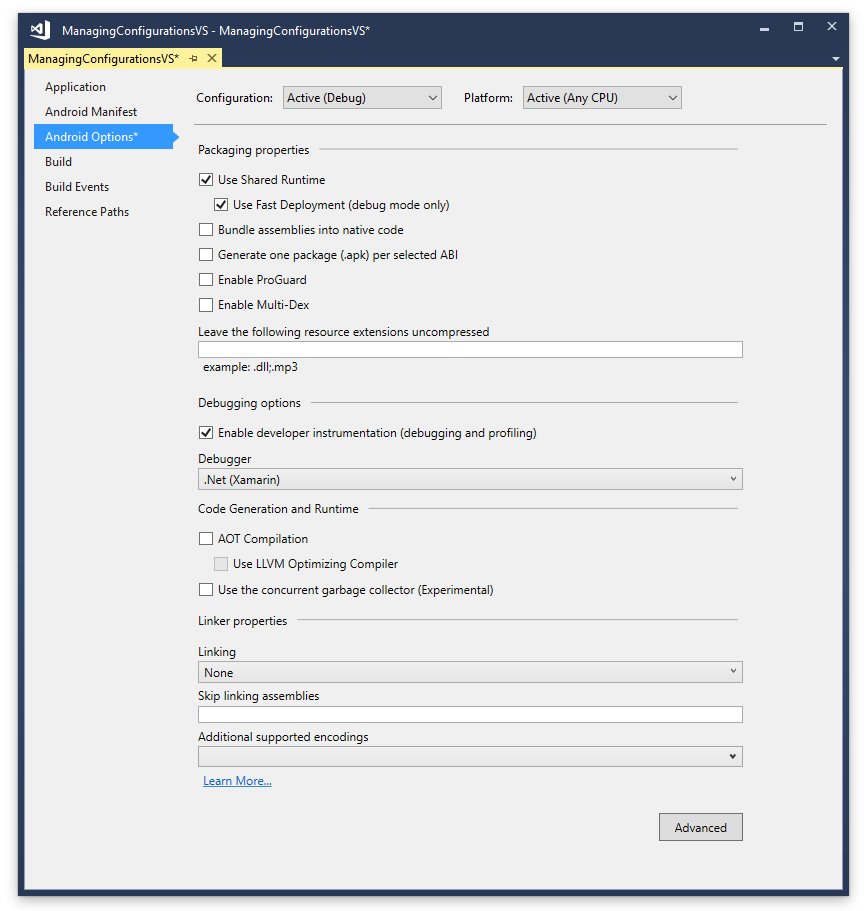
Most of the differences in the project settings for the default Debug and Release configurations are in the Android Build / Android Options settings page shown above. Open the project options/properties and select the Android Build (VS for Mac) / Android Options (VS for Windows) on the left. Make sure Debug is selected at the top in the configuration drop down. Note that the “Use Shared Mono Runtime” on VS for Mac or “Use Shared Runtime” in VS for Windows is selected, as well as the “Fast Assembly Deployment” (VS for Mac) / “Use Fast Deployment” (VS for Windows) option.
These are great options when you are debugging as they will decrease build and deploy times when developing an app, but they are not at all good for building a release version as it is unlikely that an end user will have a shared mono runtime installed on their Android devices so the app would fail to run at all since there would be no runtime. For Release builds you would want to disable that option. If you now select Release in the configuration drop-down at the top, you will see that the default Release configuration has those options disabled.
You can check the Linker behaviour of the respective configurations:
In VS for Mac: In the Android Build page select the “Linker” tab. You will see the “Linking Behaviour” is set to “Don’t Link” for Debug configuration and “Link SDK assemblies only” for Release configuration.
In VS for Windows: In the Android Options page scroll to the “Linker Properties” section. You will see the “Linking” option is set to “None” for Debug configuration and “SDK assemblies only” for Release configuration.
These default options allow for faster build during debugging and a smaller app bundle for your release build.
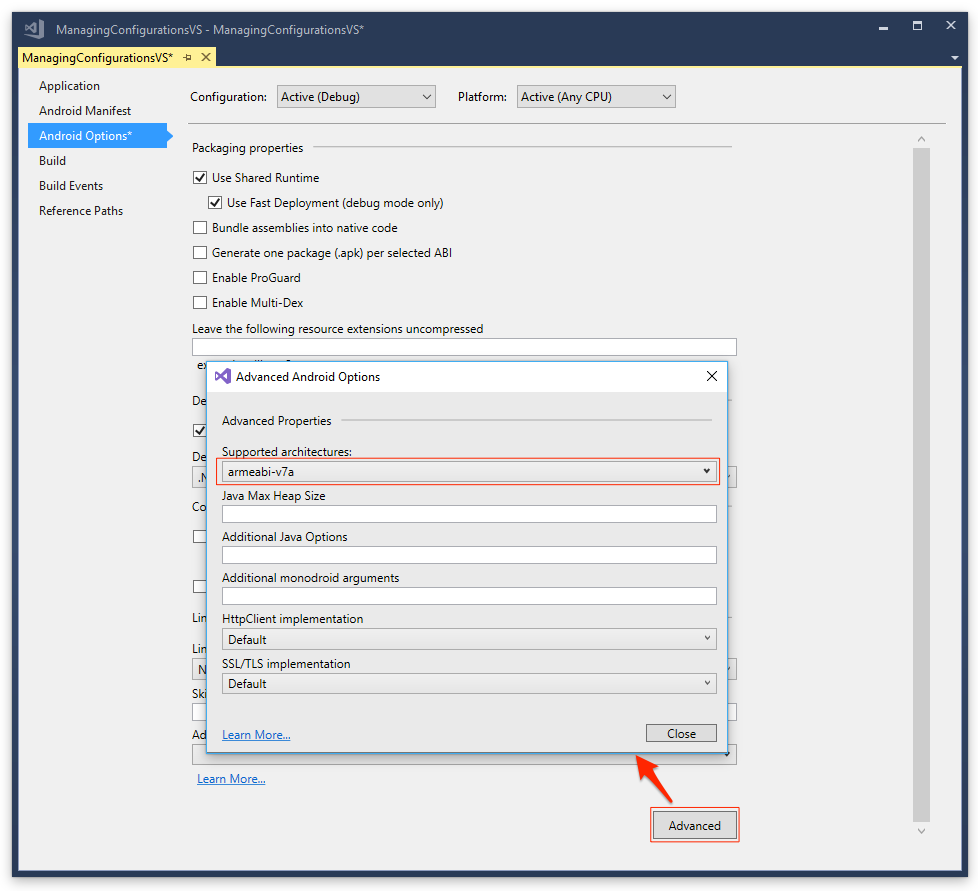
The “Advanced” tab (Mac)/button (Windows) allows you to set which CPUs (ABIs) to build for when building for Debug or Release. You will note that by default the Debug configuration builds for all possible CPUs. Every CPU you build for will take time so it might be nice to streamline this so we are only building for the CPU we will be running the app on. If we are only testing on an x86 emulator, then we can only build for x86 and deselect the other ABIs that are not needed. Go ahead and deselect all but x86 using the Advanced tab/button.
Congratulations, you have now just edited a configuration. Editing a configuration is as simple as opening the Project Options/Properties, selecting the configuration you want to change settings for, and changing those settings.
How Can I Add a Configuration?
Wouldn’t it be nice if you could easily choose which architectures to build for during debugging simply by selecting a configuration? If debugging to a device I choose one configuration, DebugDevice, and for building to an emulator I choose DebugEmulator. Let’s get that set up.
Visual Studio for Mac:
To add a configuration in Visual Studio for Mac:
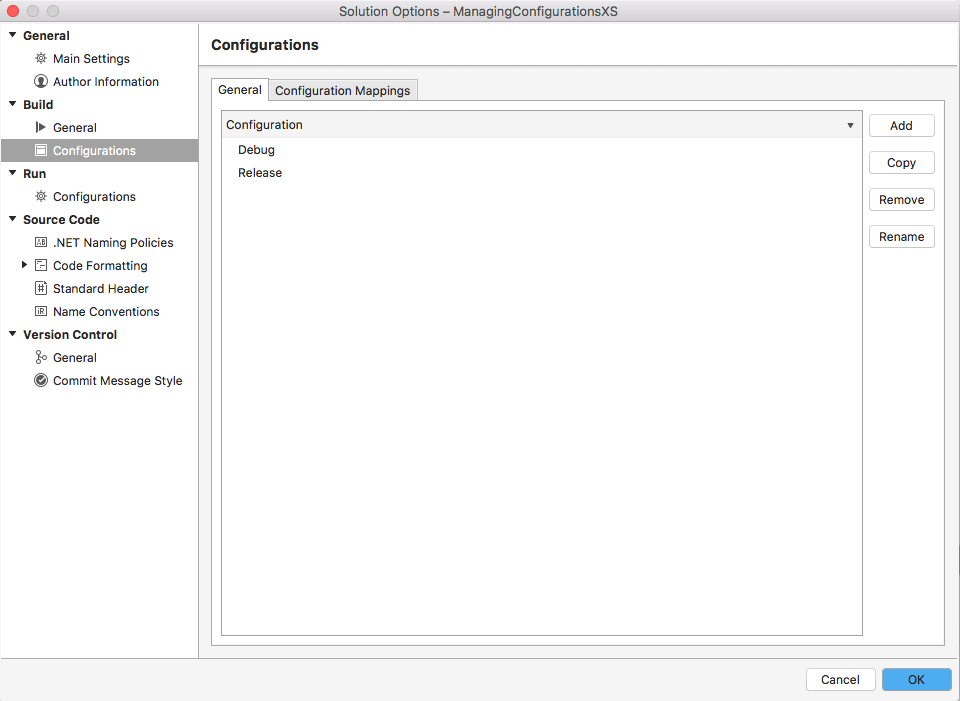
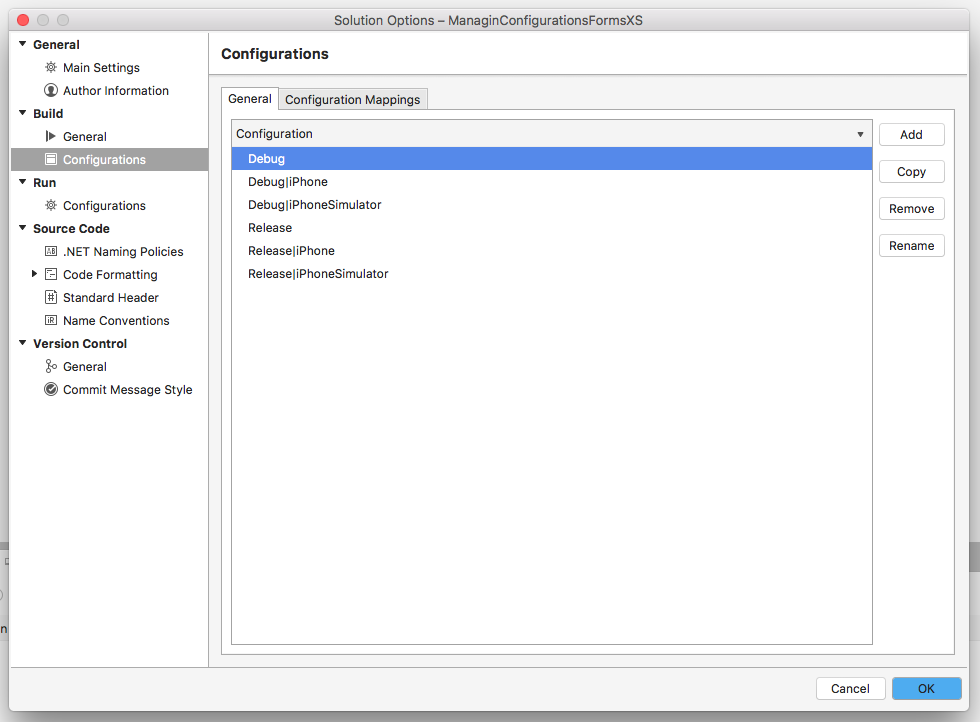
- Open the Solution Options by double clicking on the solution in the solution explorer.
- Select Build > Configurations on the left (not Run > Configurations).

- Since we want a variant of the
Debugconfiguration, in the configuration list selectDebugand click “Copy”. This will copy the currentDebugsettings to your new configuration. - Enter the name for this configuration, i.e.
DebugDevice. - Keep the default Any CPU for the Platform.
- Click “OK”.
- Repeat steps 4-8 for the
DebugEmulatorconfiguration.
Visual Studio (Windows):
To add a configuration in Visual Studio (Windows):
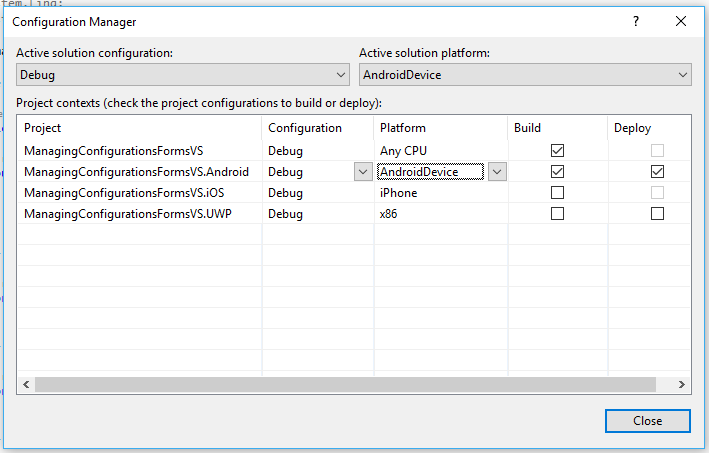
- Open the Configuration Manager with the Build > Configuration Manager menu.
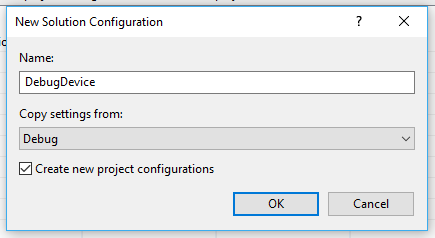
- Click on the Active Solution Configuration drop down and select “New”.
<img src="https://devblogs.microsoft.com/wp-content/uploads/sites/44/2019/03/NewConfigurationVS.png" alt="" class="alignnone size-full wp-image-31444" / - Enter
DebugDevicefor the Name field. - Select
Debugin the “Copy settings from” drop down list. - Make sure the “Create new project configurations” option is checked.

- Click OK.
- Repeat steps 2 – 6 using
DebugEmulatorfor the Name field.
Now you will see four configurations in the list, Debug, DebugDevice, DebugEmulator, and Release.

Now you just have to open the Android project options and make the desired changes to these two new configurations:
- Open the Android project options.
- Select the Android Build (Mac) / Android Options (Windows) > Advanced tab.
- Select
DebugDevicefrom the Configuration drop down. - Uncheck all of the Supported ABIs except armeabi-v7a.
- Select
DebugEmulatorfrom the Configuration drop down. - Uncheck all of the Supported ABIs except x86.
You can now select DebugDevice whenever you want to debug using an actual Android device, and you can select DebugEmulator whenever you want to debug to an x86 emulator. Your debug builds will be faster since you are only building for the one needed architecture.
Congratulations, you have now added two configurations and set them up for specific debugging scenarios.
How Can I Add a Platform?
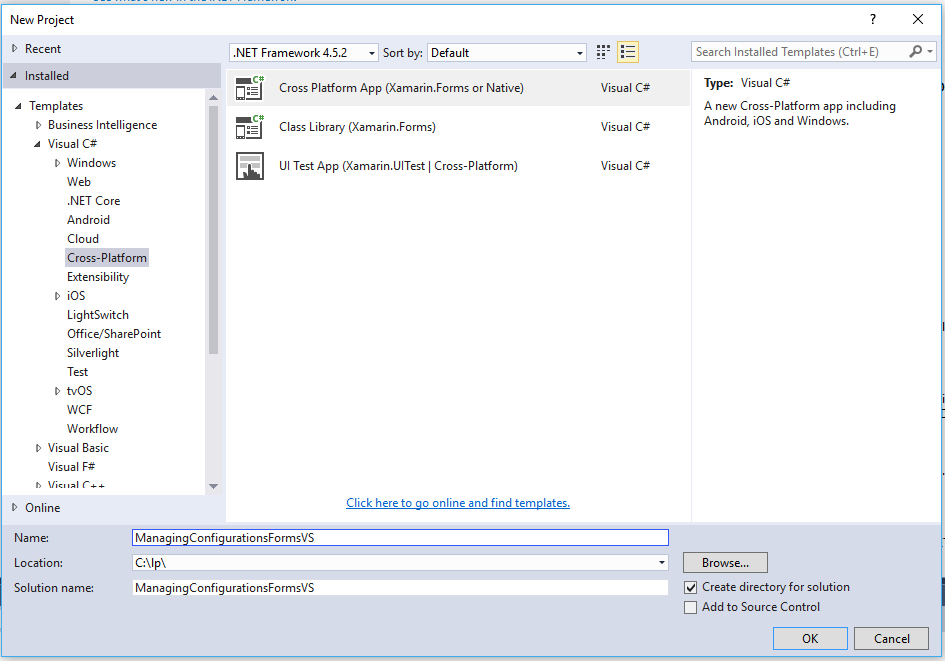
What we did above works, but it may be better to define platforms instead of configurations to switch between building for device or emulator. You will notice this is done by default for iOS projects. There are two platforms defined for iOS projects, iPhone and iPhoneSimulator. We could do the same for Android if we like. For this exercise, start with a new Xamarin Forms project, PCL or Shared type does not matter for this exercise.
Visual Studio for Mac:
To add a platform in Xamarin/Visual Studio for Mac:
- Open the Solution Options by double clicking on the solution in the solution explorer.
- Select Build > Configurations on the left (not Run > Configurations).
- Select the General tab.
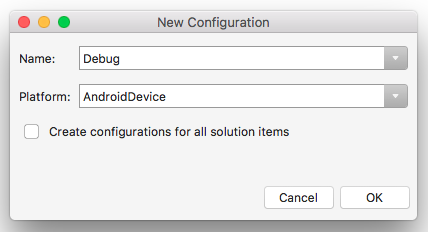
- Since we want variants of the
Debugconfiguration, in the configuration list selectDebugand click “Copy”. This will copy the currentDebugsettings to your new configuration.
- Enter the name for this configuration, in this case keep it the same,
Debug, since we only want to add a platform not a configuration. - Enter
AndroidDevicefor the Platform field. - Make sure the “Create Configurations for all solution items” option is not checked. We only want this platform for the Android project. If this option were selected, we would be adding this platform to the iOS project as well.

- Click “OK”.
- Repeat steps 4-8 using
AndroidEmulatorfor the Platform field. - Since we did not add this new platform to the projects (step 7), we will need to repeat steps 4-8 in the Android Project Options > Build > Configurations. Do this for both the
AndroidDeviceandAndroidEmulatorplatforms.

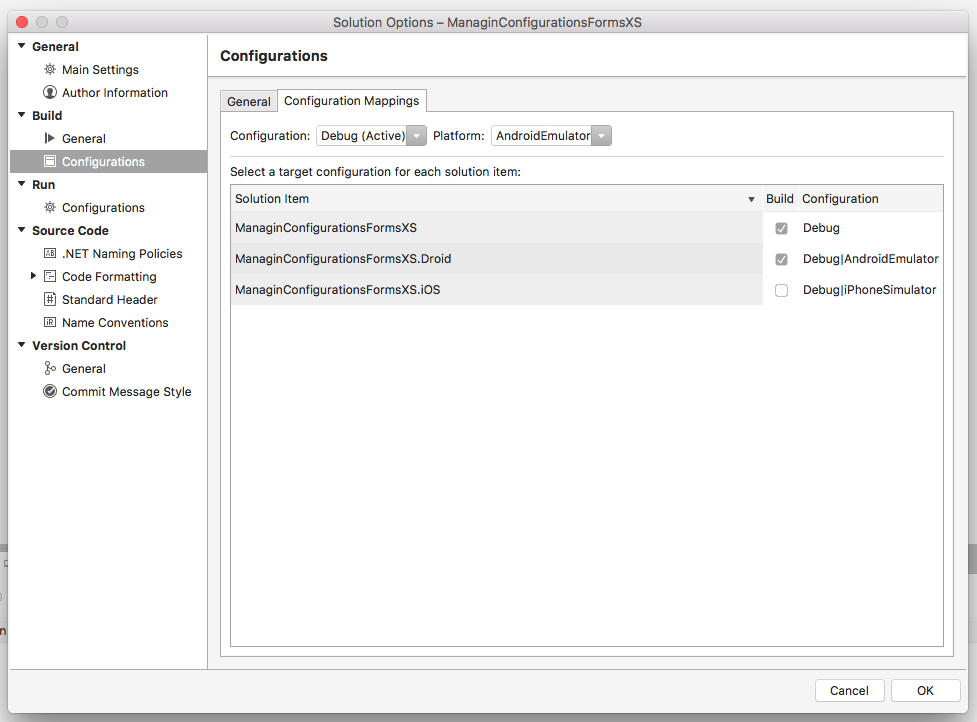
You will then have to map the solution custom platform to the project custom platform:
- Open the Solution Options > Build > Configurations > Configuration Mappings tab.
- Select the
AndroidDeviceplatform for the Platform field at the top. - In Configuration column for the Android app project, select
Debug|AndroidDevice.
- Select the
AndroidEmulatorplatform for the Platform field at the top. - In Configuration column for the Android app project, select
Debug|AndroidEmulator.
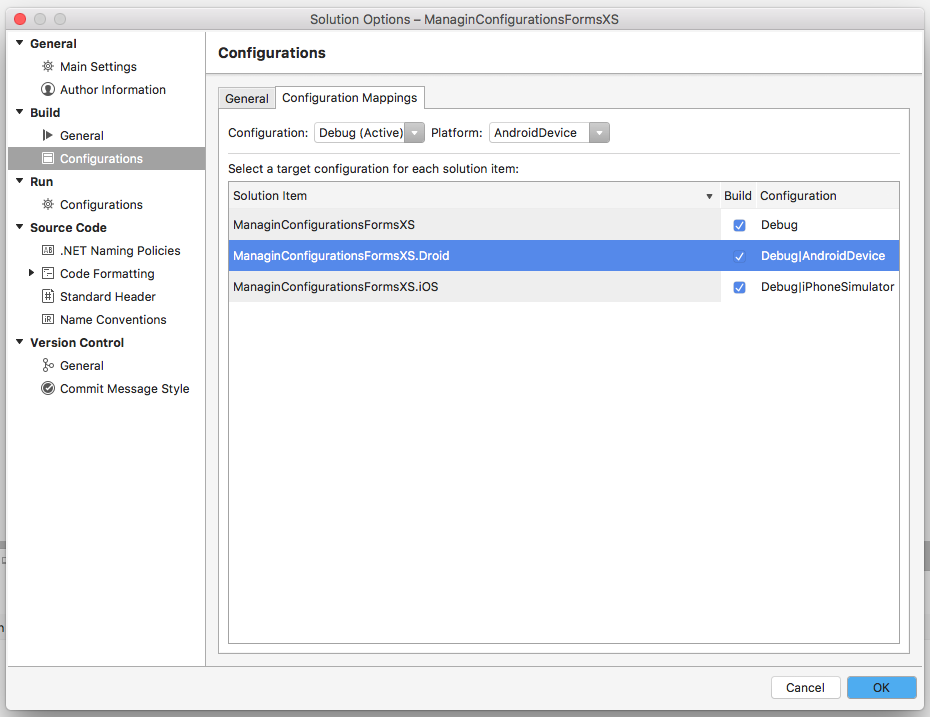
Now in the main configuration drop down list you will see Debug|AndroidDevice and Debug|AndroidEmulator.
You can edit the settings for each platform just as you did for the configurations we set up earlier, just select the correct platform that you want to edit the build settings for in the Platform drop down in the Project Options > Android Build (Mac) settings page.
Visual Studio (Windows):
Adding custom platforms is not as straightforward in Visual Studio as it is in Xamarin Studio. You can easily add the custom platform name at the solution level, but adding it at the project level requires some editing of the .csproj file. Here’s how to do all this in Visual Studio:
Add a solution level platform:
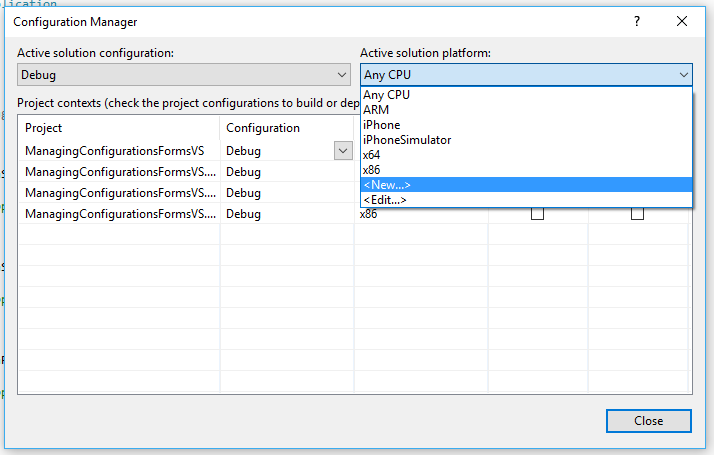
- Open the Configuration Manager with the Build > Configuration Manager menu.
- Click on the Active Solution Platform drop down and select “New”.

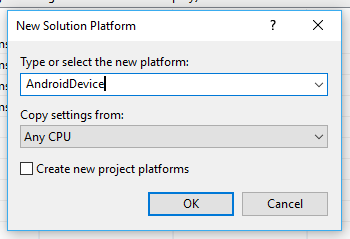
- Enter
AndroidDevicefor the Name field. - Select
AnyCPUin the “Copy settings from” drop down list. - Make sure the “Create new project configurations” option is not checked. You will get an error if this is checked since the Android app project does not have an
AndroidDeviceplatform yet.
- Click OK.
- Repeat steps 2 – 6 using
Androidmulatorfor the Name field.
Now for the hard part, adding the new platforms to the Android app project.
- Unload the Android app project (right click on the project and select Unload).
- Edit the
AppName.csprojfile (right click on the project and select “Edit .csproj”. - Paste the following XML right below the opening Project tag:
AndroidDevice AnyCPU AndroidEmulator AnyCPU - Look for the following element:
- Select all of the text for the above
PropertyGroupincluding the opening and closingPropertyGrouptag and copy it. - Paste the text twice right below the ending
PropertyGrouptag copied above. - Edit the pasted property groups, changing:
to
for the first copy and
for the second copy.
- Not required, but best to have a separate
OutputPathfor each platform, so change:bin\Debugto
bin\AndroidDevice\Debugfor the first copy and
bin\AndroidEmulator\Debugfor the second copy.
- Save and close the .csproj file.
- Reload the project.
You will then have to map the solution custom platform to the project custom platform:
- Open the Configuration Manager again.
- Select the
AndroidDeviceplatform for the Active Solution Platform. - In Platform column for the Android app project, select
AndroidDevice. - Select the
AndroidEmulatorplatform for the Active Solution Platform. - In Platform column for the Android app project, select
AndroidEmulator.
Now you will want to open the Android project properties and edit the Configuration|Platform settings to only build for the relevant architectures, i.e. armeabi-v7s for AndroidDevice and x86 for AndroidEmulator, like you did earlier for the new configurations.
Configuration Mapping
When we added the configurations above, we added them at the solution level but also added them to each project in the solution by selecting the “Create Configurations for all solution items” on Mac and “Create new project configurations” in Windows (or added them manually in the .csproj file). This way the new configurations are available at the project and the solution level. You can then map solution level configurations to project level configurations using the Configuration Manager in Windows or on Mac using the Solution Options > Build > Configurations > Configuration Mappings tab. You will see that for each project, you can select which project configuration will build when you select the active solution configuration in the Configuration drop-down list.
You can also set which projects build with each solution configuration. If you have a solution with multiple app projects, you can add a configuration to only build the project(s) needed at the time. For a Xamarin Forms app (or any solution with multiple platform projects), you may want to add a configuration that only builds the iOS project (and PCL project if used), and one to only build the Android project (and PCL project if used). This would again speed up build times, so you are only building for the platform you are currently debugging.
Configurations and MSBuild Properties in Your .csproj File
We touched briefly on the .csproj file when adding custom platforms to an app project in Visual Studio since the UI provides no way of doing that as in Xamarin Studio. Mostly you will never have to edit a .csproj file but I feel it is useful to at least touch on the items in the .csproj file that are affected when you switch the active Configuration|Platform in the IDE.
When we added the custom platform above, we copied and pasted a PropertyGroup twice to add the new platforms and set the build output path for the new platforms. The property groups that are used for each configuration is simply a set of MSBuild properties and values that will be used when the corresponding Configuration|Platform combination is selected for build. For instance, the following property group will be used when the Debug|AnyCPU Configuration|Platform is selected:
...
When the condition '$(Configuration)|$(Platform)' == 'Debug|AnyCPU' is met, then the values for the MSBuild properties in that group will be used. For instance, you will find the below in the above property group:
None
This sets the Linker options to “None” when using Debug|AnyCPU Configuration|Platform combination. Your configurations and platforms are really just a way for you to set a bunch of MSBuild properties to specific values just by choosing a Configuration|Platform for your build. If building from the command line, you can manually set any available MSBuild property using the /p:MSBuildProperty=value syntax. In other words, if you wanted to build the Debug|AnyCPU Configuration|Platform from the command line but wanted to enable the linker option “Link SDK Assemblies Only”, you would do the following (Windows):
MSBuild.exe MySolution.csproj /p:Configuration=Debug /p:Platform=AnyCPU /p:AndroidLinkMode=SdkOnly
…or on Mac:
MSBuild MySolution.csproj /p:Configuration=Debug /p:Platform=AnyCPU /p:AndroidLinkMode=SdkOnly
Any property you see defined in a PropertyGroup in the .csproj file can be set to a specific value in the command line with the /p:PropertyName=PropertyValue switch when doing a command line build. Here is the MSBuild Command Line reference for more information.
Summary
You have now learned how to create custom configurations and platforms and how to edit them so that the build options you want for a particular scenario can all be set just by selecting the appropriate configuration | platform combination.
 Light
Light Dark
Dark
0 comments