
Cross-Platform Development with Xamarin.Forms and Realm
This is a special guest post from the Realm team, written by Kristian Dupont and Yavor Georgiev.
Kristian is a C# developer at Realm, working on Realm Xamarin. You can find him and links to his various profiles at kristiandupont.com.
 Yavor Georgiev is a developer at Realm, working on Realm Xamarin. Yavor herded iPhones at Telerik AppBuilder and bent JavaScript in unnatural shapes for NativeScript, but is now back to his .NET roots. He can be found on GitHub.
What is Realm?
Realm, a mobile database that runs directly inside phones, tablets, and wearables, and offers a safe and easy non-ORM replacement for SQLite, recently launched support for Xamarin.
Realm Xamarin is built specifically with Xamarin developers in mind and is designed from the ground up for reactive app development. Data binding allows you to connect your UI to your persisted data in a very smooth and seamless way. It’s not only easy to use, but also heavily optimized for performance, which allows you to make apps that are more responsive and consume less power and memory.
In this blog post we’ll demonstrate how to create a basic Xamarin.Forms app backed by Realm using Xamarin Studio on OSX. The tutorial is exactly the same if you’re using Visual Studio, except you’ll need to be connected to a Mac OSX machine use iOS as a platform target.
Setting up a Xamarin.Forms Project
Start by creating a new Xamarin.Forms project. If you want, you can download our source from GitHub, but you’ll learn more by going through the steps yourself.
Choose the Xamarin.Forms App Project type under Cross-platform/App in the New Project dialog.

Name your app, select “Use Portable Class Library” for shared code, and target both Android and iOS.
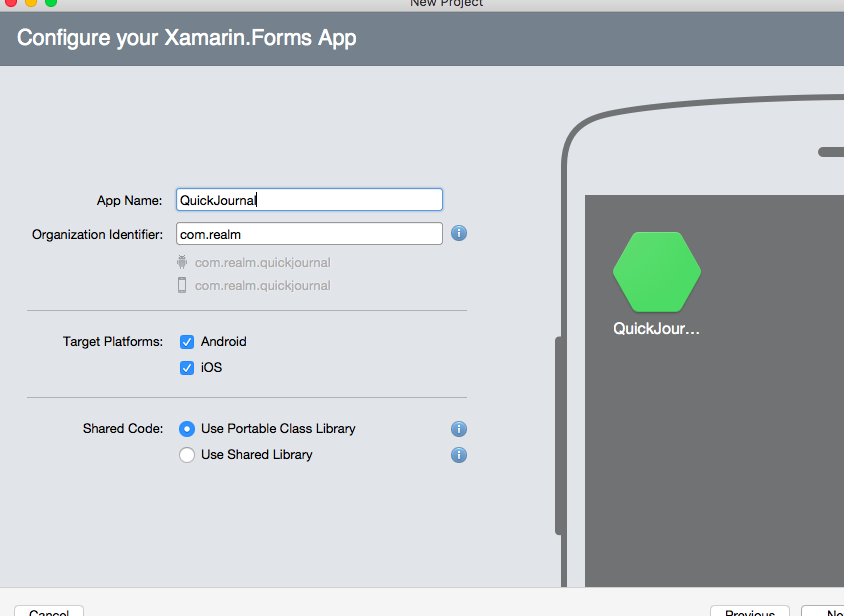
You probably want your project and solution to use the same name as your app. Put it in your preferred folder for projects and click Create.

You now have a basic Xamarin.Forms app. Click the play button to try it out.
Adding Realm
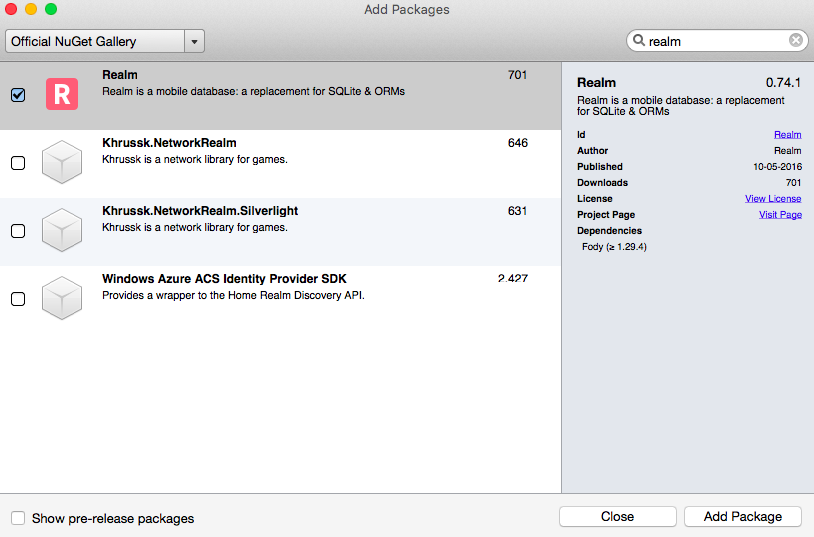
With the foundation in place, we need to add Realm to it. Our solution has three projects, the Android app, the iOS app, and the PCL library for shared code. We’ll add Realm to all three. Do this by expanding the projects in the solution view, right-clicking on the Packages node, and clicking “Add Packages…” Search for “Realm” in the search box, select it, and add it. Do this for the remaining two projects as well.
Creating Your Model
Our demo app is a minimalistic journal app. The only model is JournalEntry, which contains a timestamp and body text.
public class JournalEntry : RealmObject
{
    public DateTimeOffset Date { get; set; }
    public string BodyText { get; set; }
}
Setting up the User Interface
Now that we have our model in place, we’ll create its corresponding UI. We’ll have two pages: a list of journal entries and a details view for specific journal entries. We’ll use the Model-View-ViewModel (MVVM) pattern as much as possible, so every page will comprise of a View and an accompanying ViewModel.
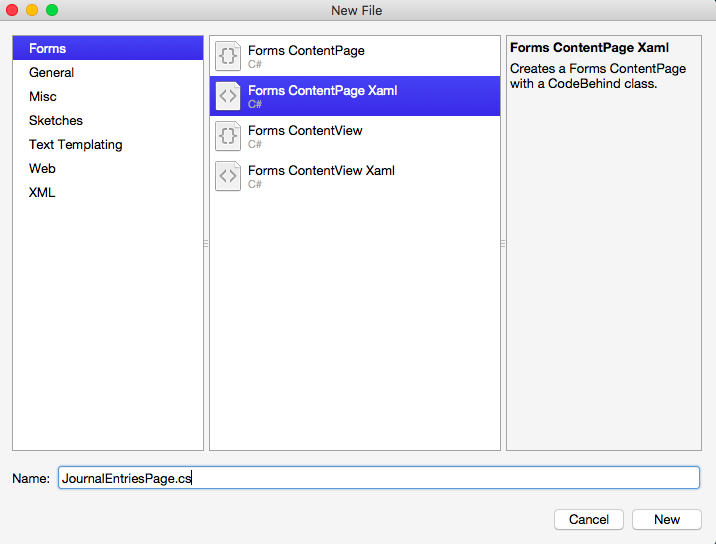
Let’s start by creating a new Page in the portable project, where all of our code will go. Make sure to select Forms > ContentPage with XAML in the New File dialog. Name it JournalEntriesPage. This will contain the ListView that displays the journal entries and will be the main screen of the app.
Тhe XAML for the page should contain a ListView:
We’ll set this as the MainPage of the App class that Xamarin.Forms generated for you in QuickJournal.cs:
MainPage = new NavigationPage(new JournalEntriesPage());
We’ll also need a ViewModel for our Page, so let’s create JournalEntriesViewModel.cs:
public class JournalEntriesViewModel
{
    public IEnumerable Entries { get; private set; }

    public INavigation Navigation { get; set; }
}
And wire it up in the page’s code-behind JournalEntriesPage.xaml.cs:
public JournalEntriesPage()
{
    InitializeComponent();
    BindingContext = new JournalEntriesViewModel { Navigation = Navigation };
}
You can now run the app, but you’ll end up with an empty list; let’s do something about that!
Binding the UI to a Realm
A Realm is an object that encapsulates a database. We’ll let our ViewModel manage the realm.
private Realm _realm;

public JournalEntriesViewModel()
{
    _realm = Realm.GetInstance();

    Entries = _realm.All();
}
Note that we are exposing the available entries by making a simple query to the Realm. Realm.All() will give us the entire set of a given type that exists in the Realm. As it’s a “live” query, we can simply bind our list view to it and it will be continuously up to date.
Now the list should still be empty, but that’s because the database is empty. Let’s create some journal entries for testing purposes in the JournalEntriesViewModel constructor:
_realm.Write(() =>
{
    for (var i = 0; i < 3; i++)
    {
        var entry = new JournalEntry { Date = DateTimeOffset.Now };
        _realm.Add(entry);
    }
});
Of course, this will add new entries every time we run the app, so we’ll need some way to delete entries as well. To do so, let’s add a Delete context action to the ListView, and later we’ll remove the for loop so we don’t create dummy entries when we run the app.
We’ll use the command pattern to wire up interactivity between our views and view models. To do so, let’s add a new property to JournalEntriesViewModel:
public ICommand DeleteEntryCommand { get; private set; }
And initialize it in the constructor:
DeleteEntryCommand = new Command(DeleteEntry);
Here, DeleteEntry is a simple method to do the actual deletion:
private void DeleteEntry(JournalEntry entry)
{
    _realm.Write(() => _realm.Remove(entry));
}
Now we have an app that displays three journal entries straight from a Realm database using concise XAML and data binding.

Adding an Edit screen with Save/Cancel
Let’s add a second page that will be used to edit the body of a journal entry: JournalEntryDetailsPage:
It needs to have a corresponding view model:
public class JournalEntryDetailsViewModel
{
    private Transaction _transaction;

    public JournalEntry Entry { get; private set; }
    internal INavigation Navigation { get; set; }
    public ICommand SaveCommand { get; private set; }

    public JournalEntryDetailsViewModel(JournalEntry entry, Transaction transaction)
    {
        Entry = entry;
        _transaction = transaction;
        SaveCommand = new Command(Save);
    }

    private void Save()
    {
        _transaction.Commit();
        Navigation.PopAsync(true);
    }

    internal void OnDisappearing()
    {
        _transaction.Dispose();
    }
}
And the two need to be wired up in the Page’s code-behind:
public partial class JournalEntryDetailsPage : ContentPage
{
    public JournalEntryDetailsPage(JournalEntryDetailsViewModel viewModel)
    {
        InitializeComponent();
        BindingContext = viewModel;
        viewModel.Navigation = Navigation;
    }

    protected override void OnDisappearing()
    {
        base.OnDisappearing();
        (BindingContext as JournalEntryDetailsViewModel)?.OnDisappearing();
    }
}
There are some familiar concepts here such as Command, but we introduce an important Realm feature with the Transaction. Because the details page will use data binding to edit the body of a JournalEntry directly in the Realm database, it will need to hold on to a Transaction—more on that in a bit.
Lastly, let’s add a new toolbar button to the `ListView` page:
and a corresponding Command in the JournalEntriesViewModel:
public ICommand AddEntryCommand { get; private set; }
Be sure to remove the for loop in JournalEntriesViewModel that adds three dummy entries each time the app is launched.
We’ll need an AddEntry method to back the AddEntryCommand in JournalEntriesViewModel. It’ll be responsible for creating an entry and navigating to the details page where it can be edited:
private void AddEntry()
{
    var transaction = _realm.BeginWrite();
    var entry = _realm.CreateObject();
    entry.Date = DateTimeOffset.Now;

    var page = new JournalEntryDetailsPage(
          new JournalEntryDetailsViewModel(entry, transaction));

    Navigation.PushAsync(page);
}
There are three things of note here:
1. We open a write transaction.
2. We create a new JournalEntry object and set its Date.
3. We create a new instance of JournayEntryDetailsPage and its view model, passing the entry and transaction we created.
That’s how you add entries. Editing existing entries is something you can work out on your own, or you can cheat and look at the complete project on GitHub.
The Realm Transaction Explained
There are three mutating actions in our app: adding, editing, and deleting a journal entry. One of the essential things to remember when working with Realm is that any time you want to mutate data, you must do so in a transaction.
Deleting is, as we saw, quite simple. Create a transaction, remove the requested JournalEntry from the Realm, and commit the transaction. We achieve this with the Realm.Write() method. This makes sure a transaction is created and subsequently committed and disposed of (unless the statement throws an exception).
To add and edit, our situation is a bit different. We want to keep a transaction alive while the user edits the body text of their journal entry so we can bind the Editor directly to our BodyText property. In other words, we practically get UI-to-disk binding with no extra plumbing. We do this by tying the transaction to the details page; when the details page is visible, a corresponding transaction will be active.
We can easily cancel the edit by not committing the transaction before disposing of it. To achieve this, we let our JournalEntryDetailsViewModel own the transaction. In the Save command, we commit the transaction so the changes are persisted and then we pop the edit page from the Xamarin.Forms navigation stack. This will trigger JournalEntryDetailsViewModel.OnDisappearing() which disposes of the transaction. If the user taps “Back” instead of “Save”, only the JournalEntryDetailsViewModel.OnDisappearing() method is called, so the transaction is disposed of without being committed first. This will cause any edits that took place inside the transaction, including creating the new entry, to be rolled back.
TL; DR
We can make an app that presents and persists data very quickly and with very little plumbing code with the power of Xamarin.Forms data binding and the Realm zero-copy architecture.
Once you’re comfortable with writing your models so they are compatible with Realm and know how to bind them to the UI, you can create end-to-end functionality as easily as you would a mockup.
We rely on a transaction that lives together with the details page. In our demo journal app, this makes an add or an edit of a journal entry atomic, so it can easily be saved or undone. We could have chosen a different design with more fine-grained transactions if, for example, we wanted to save a draft while it was being edited, but this goes beyond the scope of this post.
Although we’ve only shown you how to get the basics running, we hope this will help you get started. There’s obviously much more depth to both Xamarin.Forms and Realm and we’ll be following up with posts on more advanced topics. You can learn more about Xamarin.Forms here and about Realm Xamarin here.
 Light
Light Dark
Dark
0 comments