
Creating a Five-Star Search Experience with Azure Search
Search is a feature that can make or break a mobile app, but it can be incredibly difficult to get right. Often, the likelihood that a user continues to use your app depends on the quality of the search experience; if Yelp didn’t help me find restaurants or Amazon didn’t display the products I was looking for, I’d likely abandon that service.
There are so many options for developers looking to implement search solutions into their apps. Some of us may opt for using LINQ and the Entity Framework to query a table, or the more adventurous of us may opt to create an instance of Elastic Search, which requires a lot of work and knowledge to set up and maintain. For my app Beer Drinkin, I’m using Microsoft’s Azure Search service, since it has proved to be easy to configure and requires zero maintenance. In this blog post, you’ll learn how to implement intelligent search with Azure Search into a mobile app.
Dealing with spelling mistakes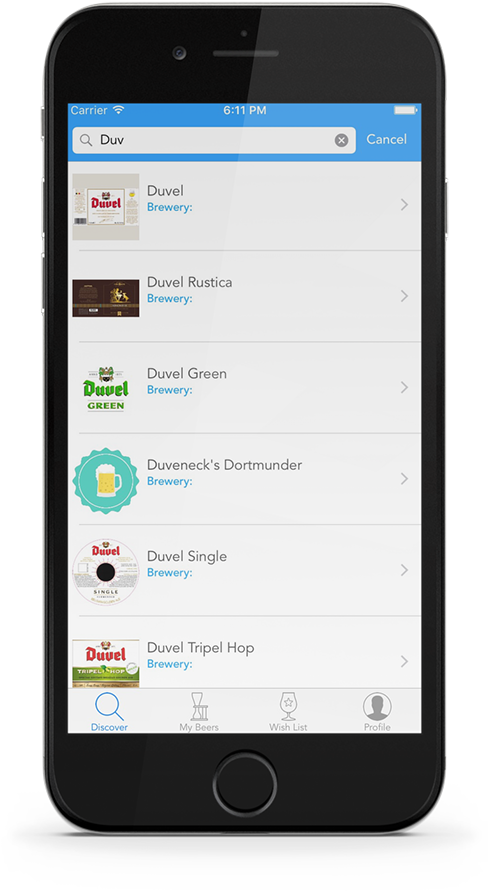
One of the main reasons that I’ve opted to use Azure Search is to resolve off-by-one-letter spelling mistakes, which yield no results. One alternative way I considered to address spelling mistakes was to utilize a spell checking service, like WebSpellChecker.net. The issue with a service such as WebSpellChecker is that it has no context in which to make corrections. It struggled with product names like Duvel, often offering to correct my spelling to Duvet, which would be incorrect and yield no result.
One popular way to minimize spelling mistakes is to provide a list of suggestions as the user types in a search query. You’re probably familiar with this in search engines like Google and Bing. This approach to searching is intuitive for users and significantly reduces the number of spelling mistakes. This is built into Azure Search with an easy to use API for consuming the predictions.
Enter Azure Search
Azure Search aims to remove the complexity of providing advanced search functionality by offering a service that does the heavy lifting for implementing a modern and feature-rich search solution. Microsoft handles all of the infrastructure required to scale as it gains more users and indexes more data. Not to mention that Azure Search supports 50 languages, which use technologies from multiple teams within Microsoft (such as Office and Bing). What this equates to is that Azure Search actually understands the intent of a search for intuitive results; it doesn’t just evaluate the result based on the characters typed.
Some of my favorite features include:
- Fuzzy Search: Find strings that match a pattern approximately.
- Proximity Search: Geospatial queries allow you to find search targets within a certain distance of a particular point.
- Term Boosting: Boosting allows you to promote results based on rules you create. One example might be to boost old stock or discounted items.
Getting Started
The first step towards adding intelligent search to your mobile apps is to provision an instance of Azure Search within the Azure Portal. Because my index already contains over 60,000 beers, I opted for the basic plan. The basic plan comes with more power through the use of dedicated resources, and I’m able to store 2GB of data and one million documents. I can also scale out to three units, which provides me with plenty of room to grow.
Creating an Index
Before I could take advantage of Azure Search, I needed to upload my data to be indexed. Fortunately, with the .NET SDK the Azure Search team provides, it’s exceptionally easy to interact with the service. Using the .NET library I wrote to interact with the BreweryDB REST API, I was able to iterate quickly through each page of beer results and upload them in blocks to the search service.

Uploading Documents
You can see how easy it is to import documents into Azure Search, as I did below with the BreweryDB.NET library.
Parallel.For(1, totalPageCount, new ParallelOptions {MaxDegreeOfParallelism = 25}, index =>
{
    var response = client.Beers.GetAll(index).Result;
    var beersToAdd = new List();
    foreach (var beer in response.Data)
    {
        var indexedBeer = new IndexedBeer
        {
            Id = beer.Id,
            Name = beer.Name,
            Description = beer.Description,
            BreweryDbId = beer.Id,
            BreweryId = beer?.Breweries?.FirstOrDefault()?.Id,
            BreweryName = beer?.Breweries?.FirstOrDefault()?.Name,
            AvailableId = beer.AvailableId.ToString(),
            GlassId = beer.GlasswareId.ToString(),
            Abv = beer.Abv
         };

         if (beer.Labels != null)
         {
            indexedBeer.Images = new[] {beer.Labels.Icon, beer.Labels.Medium, beer.Labels.Large};
         }
         beersToAdd.Add(indexedBeer);
    }
    processedPageCount++;
    indexClient.Documents.Index(IndexBatch.Create(beersToAdd.ToArray().Select(IndexAction.Create)));

    Console.Write( $"\rAdded {beersToAdd.Count} beers to Index | Page {processedPageCount} of {totalPageCount}");
});
Other Data Import Methods
Azure Search also supports the ability to index data stored in Azure SQL or DocumentDB, which enables me to point a crawler to my SQL table, removing the need to manually manage the index yourself. There are a few reasons you may not want to use a crawler. The best reason for not using a crawler is that it introduces the possibility of a delay between your database changing and your search index reflecting the changes. The crawler will only crawl on a schedule, which results in an out-of-date index.
If you opt for the self-managed approach, you can add, remove, and edit your indexed documents yourself as the changes happen in your back end. This provides you with live search results, since you know the data is always up-to-date. Using the crawler is an excellent way to get started with search and quickly get some data in place, but I wouldn’t consider it a good strategy for long-term use.
Suggestions
Before we can use suggestions, we’ll need to ensure that we’ve created a suggester within Azure.

In the current service release, there is support for limited index schema updates. Any schema updates that would require reindexing, such as changing field types, are not currently supported. Although existing fields cannot be modified or deleted, new fields can be added to an existing index at any time.
If you haven’t checked the suggester checkbox at the time of creating a field, then you’ll need to create a secondary field, because Azure Search doesn’t currently support editing the fields. The Azure Search team recommends that you create new fields if you require a change in functionality.
The simplest way to get suggestions would be to use the following API.
var response = await indexClient.Documents.SuggestAsync(searchBar.Text, "nameSuggester");
foreach(var r in response)
{
    Console.WriteLine(r.Text);
}
Having fun with the suggestion API
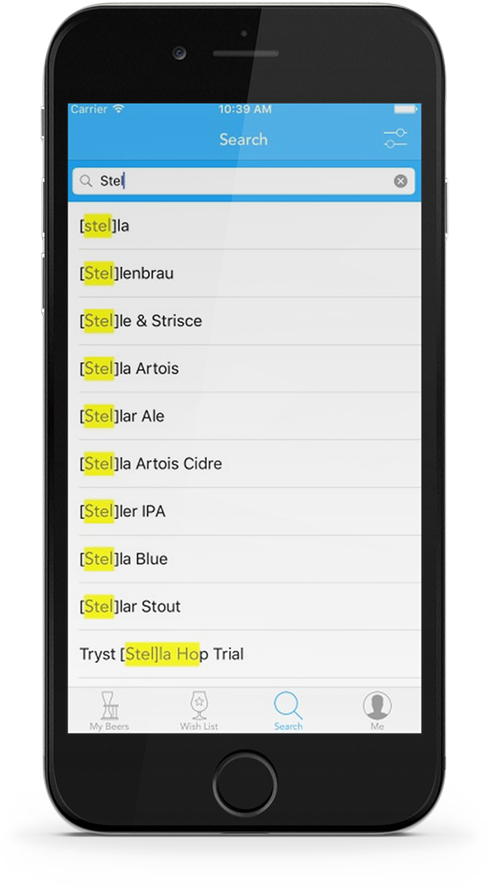
The API suggestion provides properties for enabling fuzzing matching and hit highlighting. Let’s see how we might enable that functionality within our app.
var suggestParameters = new SuggestParameters();
suggestParameters.UseFuzzyMatching = true;
suggestParameters.Top = 25;
suggestParameters.HighlightPreTag = "[";
suggestParameters.HighlightPostTag = "]";
suggestParameters.MinimumCoverage = 100;
What do the properties do?
UseFuzzyMatching: The query will find suggestions even if there’s a substituted or missing character in the search text. While this provides a better search experience, it comes at the cost of slower operations and consumes more resources.
Top: The number of suggestions to retrieve. It must be a number between 1 and 100, with its default set to 5.
HightlightPreTag: Gets or sets the tag that is prepended to hit highlights. It MUST be set with a post tag.
HightlightPostTag: Gets or sets the tag that is prepended to hit highlights. It MUST be set with a pre tag.
MinimumCoverage: Represents the percentage of the index that must be covered by a suggestion query in order for the query to be reported a success. The default is 80%.
How do the results look?
Search
The Search API itself is even easier (assuming we don’t use filtering, which is a topic for another day).
var searchParameters = new SearchParameters() { SearchMode = SearchMode.All };
indexClient.Documents.SearchAsync(searchBar.Text, searchParameters);
Getting Started
The easiest way to get started with Azure Search is to create an instance from the Azure Portal and then use my previous blog post to implement search suggestions in your own apps. You can also find plenty of videos on Youtube of the Azure Search team discussing the service and a full iOS sample on my Github.
This blog post was originally published on my personal blog and has been updated to reflect changes in Azure Search.
 Light
Light Dark
Dark
0 comments