
Code Sharing Strategies for iOS & Mac
I fell in love with the Xamarin approach to mobile development because sharing code across platforms provided me with huge productivity gains when developing apps. With Xamarin you can share an average of 75% of app code across all mobile platforms and in this blog post, I’m going to give you some strategies to help you share even more code between iOS and OS X. If you’ve recently developed an app for iPhone or iPad using the traditional approach (sans Xamarin.Forms), you might be surprised to learn how much code you can share between iOS and OS X. With the Mac platform becoming increasingly popular, there’s never been a better time to consider if your apps could benefit from targeting a new platform. Let’s learn some tips and tricks for sharing more code between the platform all in the context of C#.
General Code Sharing Strategies
It’s common knowledge that both iOS and OS X share a common architecture, which results in a great code sharing story. Many classes are compatible on both platforms without modification and with the recent release of the Unified API, we’ve made it even easier to share code between OS X and iOS.
Before we get started on linking all of our existing Xamarin.iOS code in a new Xamarin.Mac project, we need to first look at what we should share and what should remain platform dependent. The most common architectural pattern for iOS and OS X development is the Model View Controller (MVC) pattern. This increases the amount of code reuse in our app as many of the models and controllers will still be relevant regardless of the underlying platform.
Conditional Compilation (Shimming)
Sharing our view code is a little more involved, but is possible with a couple of techniques used by Apple in apps such as Keynote. Your existing iOS apps will be using the UIKit namespace, which is the framework that provides the window and view architecture needed to manage your app’s user interface. Here you will find labels, buttons, colors and other classes that you’ll build your app’s UI with. UIKit is only available for iOS, which means any code utilizing this framework will not run on the Mac without some modification. Let’s take a look at the simple sample problem of sharing colors between platforms.
iOS
var xamarinBlue = UIColor.FromRGB(0.26f, 0.83f, 0.31f);
Mac
var xamarinBlue = NSColor.FromCalibratedRgba(0.26f, 0.83f, 0.31f, 1f);
The above example is fairly consistent with what I find when looking at customers’ projects. With a little bit of trickery, we can share colors between platforms. Apple calls this “shimming” but you might know it as “conditional compilation”.
public class Color
{
 #if __MAC__

 public static NSColor FromRGB(nfloat r, nfloat g, nfloat b)
 {
 return NSColor.FromCalibratedRgba(r, g, b, 1f);
 }

 #endif

 #if __IOS__

 public static UIColor FromRGB(nfloat r, nfloat g, nfloat b)
 {
 return UIColor.FromRGB(r,g,b);
 }
 #endif
}
Now in both our iOS and OS X app, we can use the following to create our blue color.
var xamarinBlue = Color.FromRGB(0.26f, 0.83f, 0.31f);
If this is running on iOS, it will return a UIColor and on OS X we will get an NSColor. This is an approach I apply in many areas of UIKit and AppKit. You could for example extend this to UIImage and NSImage.
public static CGImage ToCGImage(string imageName)
{
 #if __MAC__
 return NSImage.ImageNamed(imageName).CGImage;
 #endif
 #if __IOS__
 return UIImage.FromFile(imageName).CGImage;
 #endif
}
Sharing Your UI with CALayers
If you want to maximize your code sharing, then you might want to investigate using CALayers. UIViews are built on CALayers, which can be accessed by using the Layer property of the UIView. The benefit of using CALayers over UIView is that CALayers can very easily be ported to OS X and there is no performance loss over using UIViews or NSViews. Apple’s Keynote canvas uses CALayers which allows them to share over 1m LOC between OS X and iOS.
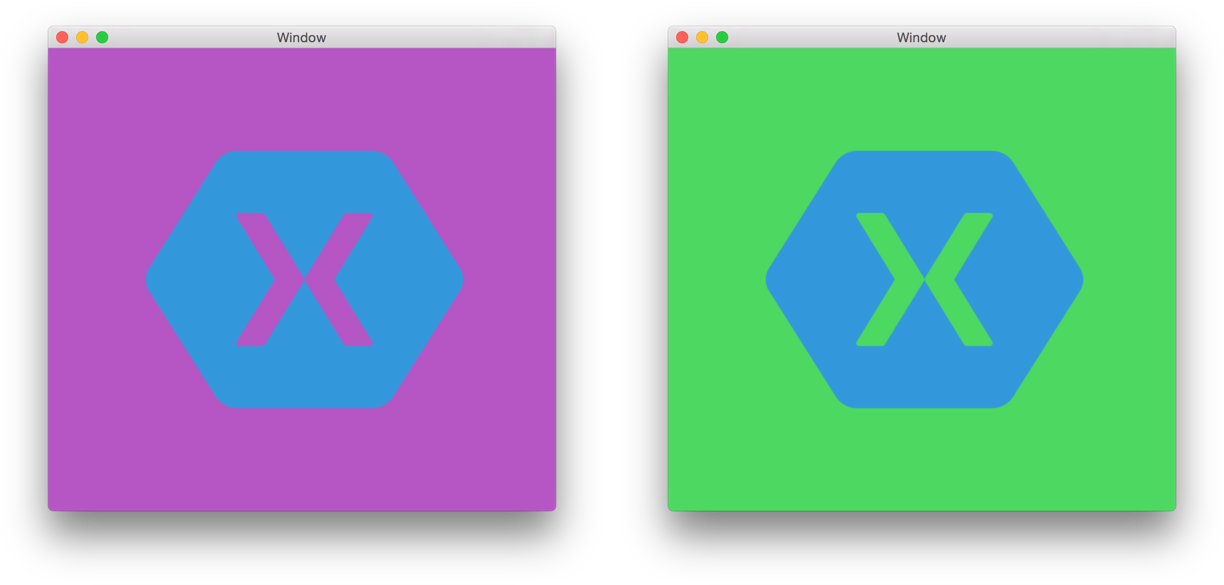
In the example below, I’ve inherited from a CALayer and overridden the DrawInContext method to get the view setup. I set the background color, using my shimming method, to be purple. I then override the HitTest, which allows me to respond to touch or click events. In this sample, I want to change the background color of the layer every time the user interacts with it. Despite being a basic example, this code works on both iOS and OS X without any modification.
public class ColorChanger : CALayer
{
 public override void DrawInContext(CGContext ctx)
 {
   base.DrawInContext(ctx);
   BackgroundColor = Color.FromRGB(0.65f, 0.22f, 0.72f).CGColor;
   count = 0;

   this.Contents = Image.ToCGImage("xamagon.png");
 }

 public override CALayer HitTest(CGPoint p)
 {
   switch (count)
   {
     case 0:
       BackgroundColor = BackgroundColor = Color.FromRGB(0.2f, 0.52f, 0.89f).CGColor;
       count++;
       break;
     case 1:
       BackgroundColor = BackgroundColor = Color.FromRGB(0.26f, 0.83f, 0.31f).CGColor;
       count++;
       break;
     case 2:
       BackgroundColor = BackgroundColor = Color.FromRGB(0.65f, 0.22f, 0.72f).CGColor;
       count = 0;
       break;
  }
  return base.HitTest(p);
 }

 int count = 0;
}
Conclusion
With Xamarin, you’ve always been able to share approximately 75% of your code between the different platforms, and now with the above tips you can share even more. If you’re looking for basic drawing between platforms, you may find Frank Krueger’s CrossGraphics library useful, as it allows for drawing graphics on Android, iOS, Mac, Windows, and ASP.Net using .Net.
 Light
Light Dark
Dark
0 comments