Add Depth in iOS 7 with Motion Effects
Depth is a distinctive theme in iOS 7 that is conveyed throughout the platform. From the home screen to your favorite apps, you are sure to have already noticed this. Take Safari for example, where tilting the device invokes a subtle parallax effect:

Apple has made it very easy for developers to include similar effects in their applications using the Motion Effects API. Motion effects allow properties to vary in response to device motion. To include a motion effect simply create an instance of the UIMotionEffect subclass to specify the property that should change with device motion, and then add it to the view for which it should be applied.
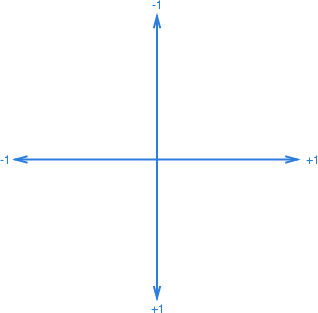
iOS includes a UIMotionEffect subclass called UIInterpolatingMotionEffect that allows you to specify the min and max values, relative to the current value, for the property being changed. As the name suggests, UIInterpolatingMotionEffect will interpolate the values as the device rotates. You can specify the UIInterpolatingMotionEffect for tilt either along the horizontal axis or the vertical axis. To include multiple motion effects, you can group them into a UIMotionEffectGroup. The max relative value corresponds to +1 and the min relative value corresponds to -1, where +/- 1 for tilt along the x and y axis are defined as below:

Motion effects operate on the property specified in a property path. For instance, say you wanted to implement a motion effect similar to the parallax effect seen on the home screen and Safari. You would simply create motion effects for the center.x and center.y properties respectively:
var xCenterEffect = new UIInterpolatingMotionEffect ("center.x", UIInterpolatingMotionEffectType.TiltAlongHorizontalAxis) {
  MinimumRelativeValue = new NSNumber (25),
  MaximumRelativeValue = new NSNumber (-25)
};

var yCenterEffect = new UIInterpolatingMotionEffect ("center.y", UIInterpolatingMotionEffectType.TiltAlongVerticalAxis) {
  MinimumRelativeValue = new NSNumber (75),
  MaximumRelativeValue = new NSNumber (-75)
};

var effectGroup = new UIMotionEffectGroup {
  MotionEffects = new []{ xCenterEffect, yCenterEffect }
};

monkeyView.AddMotionEffect (effectGroup);
This causes the view to move with device motion similar to the Safari application. However, you aren’t limited to just positional properties as any property that can be animated with Core Animation can be used with motion effects. For example, you can apply a perspective transformation that changes as you rotate the device to further convey depth by modifying the layer.transform property:
var skewEffect = new UIInterpolatingMotionEffect ("layer.transform", UIInterpolatingMotionEffectType.TiltAlongVerticalAxis) {
  MinimumRelativeValue = NSObject.FromObject (Skew (-1.0f)),
  MaximumRelativeValue = NSObject.FromObject (Skew (1.0f)),
};

var effectGroup = new UIMotionEffectGroup {
  MotionEffects = new []{ xCenterEffect, yCenterEffect, skewEffect }
};

...

CATransform3D Skew (float x)
{
  var transform = CATransform3D.Identity;
  transform.m34 = 1.0f / 1000;
  return transform.Rotate (60.0f * (float)Math.PI / 180.0f, x, 0, 0);
}
This produces a nice dynamic skewing effect as illustrated in the screenshots below:

Using the Motion Effect API in your Xamarin.iOS applications is easy and can help to create a great user experience. You can download the code from my GitHub repo and play around some more with motion effects to see what interesting effects you can create.

 Light
Light Dark
Dark