
Configuration and Settings
Welcome back. This is part 2 of an initial 4-part series discussing everything search indexer related on Windows. In this article we’re going to take a high-level look at the configuration and settings for the indexing service, and what some of these options really mean.
List of posts in the series
- The Evolution of Windows Search
- Configuration and Settings 👈You Are here
- What’s in My Index?
- How to Make the Most of Search on Windows
Let’s first take a look at the default configuration. There are many ways applications can directly change Search Indexer settings, and of course users themselves can also modify the index. When I say default configuration, I’m simply referring to how the Search Indexer operates by default on a fresh copy of Windows 10.
The Good Old Control Panel Applet
Around since Windows Vista, the desktop control panel applet for many releases was the typical go-to location for looking at and updating Search Indexer settings.
Note: You must be logged in as an administrator account to take full advantage of the settings for the Search Indexer.
When you open the control panel the default view uses ‘categories’ to display the control panel options. You will need to change this to “small icons” in order to see everything there is, including the indexing options.
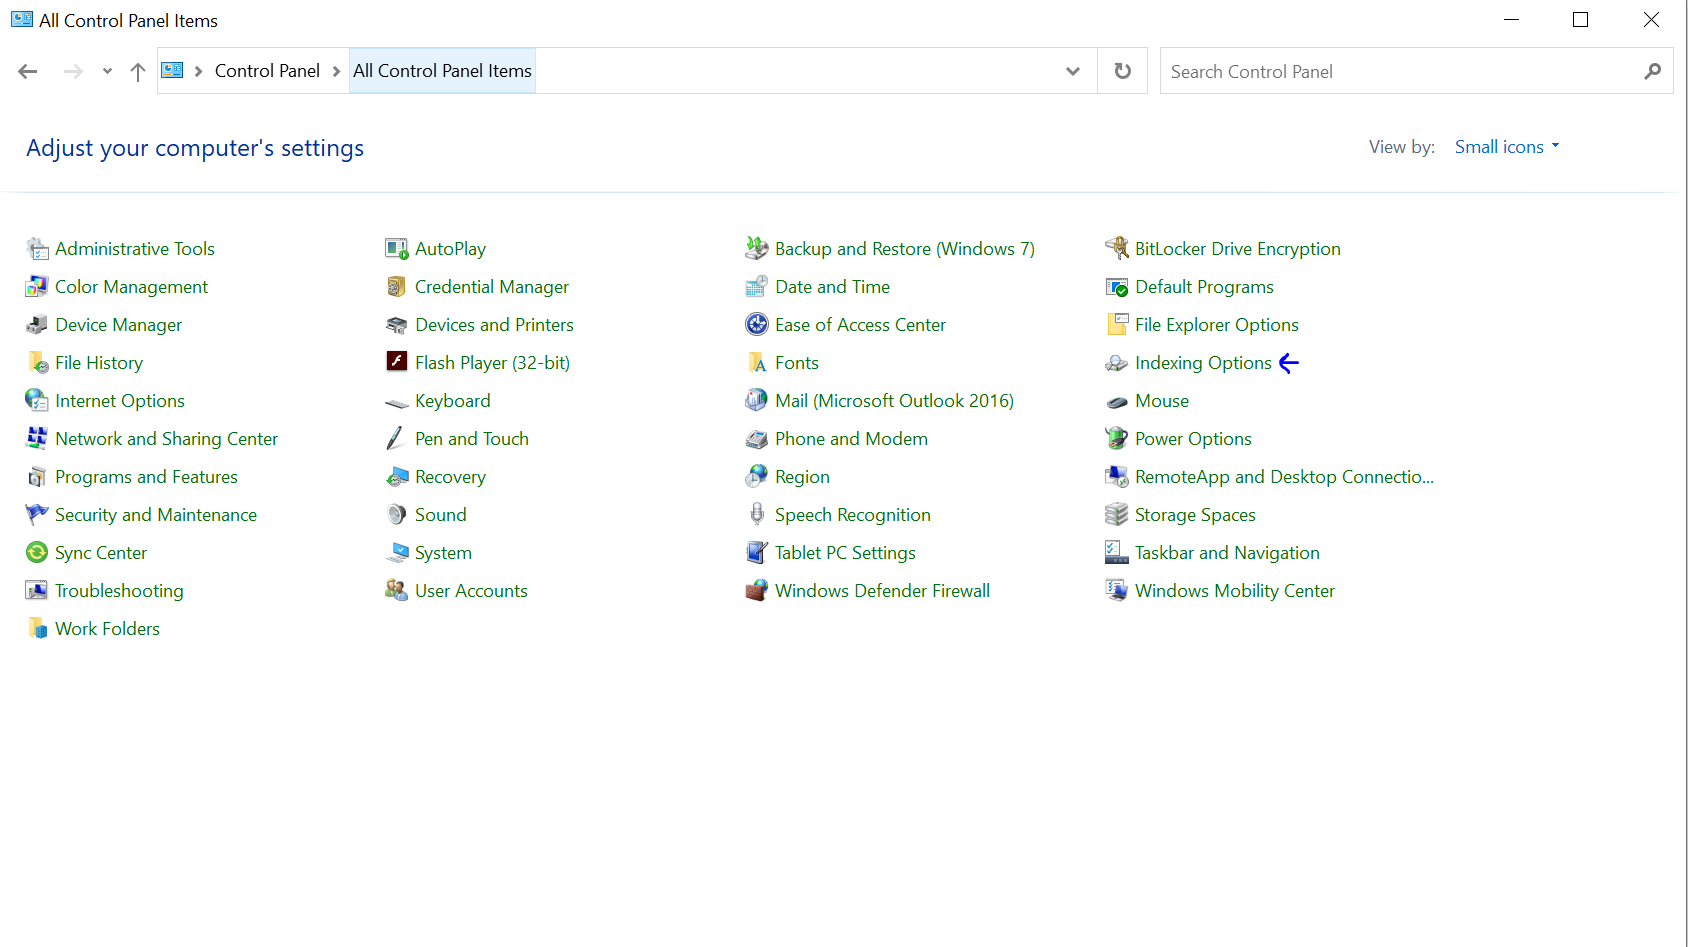
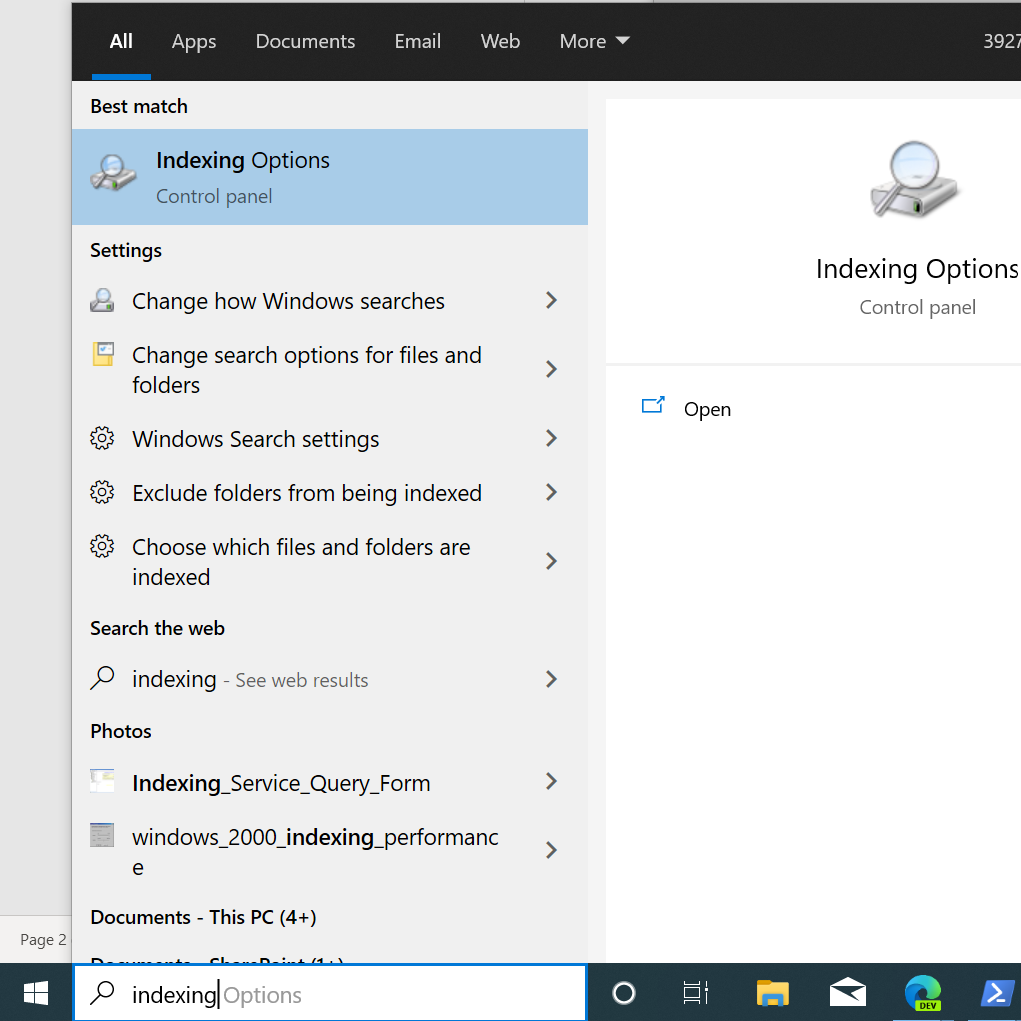
You can also directly get to the indexing options by searching directly in the windows search box.
Inside the indexing options dialog you’ll find an array of settings and options that you’re able to configure.
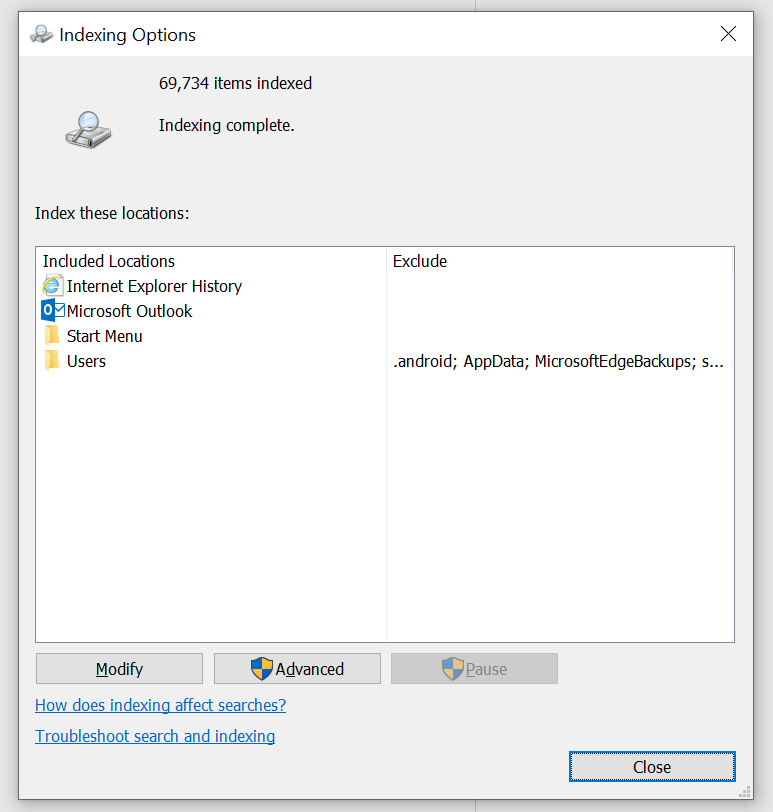
Indexed Data Types
In case you were ever curious on how the service decides what to put in the index this dialog shows you the list it uses to determine what data gets indexed. What you see right away is a list of “Included Locations” and “Excluded Locations”, and these behave exactly as they read. The indexing service contains a master list of what we call “scopes” that identify the file system paths the service will crawl, which paths we will ignore, and other data types that applications have registered on the machine for indexing.
On my machine I’ve got Internet Explorer History, Outlook, and various folder locations included. I haven’t manually messed with any of these settings, so this is typical on a Windows 10 machine out of the box with Office installed and a POP3/IMAP or Exchange Server account setup in Outlook.
In the last article we talked about how applications could write their own protocols, meaning the data inside the index didn’t stop with basic folders and files. Outlook and Internet Explorer use custom protocol handlers that allows the indexing service to understand the data coming in since they aren’t files or folders.
Outlook emails, calendar appointments, and contacts although stored on disk are not traditional file types themselves (.txt, .pdf, .doc, .xls, .ppt) but rather data that only Outlook knows how to parse and represent to you on the screen. The indexing service has no clue how to open this content either, so when Outlook gets installed it also installs its protocol handler and corresponding file filters that allow the indexing service to extract the relevant data from it.
The same goes for Internet Explorer history and other applications such as SharePoint, OneNote, just to name a few. For those interested on the tech and details behind protocols don’t worry, we’ll cover everything about them including how to create one in a future article.
Indexing Scopes
It’s not enough for the indexing service to just understand data types in order to index and provide value, it also needs to understand which locations users’ data is so it can index the right content. Like I stated previously, in the Vista timeframe your user profile directory (C:\users\<your username>) was an indexed scope by default. This means the indexing service would make sure it crawled your profile directory (including sub-folders) for all files and folders and put that content in the index.
If you click on the ‘Modify’ button in the Indexing Options Control Panel you are taken to a more descriptive screen of the scopes.
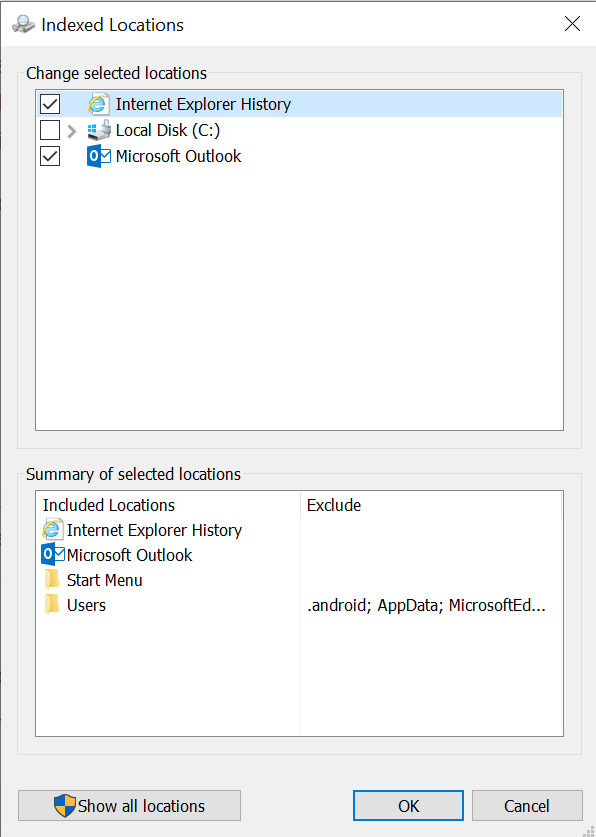
NOTE: Show all locations will expand to show you more locations that are not common.
If you expand the tree of folders into C:\users\<your username> you can easily see which folders the service is looking at for changes in order to keep the index up to date.

Notice how the AppData folder, MicrosoftEdgeBackups, and other hidden folders are not indexed by default. This is done because there isn’t a ton of data in these folders that typically provide value to the user. The AppData folder contains application settings when applications are installed on a per-user basis so most of this content is specific to the application and not data that one would typically search. You can of course check the AppData box and the indexing service will start crawling the AppData folder and all its’ subdirectories and stick those files/folders and content in the index for searching.
Advanced Options
The advanced button from the main page in the indexing options dialog takes you to another page with even more advanced settings on top of scope control.
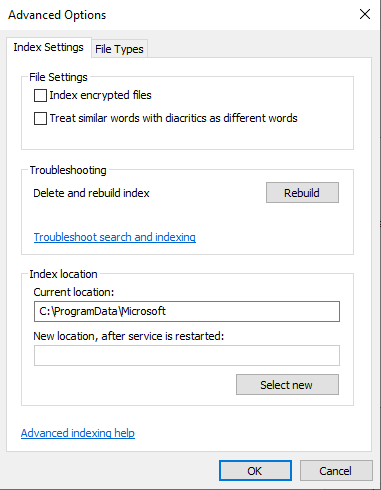
Starting from the top, let’s walk through the options an discuss in detail of what they actually mean.
Encrypted Files
By default, the indexing service does not index encrypted files. There are different types of encryption that administrators at enterprises can use to encrypt data as well as group policies that can be pushed down to company owned machines to allow the indexing of this content. The main reason behind this is the indexing service doesn’t know how to decrypt files in most cases, as well as the file that is encrypted should not be opened without the proper authority to do so or the right decryption handling present on the local machine. The “Index encrypted files” option enables/disables this behavior of encrypted files.
Diacritics
Diacritics are marks, points, signs, or accents to basic characters. In some languages these are used widely and there is a distinct difference in the meaning of the base character a, versus á (for explanation purposes only). For some languages where it’s very common to treat similar words with diacritics as different words this option is on by default. For my machine since the system locale is en-US this is not common, and therefore the indexing service treats characters and words with diacritics as the same characters. This means regardless if I search for a or á, they will be treated as the same word and find the same set of documents.
Indexing Rebuilds
An index rebuild is probably what you think it is. It means we blow away the underlying database and use the current scopes on the machine to re-crawl and re-index everything that was previously there. This is a very expensive process in terms of CPU and disk, so you want to make sure you know that certain experiences on the machine will be impacted until the index is rebuilt. If search experiences aren’t working properly or you notice it is not finding files that it should, a rebuild is a good resolution for this as it will get the index back into the most up to date and fresh state.
The index can also become corrupt due to hardware or other reasons where a rebuild will happen by itself without any explicit user interaction.
Note: Only files, folders, and applications you see in the included scopes list store their data in the index. Other things that are commonly searched for such as store applications or installed apps and settings are not stored in the system index.
Index Location
The default location of the index lives in C:\ProgramData\Microsoft. You can alter this location by entering a new one, and when you click ‘Select New’ the service will temporarily be restarted and if you navigate to the new path you’ve selected you will see the indexing service files there. This is useful if you have a very large index and want to move it to a separate volume to save space on the one with your Windows installation.
File Types
Now let’s move over to the File Types tab. You’ll noticed there is a very large list of extensions along with descriptions for each of them. These are the list of registered extensions in the system, which are done in the registry through the shell layer. Every extension in the system contains a property handler to programmatically read and write to. These can either be created and deployed by an installed application or they can be a system one. Extensions also may or may not have a corresponding file filter, which are the IFilters discussed in the previous article. These filters can be registered with a given file extension in order to help the indexing service extract the necessary pieces of content out from that file so you can search it.

Index Properties vs. Index Properties and File Contents
You’ll notice for every file extension there are a few options. By unchecking the box next to each extension, you are telling the indexing service to not process files containing these extensions. Doing so will not put these items in the index, and they will not be searchable. If you select an extension row you can decide if you want the properties of these file types to be indexed only, or both properties and contents.
Properties are things like the path, file name, last modified date, created date, size of the file, and attributes. The contents are what’s inside the file when you open it. These options give you quite a bit of flexibility to fine tune the service to your needs. Maybe you’re a developer and you store a lot of your code/projects in your user profile folder and you’d rather not have the indexing service open up your .js or .py files and index the content line by line. These options give you that control over how much data, and what data is put in the index to tailor your search experience.
You can also add in your own extensions in this dialog, which will in turn register it with the system and use the default “File Properties filter”.
Modern Settings Page (Windows 10)
A few releases ago we put together a new Windows Search settings page in the Settings app, trying to bring over and expose even more functionality to users. Here’s a quick look at the page today.
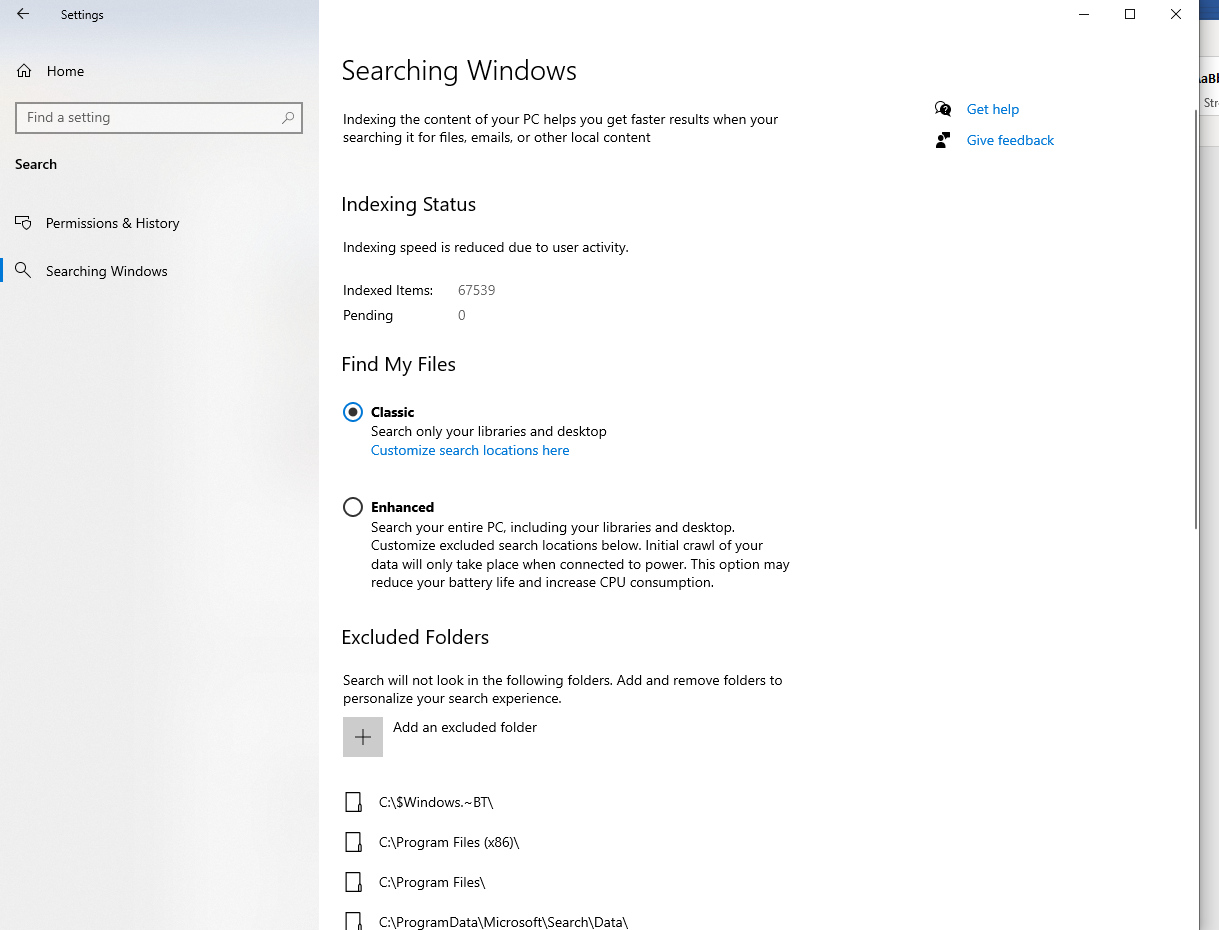
Starting from the top again this settings page contains some of the same information to start as the indexing options dialog. The only new piece of information here is that is also shows the # of items that are pending or in the queue to be indexed.
Find My Files
Find My Files was a feature introduced in build 1903 that contained a brand-new mode for search on top of the current Classic mode that everyone has been used to for many releases.
Classic Mode
Classic mode is the default out of the box where the Search Indexer would look in your user profile and start menu folders for things to index. The idea behind this is most people do not add custom configuration to their machines, and applications as well as these users tend to store things here near the user libraries/known folders.
Enhanced Mode
Enhanced mode turns on indexing for more than just your user profile, but not for content. What this means is that the indexer will start crawling and looking for items on other drives and on other folders of your system drive (excluding some windows update and windows directories) but it will only index key properties of those items so that you can still find them through all windows search experiences. You will not be able to search the contents of these files in this mode. This is intended to help users who want to be able to find items by name, as well as be able to sort by the most common properties in file explorer views.
Excluded Folders
Excluded folders was always a concept from a programming perspective as well as in the Indexing Options panel. You can exclude folders by walking the tree of folders from the indexing options screen and unchecking which folders you don’t want the indexing service to look at, however you need to expand all paths to see the list of excluded scopes, and that is sometimes not ideal. This was created to be a more intuitive way to see and understand these scopes all on a single screen and give the user a quick way to add or remove them.
Indexer Performance
Another new feature was added in 20H1 that when turned on will adjust the back-off logic based on the current effective power mode setting on your device. When the performance toggle is enabled the service will completely back off when you are in BatterySaver and BetterBattery modes, and it will run with its normal back-off logic in all other performance modes including balanced.
While there are many different options available, the default configuration might not be what is best for you. You might store a lot of your data on volumes separate from the system/OS one in which case you might add scopes to be content indexed on those drives, or a combination of that plus enhanced mode to target specific folders on those drives for content while the rest is still searchable by basic properties.
Or, you might be the opposite and store everything in your user profile folder but might want to exclude some developer projects or other folders that don’t provide you much value. Whatever the reasons, we are always looking for ways to help users fine tune their machine so that their experience is most enjoyable.
There are definitely challenges over the years to understand all user behavior and setup indexing for everyone automatically, so we try to provide you with enough options to make your experience better depending on how much data you have on your machine. We encourage you to file feedback or suggestions on how to make the platform better, and we’re constantly learning about new user patterns to make better options in settings available or create new APIs for applications to tweak the settings as well.
Again, thanks for tuning in. Next up – What’s in My Index?, where we take a deep dive into understand the data that the index holds, how you can read it, access it, and query it yourself.
 Light
Light Dark
Dark
9 comments
“Notice how the AppData folder, MicrosoftEdgeBackups, and other hidden folders are not indexed by default.”
If by other hidden folders you refer to the . folders, those are neither hidden by default for me (which they actually don’t seem to be for you either), nor are they excluded from the index by default, i.e. they are treated like normal folders. In fact, this has always been the case for me across several installations. However, they are excluded from the index in your case. Did you do that yourself? I’m a bit confused since you said you were talking about the default configuration.
I am sorry for the confusion here, I can definitely word this better. What I mean is certain hidden folders “MicrosoftEdgeBackups”, and “AppData” are not indexed by default (while other hidden folders might be). We are actually actively working on fixing the ‘.’ folders as these also contain little user value in the majority of cases we have seen, but you are correct in that I did happen to exclude those myself on my machine.
I will update the post. Thank you for catching the miswording.
Thank you for clarifying, and I’m glad you’re working on fixing the . folders, I always exclude most of those manually.
Might I make you aware of an unrelated issue, which is that when you add folders from a removable drive (e.g. an SD card on a Surface) to a library, changes to those folders on the removable drive are not indexed automatically despite the library itself being on the index. This happens when “Find My Files” is set to Classic. Before the Enhanced setting was introduced, I had to use a folder in C:\ (e.g. C:\Mount_SD) as mounting point for the SD card and add those paths to the library, as that would fool the indexer into indexing the C:\Mount_SD automatically despite it being on a removable drive.
Unfortunately, what this means (since Classic is still the default setting) is that the default experience on e.g. a Surface if you choose to use an SD card is not ideal from this standpoint.
All my documents and photos are stored in OneDrive, yet the local OneDrive sync folder does not seem to be included in the Windows Search paths, and there seems to be no way to add it. The result being that Windows Search is useless as far as I’m concerned. It can’t find my documents or any content in them, and cannot find photo metadata (e.g. IPTC tags)
Hey Geoff,
OneDrive should by default add themselves as a scope to the index so the service picks up the files in question. I am publishing a post on Monday that details how one can go about digging into their index, which could serve as a good troubleshooting starting point to figure out why on your machine it is not working.
Note, by default OneDrive will not sync the contents of most files unless those files are opened on the local machine (and synced down) or you have explicitly told the system to keep these files on your device via the “Always keep on this device” context menu option when navigating your OneDrive folder in File Explorer.
Brendan,
Thank you for the information. Would you be able to go deeper into the indexing contents of the file? I know not all the documents will get indexed beginning to end. I imagine is due to a limitation, and in case of a large document not all would get indexed. How much of the file gets indexed? Does it vary by type? Is there any more documentation on this? Another question is regarding zip files, even when I have checked the option to index the contents of a zip file if I specifically search for a file name inside of an archive or a key term on a document that is in the archive my search yields no results. Would you be able to explain how indexing works for archives? Thank you
Yes, definitely. This is just the beginning of the blog with the first series being pretty high-level. A few coming posts detail how to find snippets of content in your index and shortly after I am planning to do a deep dive into how content filters and property handlers work.
Short answer:
Any developer can write a custom property handler for a given extension: https://docs.microsoft.com/en-us/windows/win32/search/-search-3x-wds-extidx-propertyhandlers
They can also create Filters for extensions as well: https://docs.microsoft.com/en-us/windows/win32/search/-search-ifilter-conceptual
During indexing we will use the property handlers and filters to ask what text or content should get put into the index so that applications can search for it. There is a distinction between indexing only the file name, path, date modified, created date, etc…and actually opening the file and looking into the file stream itself. If “index contents” is checked for a specific item, we will attempt to load the filter handler to grab data inside. For .zip files specifically, it would be up to an installed filter handler on the machine for this extension to be able to understand how to parse the .zip files’ contents and return that data back to the indexing service so that you can search it.
Can help? There is no indexing option in my control panel, i already try many ways to show it up, but it still cant, can you help me please? (my laptop was just reset)