
Weekend Scripter: Use PowerShell to Configure a Huge Query Completion System
Summary: Learn how to use Windows PowerShell to turn a huge text file in to a query completion system, using Fast ESP 5.3 SP3.
Microsoft Scripting Guy Ed Wilson here. Today we have another guest blogger, Dennis Whitney. Here is what Dennis has to say about himself.
I have been programming for a long-time, starting way back when MS Basic was being used and 5¼ inch floppies were your storage option. Over the years, I have done many projects for many companies using several different languages: Batch files, Perl, C/C++, ASP and VB, python, java, JavaScript and CSS, XML/XSLT, various Linux scripting languages and now I am learning Windows PowerShell and re-learning C#.
I now turn the keyboard over to Dennis.
So there I was on a peaceful afternoon, coding away on my latest killer app using Microsoft Fast ESP (Enterprise Search Platform) 5.3 SP3 when my Program Manager (PM) comes in and tells me that I have to get this done for a Proof of Concept (POC) as soon as I can. Of course, he did not have to say the sooner the better.
After decompressing the 600 megabyte (MB) source file, I was left with a 6.5 gigabyte (GB) text file, with 133 million entries. There is no way a file that size will fit into a single FAST dictionary (.aut or .ftaut) file. In my case, I had U.S. addresses and could therefore ignore ‘P.O. Boxes’ and did not have to worry about any term weighting. So, I used the following code snippet to append each line to the appropriate file in the output file set.
Write-Host -nonewline “Processing $Infile :> “
$InfileFH = [System.IO.File]::OpenText(“$Infile”)
while ($line = $InfileFH.ReadLine().trim().ToLower()) {
$row = $line.Substring(0,1)
$col = $line.Substring(1,1)
$line = <Do any string manipulations to the line here>
if ([Regex]::IsMatch($row,”[a-z]”)) {
$Outfile = Join-Path -Path $RawOutdir -ChildPath ([Regex]::replace($Outfile_Tmpl, ‘VALUE’, “$row”))
Add-Content -Path “$Outfile” -Value “$line”
}
elseif ([Regex]::IsMatch($row,”[0-9]”)) {
if ([Regex]::IsMatch($col,”[0-9]”)) {
$Outfile = Join-Path -Path $RawOutdir -ChildPath ([Regex]::replace($Outfile_Tmpl, ‘VALUE’, “$row.$col”))
Add-Content -Path “$Outfile” -Value “$line”
} else {
$Outfile = Join-Path -Path $RawOutdir -ChildPath ([Regex]::replace($Outfile_Tmpl, ‘VALUE’, “$row.other”))
Add-Content -Path “$Outfile” -Value “$line”
}
} else {
$Outfile = Join-Path -Path $RawOutdir -ChildPath ([Regex]::replace($Outfile_Tmpl, ‘VALUE’, “other”))
Add-Content -Path “$Outfile” -Value “$line”
}
# Some eye candy…
if ((++$linecount % $linemax) -eq 0) {
Write-Host -nonewline “.”
}
# Debugging if ($linecount -eq 25) { exit }
}
$InfileFH.Close()
$InfileFH.Dispose()
My next step was to remove duplicates entries. To perform this feat, I used the following Windows PowerShell code.
Write-Host “Unique-ifying $RawOutdir :> “
foreach ($file in (Get-Childitem $RawOutdir)) {
$data = (Get-Content (Join-Path -Path $RawOutdir -ChildPath $file) | Measure-Object)
Write-Host -nonewline “‘t’t$RawOutdir\$file line count:>” $data.Count “… “
Get-Content (Join-Path -Path $RawOutdir -ChildPath $file) | Sort-Object | Get-Unique > (Join-Path -Path $UniqueOutdir -ChildPath $file)
$data = (Get-Content (Join-Path -Path $UniqueOutdir -ChildPath $file) | Measure-Object)
Write-Host “$UniqueOutdir\$file line count:>” $data.Count
}
After this code completed its run, I ended up with 137 text files that ranged in size from 47 lines of text (2KB on the disk) to 4,570,060 lines of text (204MB on the disk). The total consisted of around 103 million unique items.
My next step, was to execute the makeaut command on each file in the $UniqueOutdir directory referenced above. This FAST command is shown here.
%FASTSEARCH%/bin/makeaut $infile $outfile “||”
Now that we have our aut files (the result of the makeaut command), we have to set up the query completion servers to handle all this. One of the very nice features of the completion server is the concept of a branch. A branch is the method within the matcher server (which the completionserver is based on) that enables us to target a specific dictionary at query time and it is also how we can squeeze 136 dictionaries in to 12 query completion servers and run them on a single computer. In our case, we did not want to include the ‘other’ dictionary in our query completion setup.
One other consideration we had, was that if you examine the file sizes, the really huge monsters are all clustered in one end of the directory listing (1.0 – 1.9) and we have to make sure these guys are not under the same completionserver. (We will get to more on this in a moment.)
To configure the QC server, start by opening %FASTSEARCH%\etc\NodeConf.xml in your favorite Text Editor, comment out the existing completionserver in the <startorder> section and add references to our query completion server set. I ended up with the following.
<!– <proc>completionserver</proc> –>
<proc>addr_qc_0</proc>
<proc>addr_qc_1</proc>
<proc>addr_qc_2</proc>
<proc>addr_qc_3</proc>
<proc>addr_qc_4</proc>
<proc>addr_qc_5</proc>
<proc>addr_qc_6</proc>
<proc>addr_qc_7</proc>
<proc>addr_qc_8</proc>
<proc>addr_qc_9</proc>
<proc>addr_qc_10</proc>
<proc>addr_qc_11</proc>
Next, we comment out the existing completion server definition in the process definition section and using the xml snippet below as a template, add the process definitions for each new <proc> referenced above:
<!– Address Query Completion Server XX –>
<process name=”addr_qc_XX” description=”Addr QC Server XX” multi=”no“>
<start>
<executable>matcherserver</executable>
<parameters>-m $FASTSEARCH/etc/resources/matching/qcaddr-groupXX.xml -f javascript -e -p $PORT -w $FASTSEARCH/www/matcherserver</parameters>
<port base=”<PORT>” increment=”3” count=”1” />
</start>
<stop>
<timeout>5</timeout>
<timeout_action>kill</timeout_action>
</stop>
<outfile>addr_completionserver_XX.scrap</outfile>
</process>
Where XX is the number in the <proc> you are configuring for.
Please note the port number is set using: 2200 + ( 5 * XX) and we should end up using port numbers 2200 – 2255
My next step was to create the $FASTSEARCH/etc/resources/matching/qcaddr-groupXX.xml files I referenced in the process definitions. As mentioned earlier, I also have to make sure that no single query completion server was responsible for all the very large dictionaries. To do this, we used the summed ASCII values of the characters in the file name and used modulo 12 to tell us where the dictionaries should be stored and we ended up with configuration skeleton that looked like:
<configuration>
<matcher type= “dispatcher” debug= “no” verbose=”no”>
<dispatcher>
<!– ‘<foo>’ dictionary configuration –>
<branch condition=”<foo>”>
<matcher type=”completion” debug=”no” limited=”no”>
<completion automaton = “resources/dictionaries/matching/dictionary_<foo>.aut”
results = “10” candidates = “100” spread = “yes” sort = “yes” lowercase = “no” cache = “yes”>
<scoring>
<length coefficient = “1.0” exponent = “1.0”/>
<frequency coefficient = “1.0” exponent = “1.0”/>
</scoring>
</completion>
</matcher>
</branch>
</dispatcher>
</matcher>
</configuration>
Repeatedly updating <foo> to match the modulo values I derived earlier.
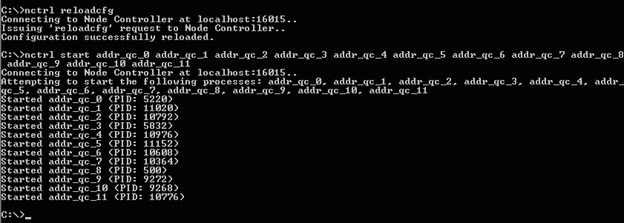
All right, I have the processes setup, configured and the .aut files created. If I did everything right, my last steps on the ESP side should be to turn it on and test it. What you want to do and see at the command line is shown here in the following figure:
If everything went well here and there are no reported warnings at http://<yourserver>:16000/admin/logs/ folder, your next step is to test it. I used this Windows PowerShell script to perform the testing.
$url=”http://<your qc server>:<your port>/search?q=<your term>&c=<your context>”
$output=”.\output.txt”
(New-Object Net.WebClient).DownloadString(“$url”) | Set-Content -path “$output”
if ( ! (Test-Path “$output”) ) {
Write-Error “Failed to download $uri to $output”
$(throw “Failed to download $uri to $output !”)
exit 1
}
Write-Host Saved $url to $output !
exit 0
At this point, you have a working QC system and in a future post, I will explain how we connected the UI to this beast.
That is all for today. Thank you, Dennis for sharing your time and knowledge. Join us tomorrow for another guest weekend scripter, Ben Pearce, as he talks about patching VHD’s and WIM files.
I invite you to follow me on Twitter or Facebook. If you have any questions, send email to me at scripter@microsoft.com or post them on the Official Scripting Guys Forum. See you tomorrow. Until then, peace.
Ed Wilson, Microsoft Scripting Guy
 Light
Light Dark
Dark
0 comments