
Use PowerShell to obtain SQL Server database sizes
Summary: Learn how to use Windows PowerShell to obtain SQL Server database information.
![]() Hey, Scripting Guy! Is there an easy way to obtain database size information by using Windows PowerShell?
Hey, Scripting Guy! Is there an easy way to obtain database size information by using Windows PowerShell?
— NA
![]() Hello NA, Microsoft Scripting Guy Ed Wilson here. As I mentioned yesterday, this week we are hosting guest bloggers from the SQL side of life in honor of SQL PASS Summit 2010 next week in Seattle. Today we have Aaron Nelson.
Hello NA, Microsoft Scripting Guy Ed Wilson here. As I mentioned yesterday, this week we are hosting guest bloggers from the SQL side of life in honor of SQL PASS Summit 2010 next week in Seattle. Today we have Aaron Nelson.

Aaron Nelson is a Senior SQL Server Architect with over 10 years of experience in architecture, business intelligence, development, and performance tuning of SQL Server. He has experience managing enterprise wide data needs in both transactional and data warehouse environments. Aaron holds certifications for MCITP: Business Intelligence Developer, Database Administrator, Database Developer; as well as MCTS: Windows Server Virtualization, Configuration (meaning Hyper-V). Aaron can be found on Twitter ( @SQLvariant ) and on his blog.
Aaron helps run the AppDev and PowerShell Virtual Chapters of PASS, and volunteers for the local PASS Chapter AtlantaMDF. He also co-runs the Atlanta PowerShell User Group, and helps organize SQL Saturday seminars in Atlanta.
Take it away Aaron!
The City of Atlanta is frequently referred to by several different names. Today you may hear someone refer to the city as A-Town, The ATL, or Hotlanta. The first of the European migrants called the area Terminus because at the time, all that was here was the end of the railroad. Just as you have different options for ‘Calling’ Atlanta you also have different options to ‘Call’ Windows PowerShell to request a list of databases and their sizes from a SQL Server. In today’s post, we are going to explore three of those options: cmdlet, Provider, and SMO. I’m sure there are other ways too. Therefore, feel free to add them in the comments.
This task requires Snap-ins. Fortunately, the Windows PowerShell Snap-ins that we have to use are included with SQL Server Management Studio (SSMS) 2008 and SSMS 2008 R2. If you do not already have this installed you can download the free version of SSMS.
After you have one of those installed, just start your favorite Windows PowerShell editor and load those Snap-ins as follows:
add-pssnapin SqlServerCmdletSnapin100
add-pssnapin SqlServerProviderSnapin100
Before we begin, I want to make a quick observation about these Snap-ins: I keep these in my profile because I work with SQL Server all day every day. If you are a SQL person, you may want to do the same. If you are a system administrator, who does not work with SQL daily you may want to leave them out because they do slow down Windows PowerShell startup time.
CMDlet
Let’s start with the Invoke-SQLCmd cmdlet. All this cmdlet does is call SQLCMD . Therefore, you should feel comfortable with this right away. In fact, Windows PowerShell makes this so easy that some SQL people may feel even more comfortable with this than SQLCMD itself.
Invoke-SQLCmd -Query “sp_databases” -Database master -ServerInstance WIN7NetBook | Out-GridView
All we did here is use the Invoke-SQLCmd cmdlet to call the SQL Server and pass it a query in the form of a stored procedure named sp_databases. It returns the results of that stored procedure just as if we had called it from inside SSMS. We piped it to Out-GridView for a nice sortable result set as seen in the following figure.
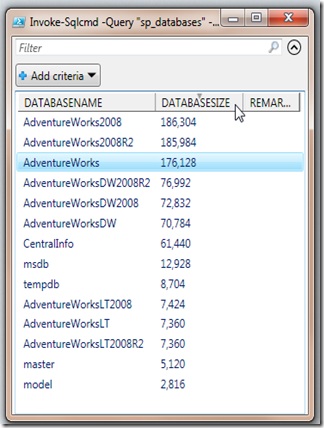
This method is great for verifying quick information about how much space the databases on a SQL Server are using . However, it leaves some important information out. SQL Server databases are always made up of a minimum of two files – a data file and a transaction log file – but this stored procedure only gave us back a total size for our database. In addition, because the Best Practice for SQL Server databases is to store the data files and log files on separate drives for fault tolerance and performance reasons, we are usually going to want to see these numbers broken out by file and on which drive those files reside.
Let us examine what other techniques we have at our disposal.
Provider
We can use the Provider to obtain information about databases also. To do that let us first run Get-PSDrive. This will show you a drive called SQLSERVER:\ that we will use. In this example, I’m using the Default Instance on my local machine but you can do this connected to any SQL Server on the network by including the server name and the instance name in the path below. (\Default means the Default instance of SQL on the server. Yes, it is mandatory in this particular context.)
cd SQLSERVER:\SQL\WIN7NetBook\Default\DATABASES\
We obtain a wealth of information by running the dir (Get-ChildItem) command. Be patient, because this could take a while to finish. To be more selective, we can run the command shown here.
Get-ChildItem | select Name, Size, SpaceAvailable, DataSpaceUsage, IndexSpaceUsage | Format-Table
Notice that this information is generally consistent with what you find from running the sp_spaceused SQL stored procedure on each of the databases. Windows PowerShell has enabled us to get all the information back in a single table with a single command. You might be asking yourself, “Self, how did he know that he could select those ‘columns’ from the database?” What I did was grab one of the databases into a variable with the Get-Item Windows PowerShell cmdlet and pipe the results to the Get-Member cmdlet. This enables me to see what properties are available. This technique is seen here.
$AdvWks = Get-Item AdventureWorks
$AdvWks | Get-Member -MemberType Property
SMO
This next technique is one which may be less familiar to many. Even those who know about it sometimes shy away from it because it has the word “Assembly” in it (ok, maybe that is just me). At first glance it is easy to become overwhelmed by all the things that are inside the SMO but just remember that the Get-ChildItem cmdlet and the Get-Member cmdlet are your friends here. This is shown here.
$Server=”WIN7NetBook”
[System.Reflection.Assembly]::LoadWithPartialName(“Microsoft.SqlServer.SMO”) | out-null
$SMOserver = New-Object (‘Microsoft.SqlServer.Management.Smo.Server’) -argumentlist $Server
$SMOserver.Databases | select Name, Size, DataSpaceUsage, IndexSpaceUsage, SpaceAvailable | Format-Table
When we run this command, it will produce a result like the one in the following figure (only with your databases, of course).

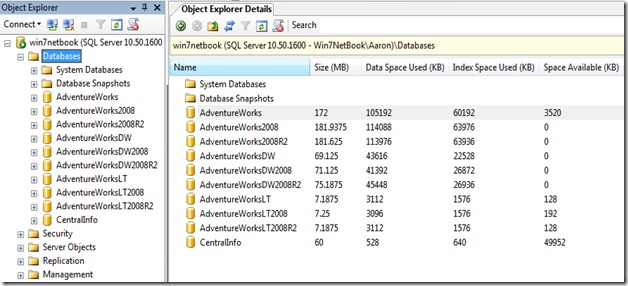
That did not get us anything different from the Provider did now, did it? No. However, it is one of the ways available to us and I bring it up because we can go into SSMS and retrieve the same information by expanding a server in Object Explorer, clicking Databases, and then hitting F7 to display Object Explorer Details.
Note: You may have to right-click there where it says Name and add the columns to your Object Explorer Details window as shown in the following figure.
OK, that is great and this is all good information, but what do we do with all this? We store it, of course!
Knowing how to retrieve this information is important, but having this information stored historically is very important when you have to know how fast your databases are growing. Recording this information locally for a single server is an easy deed. However, if we have multiple servers we are probably going to want to store the results of all or at least some of those servers back to a central spot. I’ve created a database named CentralInfo and a simple table named DatabaseFileSizes to hold the information from multiple instances. I created a Primary Key on this table so that it will be well organized for reporting and prevent us from inserting information from the same instance multiple times in a single day. The SQL code that creates the table is shown here.
CREATE TABLE dbo.DatabaseFileSizes(
ServerName NVARCHAR(128) NOT NULL,
DatabaseName NVARCHAR(128) NOT NULL,
LogicalFileName SYSNAME NOT NULL,
CheckDate DATE NOT NULL,
SizeInKB BIGINT NULL,
DBFileName NVARCHAR(260) NOT NULL,
DiscoveryOccured datetimeoffset(7) NOT NULL,
CONSTRAINT [PK_DatabaseFileSizes] PRIMARY KEY CLUSTERED(ServerName, DatabaseName, LogicalFileName, CheckDate)ON [PRIMARY]
)
Putting it all together
Finally, we will take advantage of a piece of the SMO that was exposed to us through the Provider to supply us with a list of SQL Server instances to query. If you have no servers in your Registered Servers list you will have to add a couple to do this. We are also using a nice piece of Windows PowerShell code called Write-DataTable that Chad Miller ( blog | twitter ) wrote for saving off a complete table (meaning columns and multiple rows, instead of just one row) to a different SQL Server instance. You have to download the Write-DataTable script and load it into your scripting environment.
foreach ($RegisteredSQLs in dir -recurse SQLSERVER:\SQLRegistration\’Database Engine Server Group’\ | where {$_.Mode -ne “d”} )
{
$dt=invoke-sqlcmd -query “SELECT @@ServerName AS ‘ServerName’
, DB_NAME(dbid) AS ‘DatabaseName’
, name AS ‘LogicalName’
, GETDATE() AS ‘CheckDate’
, CONVERT(BIGINT, size) * 8 AS ‘SizeInKB’
, filename AS ‘DBFileName’
, SYSDATETIMEOFFSET() ‘DiscoveryOccured’
FROM master..sysaltfiles
WHERE dbid != 32767″ -ServerInstance $RegisteredSQLs.ServerName -database master
Write-DataTable -ServerInstance “WIN7NetBook” -Database CentralInfo -TableName DatabaseFileSizes -Data $dt
}
Now we have it, lots of data from different instances saved back to the same central location. This is important so that we do not have to go creating tables on every instance of SQL Server in our environment. It also allows for obtaining the total size of multiple servers very easily. Let us run a select in SSMS so that we can see our data:
SELECT ServerName, DatabaseName, CheckDate, SizeInKB, DBFileName, LogicalFileName, DiscoveryOccured FROM CentralInfo.dbo.DatabaseFileSizes
Having this kind of capability to record information from multiple servers back to a central location in a user-friendly format is important to any size IT organization. I hope this helps you build on Windows PowerShell knowledge you already have by helping you explore the other techniques that are available to you.
NA, that is all there is to using Windows PowerShell and SQL Server to store database size information. SQL guest blogger week will continue tomorrow when Aaron will join us again; thank you Aaron for your ideas and words of wisdom.
I invite you to follow me on Twitter or Facebook. If you have any questions, send email to me at scripter@microsoft.com or post them on the Official Scripting Guys Forum. See you tomorrow. Until then, peace.
Ed Wilson, Microsoft Scripting Guy
 Light
Light Dark
Dark
0 comments