Use PowerShell to Graph the Reliability of Windows 2008 R2
Summary: Microsoft Scripting Guy Ed Wilson shows you how to use Group Policy to enable reliability tracing via Windows PowerShell and Microsoft Graph.
![]()
Hey, Scripting Guy! First of all, let me say that yesterday’s article was interesting. We are also looking at attempting to determine server reliability, and I think that the WMI Reliability provider may provide just what we need. However, when I attempted to run your commands on our Windows Server 2008 R2 servers, I got an error. Is your code broken? Say it ain’t so!
— DA
![]()
Hello DA,
Microsoft Scripting Guy Ed Wilson here. Fall in the Deep South is absolutely my favorite time of the year. SQLSaturday in Columbia, South Carolina, was a great event. I had the opportunity to meet several people I had been following on Twitter, and found new database administrators who are active in the SQL community. In addition to the networking, the sessions were awesome.
GP, to gain access to the WMI classes that are supplied by the Reliability provider on a Windows Server 2008 R2 computer, you need to first enable the provider via Group Policy. On Windows 7, the provider is enabled by default.
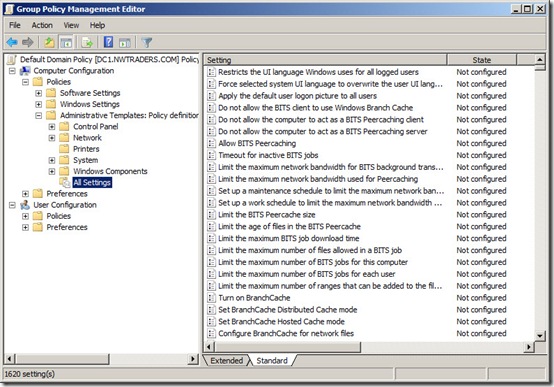
There are two things about Group Policy. The first, as shown in the following image, is that there are several thousand policy settings (luckily there is a Group Policy spreadsheet that you can download for reference) in the Group Policy Management Editor.
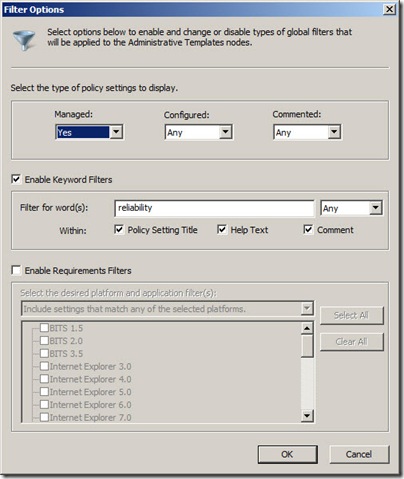
The second thing you need to know about Group Policy is that there is an excellent search feature. Unfortunately, the feature is not called search or even find; it is called filter. The Filter Options dialog box is shown in the following image.
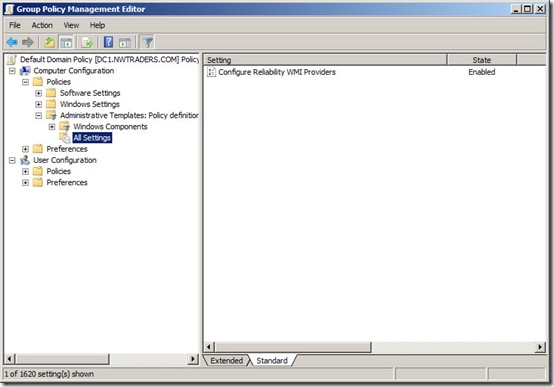
After I apply the filter, only the Configure Reliability WMI Providers policy setting remains, as shown in the following image.
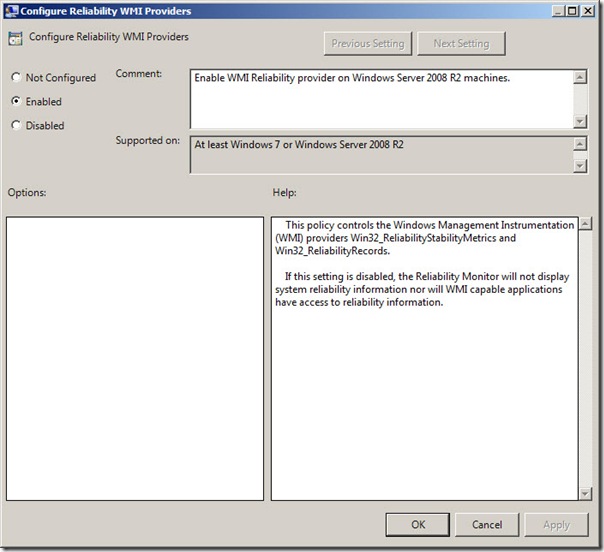
The Configure Reliability WMI Providers policy setting is a simple setting: enable or disable. This is shown in the following image.
After the Group Policy setting has been enabled, you will need to refresh the Group Policy settings on your servers. Updating Group Policy settings can easily be accomplished from the Windows PowerShell console.
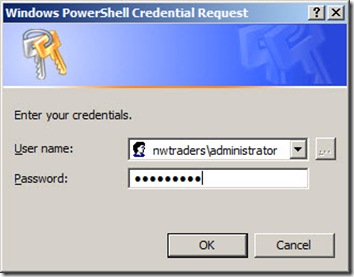
The first thing I need to do is store administrative credentials in a variable. I do this by using the Get-Credential cmdlet. A message appears in the Windows PowerShell console as shown here:
PS C:\> $credential = Get-Credential cmdlet Get-Credential at command pipeline position 1
Supply values for the following parameters:
Credential
In addition, the dialog box shown in the following image allows me to securely type the user name and password.
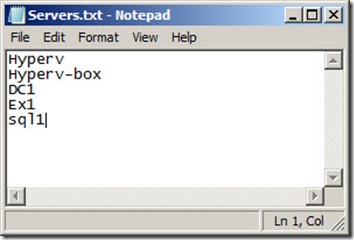
I then use the Get-Content cmdlet to read a text file that contains a listing of the servers upon which I wish to operate. The text file simply contains each computer name on an individual line as shown in the following image.
I pipe the results of the Get-Content cmdlet to the ForEach-Object cmdlet, and call the Invoke-Command cmdlet. I pass the name of the current computer name to the –computername parameter, the credential that is stored in the $credential variable to the –credential parameter, and the gpupdate /force command to the scriptblock parameter. The command (which is a single line) is shown here:
PS C:\> Get-Content C:\fso\Servers.txt | ForEach-Object { Invoke-Command -ComputerNam
e $_ -Credential $credential -ScriptBlock { gpupdate /force } }
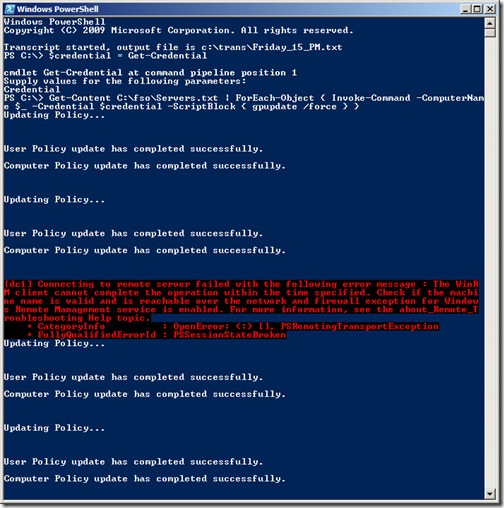
The output from running the command is shown in the following image.
As shown in the output above, the computer DC1 was unreachable. A quick ping confirms it is up and running. This tells me that Windows PowerShell remoting has not been enabled on that computer. I pop over to the DC1 box, open the Windows PowerShell console, and type enable-psremoting –force (Because DC1 is a server and administrator rights are required to log on to the console, I do not have to open an “elevated” Windows PowerShell console; UAC is disabled on that server.)
After Group Policy has been updated on the Windows Server 2008 R2 machines, you will not be able to query the servers until several hours have passed, and the machines have had an opportunity to create reliability stability metrics that are retrieved via the Win32_ReliabilityStabilityMetrics class. Rather than trying to weed through a bunch of data, it might make sense to write a nice script. A sample of the raw data is shown here:
PS C:\> Get-WmiObject -Class win32_reliabilityStabilityMetrics -ComputerName hyperv-box __GENUS : 2
__CLASS : Win32_ReliabilityStabilityMetrics
__SUPERCLASS : Win32_Reliability
__DYNASTY : Win32_Reliability
__RELPATH : Win32_ReliabilityStabilityMetrics.TimeGenerated=“201009241900
00.000000-000″
__PROPERTY_COUNT : 5
__DERIVATION : {Win32_Reliability}
__SERVER : HYPERV-BOX
__NAMESPACE : root\cimv2
__PATH : \\HYPERV-BOX\root\cimv2:Win32_ReliabilityStabilityMetrics.Tim
eGenerated=“20100924190000.000000-000”
EndMeasurementDate : 20100924190000.000000-000
RelID : {DE0BA634-C7D7-4D80-AEC3-08E604F96B0F}
StartMeasurementDate : 20100924180000.000000-000
SystemStabilityIndex : 10
TimeGenerated : 20100924190000.000000-000 __GENUS : 2
__CLASS : Win32_ReliabilityStabilityMetrics
__SUPERCLASS : Win32_Reliability
__DYNASTY : Win32_Reliability
__RELPATH : Win32_ReliabilityStabilityMetrics.TimeGenerated=“201009241800
00.000000-000″
__PROPERTY_COUNT : 5
__DERIVATION : {Win32_Reliability}
__SERVER : HYPERV-BOX
__NAMESPACE : root\cimv2
__PATH : \\HYPERV-BOX\root\cimv2:Win32_ReliabilityStabilityMetrics.Tim
eGenerated=“20100924180000.000000-000”
EndMeasurementDate : 20100924180000.000000-000
RelID : {DE0BA634-C7D7-4D80-AEC3-08E604F96B0F}
StartMeasurementDate : 20100924170000.000000-000
SystemStabilityIndex : 10
TimeGenerated : 20100924180000.000000-000
In fact, the best way to view this type of data is to create a chart. The easiest way to create a chart is to use the Microsoft Graph COM object. The use of the Win32_ReliabilityStabilityMetrics WMI class and the [Management.ManagementDatetimeConverter]::ToDateTime static method were discussed in yesterday’s Hey, Scripting Guy! Blog post.
New-ReliabilityChart.ps1
$computer = “localhost”
$chart = New-Object -ComObject msgraph.application
$chart.visible = $true
$chart.datasheet.cells.item(1,1) = “Time”
$chart.datasheet.cells.item(1,2) = “ReliabilityMetric”
$r = 2 Get-WmiObject -Class win32_reliabilityStabilityMetrics -computername $computer|
Select-Object -First 254 |
ForEach-Object {
$chart.datasheet.cells.item($r,1) = `
[Management.ManagementDatetimeConverter]::ToDateTime($_.TimeGenerated)
$chart.datasheet.cells.item($r,2) = $_.SystemStabilityIndex
$r++
}
The $computer variable is used to hold the computer name. If the script were to be modified to run against multiple computers at the same time, you would need to modify the chart code to save each chart as the computer name, and maybe the date. The MSDN documentation for the Microsoft Graph object tells you how to save the chart.
The msgraph.application program ID is used to create an instance of the Microsoft Graph application. The returned object is stored in the $chart variable. Next, the graph is made visible by setting the visible property to $true. This is shown here:
$chart = New-Object -ComObject msgraph.application
$chart.visible = $true
Now I add two column headers: time and ReliabilityMetric. These go into the first row. I then set the value of $r to 2 (for the second row). This is shown here:
$chart.datasheet.cells.item(1,1) = “Time”
$chart.datasheet.cells.item(1,2) = “ReliabilityMetric”
$r = 2
I then query the Win32_ReliabilityStabilityMetrics WMI class and pipe the results to the Select-Object cmdlet to retrieve the first 254 objects (this is because the Microsoft Graph application is limited to 255 points). This is shown here:
Get-WmiObject -Class win32_reliabilityStabilityMetrics -computername $computer|
Select-Object -First 254 |
The Foreach-Object cmdlet is used to allow us to write to each new row in the chart. This is shown here:
ForEach-Object {
$chart.datasheet.cells.item($r,1) = `
[Management.ManagementDatetimeConverter]::ToDateTime($_.TimeGenerated)
$chart.datasheet.cells.item($r,2) = $_.SystemStabilityIndex
$r++
}
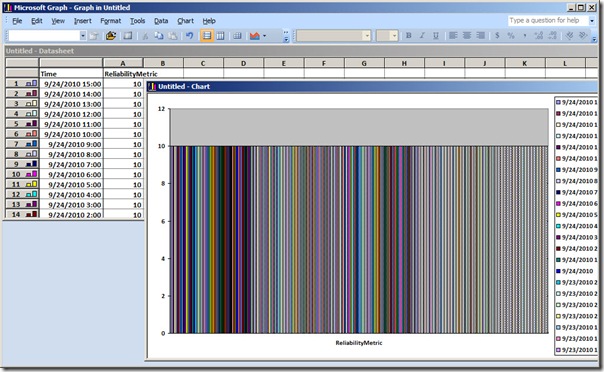
When the New-ReliabilityChart.ps1 script runs, the chart shown in the following image appears. As you can see, my Windows Server 2008 R2 server that is running Hyper-V currently has perfect reliability.
DA, that is all there is to using Windows PowerShell and WMI to work with the Reliability provider. Reliability Week will continue tomorrow when we will talk about parsing reliability data.
We invite you to follow us on Twitter and Facebook. If you have any questions, send email to us at scripter@microsoft.com, or post your questions on the Official Scripting Guys Forum. See you tomorrow. Until then, peace.
Ed Wilson and Craig Liebendorfer, Scripting Guys

 Light
Light Dark
Dark
0 comments