Renaming Network Adapters by Using PowerShell
Summary: Microsoft Scripting Guy, Ed Wilson, talks about various ways to rename network adapters by using Windows PowerShell.
Microsoft Scripting Guy, Ed Wilson, is here. I am sitting here sipping a cup of tea made from English Breakfast, peppermint and spearmint leaves, strawberry leaves, licorice root, and a cinnamon stick. It is delightfully refreshing. I am working on Windows PowerShell Saturday #007 that will be in Charlotte.
PowerShell Saturday #007 will be held in Charlotte, North Carolina on February 8, 2014. This will be an awesome chance to meet and to learn from some of the best PowerShellers around. In fact, five of the speakers are also speakers at the PowerShell Summit this year. There are a limited number of tickets still available for this event, so you’ll want to sign up now. The Scripting Wife wrote a great post that provides a quick overview of the event: Psst…Charlotte PowerShell Saturday Details Leaked.
Now let’s visit how to rename network adapters…
Note This is the third post in a series that examines working with network adapters. You may want to refer to
the earlier posts to get a feel for the way the series progresses:
- Use PowerShell to Identify Network Adapter Characteristics
- Enabling and Disabling Network Adapters with PowerShell
Depending on the version of your operating system, you will have various capabilities available for renaming the network adapter. These methods involve using Netsh, WMI, and the functions from the NetAdapter module.
Using Netsh
To rename the network adapter by using Netsh, I need to know the interface name and the new name I want to use. That is about it. To find the network adapter names, I can also use Netsh. Here is the command:
netsh interface ipv4 show interfaces
Netsh is available everywhere right now. I can use Netsh to configure network adapters from Windows 2000 forward, so it has the greatest amount of backward compatibility. But it is being deprecated, and therefore, it may not always be available going forward. To rename a network interface by using Netsh, I can use a command such as the following:
Netsh interface set interface name="Ethernet" newname="RenamedAdapter"
Using WMI
Since Windows Vista, it has been possible to use WMI to rename the network interface. The thing to keep in mind is that the property I change is NetConnectionID and not the Name property. Because this command modified the NetConnectionID property, it is a simple property assignment, and not a method call.
The Win32_NetworkAdapter WMI class shows the properties that are Read and Write. The steps to using WMI include:
- Retrieve the specific instance of the network adapter.
- Assign a new value for the NetConnectionID property.
- Use the Put method to write the change back to WMI.
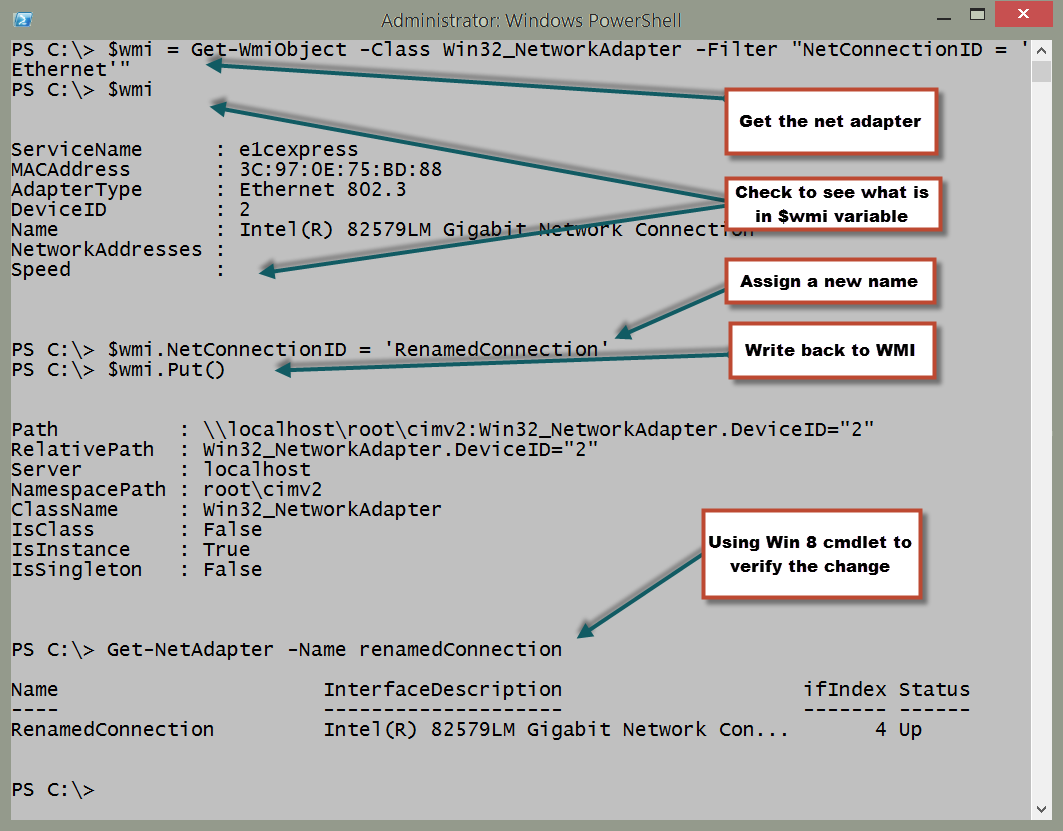
The following command illustrates these steps using a network adapter that is named Ethernet. The command will rename the network adapter named Ethernet to RenamedConnection:
$wmi = Get-WmiObject -Class Win32_NetworkAdapter -Filter "NetConnectionID = 'Ethernet'"
$wmi.NetConnectionID = 'RenamedConnection'
$wmi.Put()
The following image shows using WMI to rename the network adapter.
Using WMI in Windows 7
In Windows 7 and Windows Server 2008 R2, it is not necessary to use the Get-WmiObject cmdlet, assign new values for the property, and call the Put method. This is because the Set-CimInstance cmdlet permits accomplishing this feat as single command.
The easiest way to use Set-CimInstance is to use a query. Interestingly enough, this WQL query is the same type of query that would have been used back in the VBScript days. The query to retrieve the network adapter named Ethernet is shown here:
"Select * from Win32_NetworkAdapter where NetConnectionID = 'EtherNet'"
To assign a new value for a property, I use a hash table. The hash table specifies the property and the new value for the property. The hash table to specify a value of RenamedConnection for the NetConnectionID property is shown here:
@{NetConnectionID="RenamedConnection"}
The complete Set-CimInstance command appears here (this is a single line command)
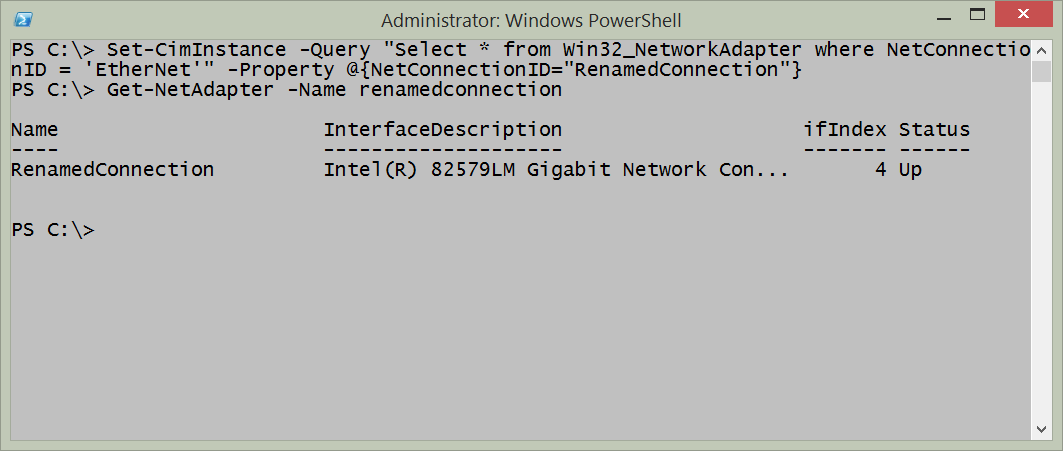
Set-CimInstance -Query "Select * from Win32_NetworkAdapter where NetConnectionID = 'EtherNet'" -Property @{NetConnectionID="RenamedConnection"}
When I run the command, nothing appears in the output. The following image shows the single command (wrapping in the Windows PowerShell console) and no output from the command. On my laptop running Windows 8.1, I use the Get-NetAdapter cmdlet to verify that the adapter renamed.
Using the NetAdapter module
Renaming a network adapter via Windows PowerShell requires admin rights. Unfortunately, the Help does not mention this. You just have to know this. Luckily, an error message appears when attempting to run the command without admin rights. The message is instructive, and it informs you that access is denied. It is shown here:
The good thing is that the access denied error message appears. Some cmdlets do not display output, and they do not let you know that you need admin rights to obtain the information. The Get-VM cmdlet is one of those—it returns no virtual machine information, but it does not generate an error message either. This situation is also true with the Start-VM cmdlet—it does not do anything, but it does not generate an error message if you do not have the proper rights.
So I close the Windows PowerShell console. I right-click the Windows PowerShell console icon that I created on my task bar, and run Windows PowerShell as Administrator. I now run the command to rename my network adapter with the whatif parameter to ensure that it accomplishes what I want. Here is the command I use:
Get-NetAdapter -Name Ethernet | Rename-NetAdapter -NewName Renamed -whatif
What if: Rename-NetAdapter -Name 'Ethernet' -NewName 'Renamed'
That is exactly what I want to happen. I now use the Up arrow, and remove the whatif parameter. Here is the command (no output returns from this command).
Get-NetAdapter -Name Ethernet | Rename-NetAdapter -NewName Renamed
The command and its associated output are shown in the following image:
I can modify my command a bit, and return an instance of the renamed network adapter. To do this, I use the –passthru parameter from the Rename-NetAdapter function. One reason to do this is to see visual confirmation that the command completed successfully. Other reasons would be to use the returned object to feed into other cmdlets and to perform other actions. Here is the revised command, which shows how to use –passthru:
Get-NetAdapter -Name Ethernet | Rename-NetAdapter -NewName Renamed –PassThru
The command and its associated output are shown in the following image:
One of the really powerful things about the Get-NetAdapter function is that I can use wildcard characters with the Name parameter. This means that if I do not want to type the entire network adapter name, I can shorten it. It also means that if I have a similar naming pattern, I can also use a wildcard pattern to retrieve them. Here is an example of using a wildcard character:
Get-NetAdapter -Name Ether*
This command works the same as the other commands, and therefore I can pipe the results to the Rename-NetAdapter function. This technique is shown here:
Get-NetAdapter -Name Ether* | Rename-NetAdapter -NewName Renamed –PassThru
As shown in the following image, the command works perfectly:
Network Adapter Week will continue tomorrow when I will talk about how to find connected network adapters.
I invite you to follow me on Twitter and Facebook. If you have any questions, send email to me at scripter@microsoft.com, or post your questions on the Official Scripting Guys Forum. See you tomorrow. Until then, peace.
Ed Wilson, Microsoft Scripting Guy


 Light
Light Dark
Dark
0 comments