
Using Azure DevOps Pipelines with Redgate to Automate Oracle Database Deployments
Application Development Manager Jafar Jaffery demonstrates using DevOps build and release pipelines to streamline development changes to your Oracle databases.
In this post, I will cover a basic end to end-to-end example of taking a local Oracle database, setting up a project in a Git repository and using a Continuous Integration / Continuous Delivery (CI/CD) pipeline to take your database changes from code through to production. I will use Azure DevOps as the foundation for my CI/CD pipeline, and will use Redgate Tools (Source Control for Oracle / Schema Compare for Oracle) to perform the build & release steps. Database development and deployment in Oracle is an involved effort with many moving parts, and using the products previously mentioned helps streamline the process.
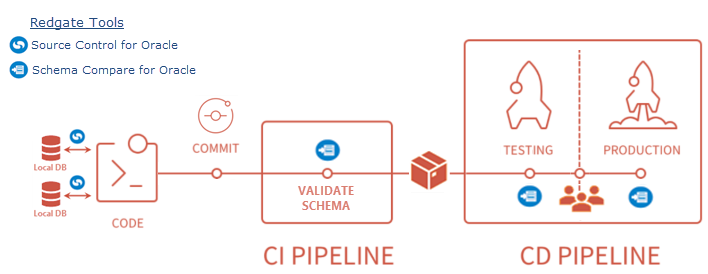
Below is a diagram of the pipeline that this post will cover. We won’t cover topics like unit testing or restoring data from other environment as part of the pipeline, but instead focus on the core components needed to get started with database deployments with Oracle databases. The process will start by committing changes to source control, which will kick off the build & publish artifact steps. Once that completes, our changes will be deployed first to a testing environment, and upon approval be promoted to a production environment. This can be extended to have as many environments as needed, but for simplicity we will stick to these two environments.
Build Server / Agent Pool
In order to perform build and release tasks for an Oracle database, we will need to have a build server that has the requisite components. To achieve this, I started with Windows Server 2019. Additional components you’ll need to add are Oracle Client (I used the 18c Client for Windows for my setup), and Redgate Schema Compare for Oracle. Once the build server is setup, you’ll also need to create a new agent pool using these steps, and add a virtual machine as a new self-hosted agent to that agent pool. We will refer to this agent pool as “Oracle Pipelines” for our example, and will later use this agent pool to perform our build and release steps.
Source Control

For the source code, we will be using two different source control systems. The first one will be setup with an Azure DevOps Git repository (we’ll call it “OracleSandbox”) as our main repository for database code. It will also be used to initiate our CI Pipeline when a change is committed. The other will be Source Control for Oracle, which will be used to synchronize changes between local databases and our main Azure DevOps repository. Source Control for Oracle lets developers make changes directly in the database without having to manually script changes & organize them into a database folder structure. It also facilitates developer collaboration during database development.
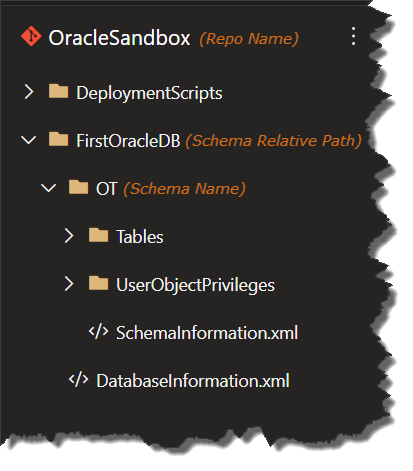
To create a new source control project, follow the steps shown here on the Redgate site. Redgate also has a series of getting started videos that cover a variety of source control topics like creating a new project, branching with Git, and conflict resolution. Once setup, the Git repository should look something like this:
CI Pipeline
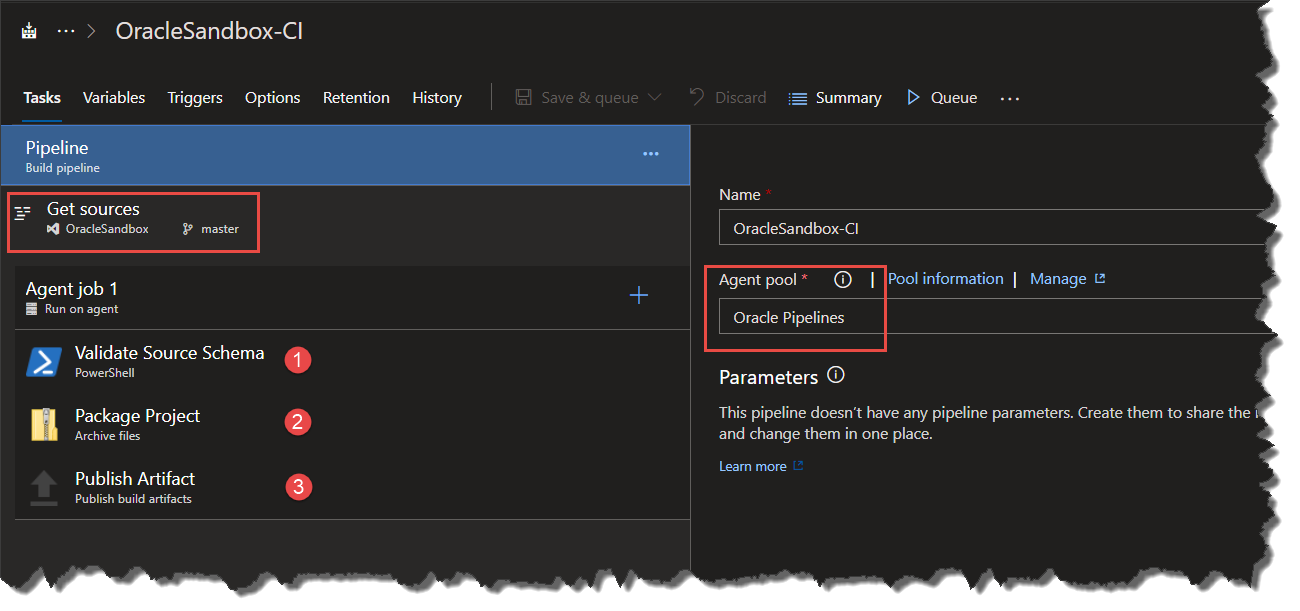
The build pipeline will perform the following tasks:
- Validate the source schema in our Git repository.
- Package the project files into an artifact. In this case it will be a .zip file, but it could also be a NuGet package or some other type as well.
- Publish the artifact.
In this example, I’ve created the build pipeline using the classic editor, and started with an “Empty Job”. You you can do this using YAML pipelines as well. For more information on pipelines, you can start with this doc as well as this guide. As a note, set the Agent Pool to the one created earlier, namely “Oracle Pipelines”.
The validation script uses SQLPlus & Redgate Schema Compare for Oracle to create a new temporary schema from the definition in our Git repository, and then removes that schema. This is done to ensure the schema definition in our Git repository is valid. As a reference, here is the PowerShell script I’m using for this:
# this script creates a target DB using the source schema (to validate it works), and then deletes that target schema
param (
   $schemaCompareExePath,  # location of Redgate SCO EXE
   $sourceSchemaName, # source schema name from source control
   $sourceSchemaRelativePath,  # relative path of schema from source control root folder
   $targetSchemaName, # target schema name to be created for validation purposes
   $buildLocalPath, # local path where build files will be located
   $sqlPlusConnStr, # connection string for SQL Plus commands
   # connection / creds for Redgate Schema Compare
   $tnsName,
   $userName,
   $password
)
$ErrorActionPreference = "Stop"
$createQuery = "CREATE USER $targetSchemaName IDENTIFIED by null; GRANT ""DBA"" TO $targetSchemaName; ALTER USER $targetSchemaName DEFAULT ROLE ""DBA"";"

# Create empty schema for validation
$createQuery | sqlplus $sqlPlusConnStr | Out-Host

# Deploy changes using Redgate Schema Compare for Oracle
Write-Warning "Upgrading $targetSchemaName"

try {
   & $schemaCompareExePath -source "$buildLocalPath\$sourceSchemaRelativePath{$sourceSchemaName}" -target "$userName/$password@$tnsName{$targetSchemaName}" AS SYSDBA -deploy | Out-Host

   # Logging the Schema Compare exit code and path to artifacts
   Write-Output "Schema Compare for Oracle exited with code $lastExitCode"
}
finally {
   # drop the validation schema created
   $dropQuery = "DROP USER $targetSchemaName CASCADE;"
   $dropQuery | sqlplus $sqlPlusConnStr | Out-Host
}
 CD Pipeline
The release pipeline will perform the following tasks:
- Unzip/unpack the artifact contents.
- Deploy the changes using Redgate Schema Compare, wrapped in PowerShell in this example.
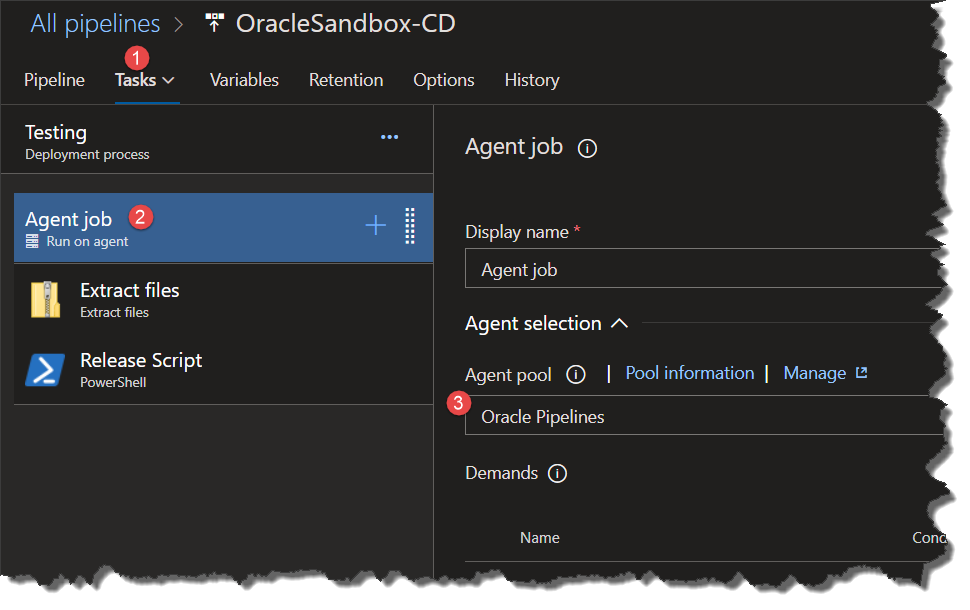
For information on how to create release pipelines, view the Microsoft documentation here. Here are the things you need to set up in your pipeline:

Note: be sure to set the Agent Pool (in the Agent Job) to the one created earlier, namely “Oracle Pipelines” — as shown here:
Here is the PowerShell script I’m using for the release DB deployment:
param (
   $schemaCompareExePath,  # location of Redgate SCO EXE
   $sourceSchemaName, # source schema name from source control
   $sourceSchemaRelativePath,  # relative path of schema from source control root folder
   $releaseLocalPath, # local path where build files will be located
   $targetSchemaName, # target schema name to be created for validation purposes
   # connection / creds for Redgate Schema Compare
   $tnsName,
   $userName,
   $password
)

# perform deployment with Redgate Schema Compare
& "$schemaCompareExePath" /source:"$releaseLocalPath\$sourceSchemaRelativePath{$sourceSchemaName}" /target:"$userName/$password@$tnsName{$targetSchemaName}" AS SYSDBA /deploy
Write-Output "Schema Compare for Oracle exited with code $lastExitCode"

# exit code of 61 (differences in source/target schemas) is not actually an error, but ends up being treated like one -- so adding logic to ignore that
If ($lastExitCode = 61) {
   exit 0
}
Closing Thoughts
As mentioned earlier, the pipeline described in this post is not meant to be a comprehensive one. Rather, it is intended to be a starting point for automating your Oracle deployments. For additional considerations in your Oracle database DevOps process, Redgate has a good whitepaper here.
Below are some additional references for your consideration:
- Schema Compare for Oracle 5 – Using the command line https://documentation.red-gate.com/sco/using-the-command-line
- Permissions required to use Schema Compare for Oracle https://documentation.red-gate.com/sco/requirements/permissions-required-to-use-schema-compare-for-oracle
- Database build – Database DevOps for Oracle – Product Documentation https://documentation.red-gate.com/ddfo/automated-build-and-test/database-build
- Deployments – Database DevOps for Oracle – Product Documentation https://documentation.red-gate.com/ddfo/release-management/deployments
 Light
Light Dark
Dark
0 comments