Using ADAL.js with Angular4+
In the following post, App Dev Managers Vishal Saroopchand and Sr. Dev Consultant Hemant Kathuria explain how you can wrap ADAL.js with Angular4+.
This is an update post to a previous article published in April 2017 explaining how to wrap ADAL.js with Angular2+. The previous article is no longer relevant given the changes to the Angular framework. This new post explains a reimplementation which uses the PathLocationStrategy and Angular features such as HttpInterceptor and InjectionToken.
The project setup
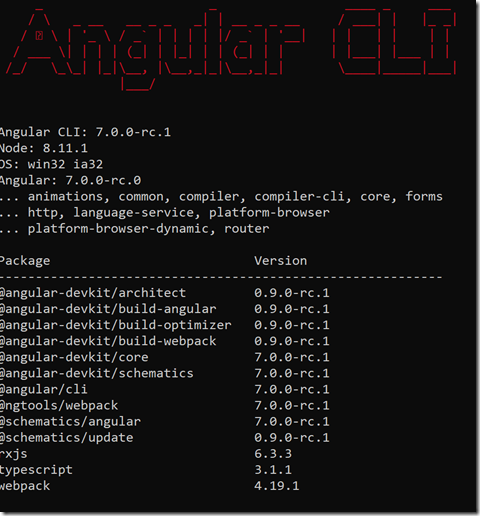
This new sample was scaffolded with Angular-CLI 7.0.0-rc.1; it uses Bootstrap 3.3.7 to create a very basic layout. The top navbar has a Sign-in/Sign-out buttons to trigger the OpenID Connect Implicit Flow with ADAL.js. Read more about OpenID Connect and AAD here.
Figure 1: Angular tools used in this sample
Register applications in Azure Active Directory
To run this sample, you must register two Azure AD Application.
The first application named Client-App will be used for OpenID Connect Implicit Flow to fetch User Identity and claims. See the following link for list of claims in the JWT Token.
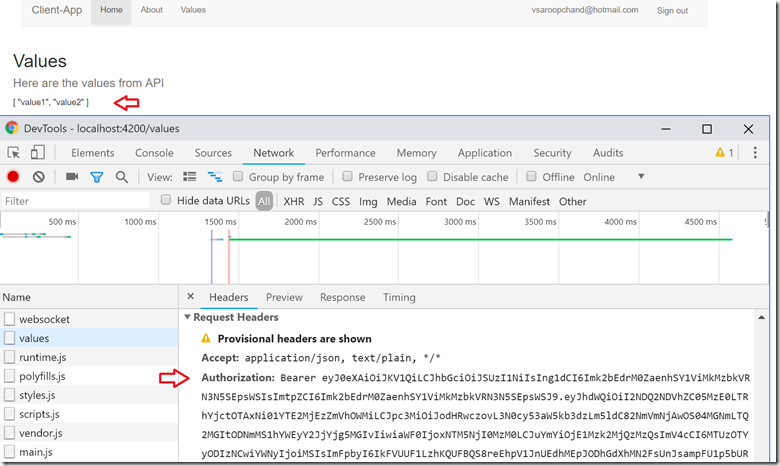
The second application named Server-App will used for the WebAPI resource. The Client-App (Angular SPA) will request an access token for Server-App when route Values is activated. The access token will be used as the HttpRequest Authorization Header/Bearer Token for WebAPI Authorization.
Client-App Setup
- In the Azure Portal, navigate to Azure Active Directory >App registrations, click New application registration
- Set Name to Client-App
- Set Application-Type to Web app / API
- Set Sign-on URL to http://localhost:4200/frameredirect
- Press the Create button
Server-App Setup
- In the Azure Portal, navigate to Azure Active Directory >App registrations, click New application registration
- Set Name to Service-App
- Set Application-Type to Web app / API
- Set Sign-on URL to https://localhost:44351
- Press the Create button
Edit application Client-App, click Edit Manifest, change property oauth2AllowImplicitFlow to true and Save
Edit application Client-App, click Settings > Required permissions > Add > Select an API
- Search for “Server-App” and click Select
- Click checkbox Delegated Permissions and Save
- Finally, click Grant Permissions
For more on application registration, see docs below.
https://docs.microsoft.com/en-us/azure/active-directory/active-directory-app-registration
https://docs.microsoft.com/en-us/azure/active-directory/develop/quickstart-v1-add-azure-ad-app
Key Implementation Details
Configuration for ADAL
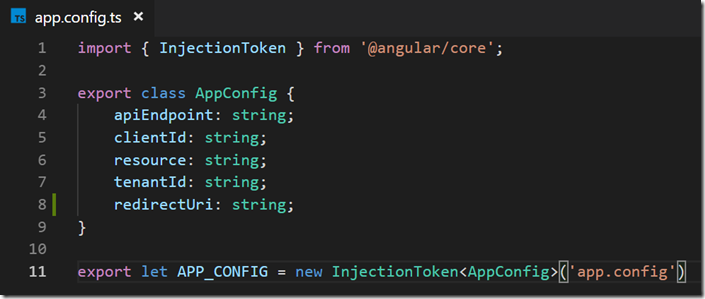
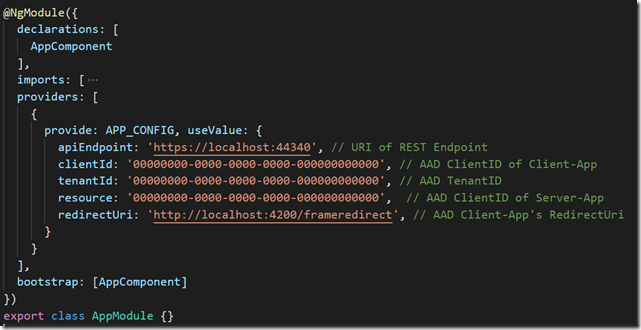
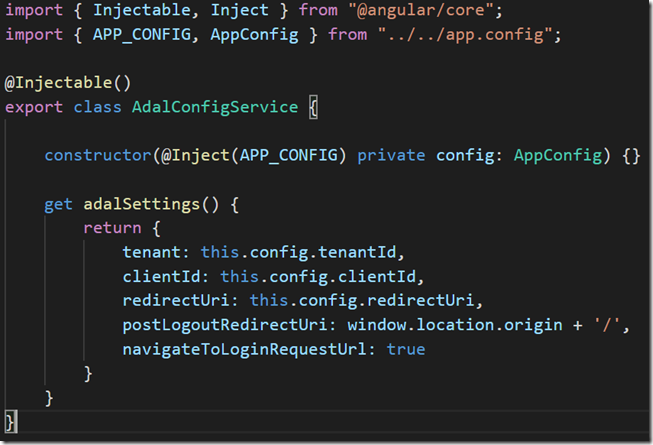
The new implementation uses InjectToken to wrap the configuration which includes ClientID, TenantID, ResourceID and endpoint for the WebAPI. A configuration service is used to construct the bare-minimum settings for ADAL.JS. You will find the complete configuration options here. This is all configured as a value provider in the application module.
Figure 2: Define InjectionToken in app.config.ts
Figure 3: Configure APP_CONFIG Token as value provider in app.module.ts
Figure 4: Configuration for ADAL.js in adal-config.service.ts
The ADAL.js Wrapper
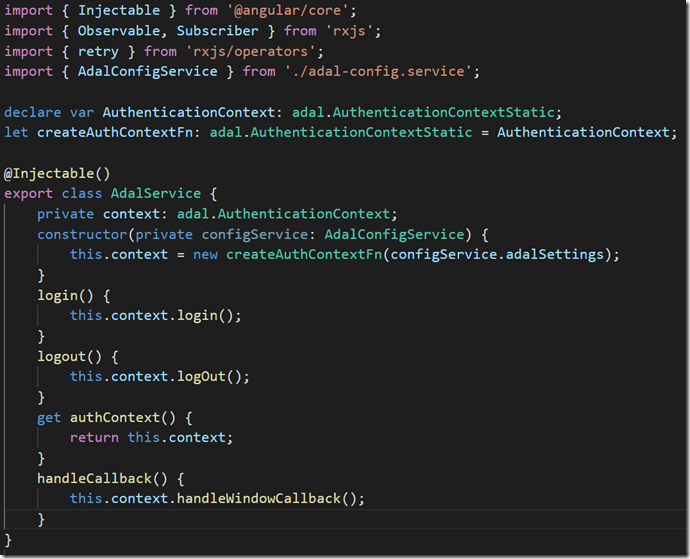
Like the original implementation, we wrap ADAL.js AuthenticationContext as an Injectable Service. One change to note is function acquireTokenResilient; we use a simple retry policy to fetch the token.
Figure 5: ADAL.js Wrapper service in adal.service.ts
Guard for protected routes
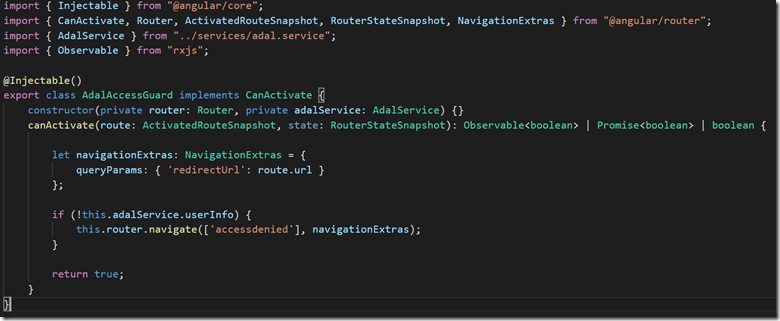
The CanActivate guard remains the same as the original implementation. It will redirect to route AccessDenied if UserInfo is not present.
Figure 6: CanActivate Guard using ADAL.js cached userInfo to enforce Authorization
HttpClient & Bearer Token
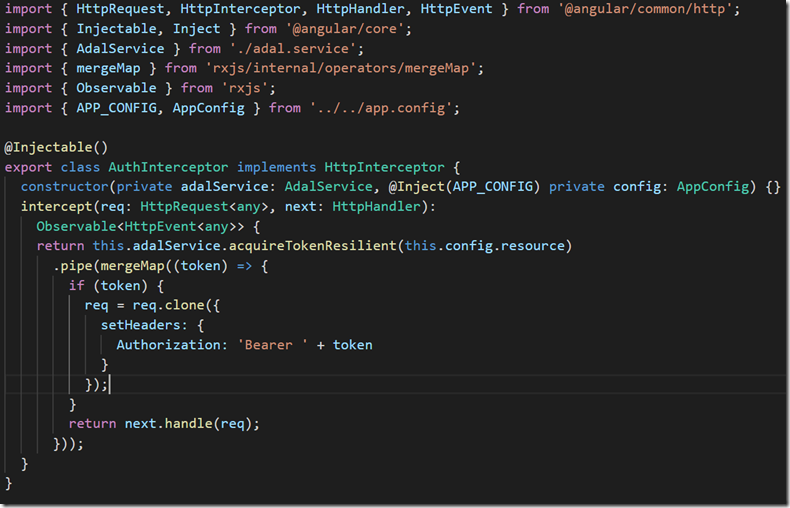
The new implementation uses Angular HttpInterceptor to frame the HttpRequests with Authorization Header for WebAPI calls. Using HttpInterceptor keeps our BaseService HttpClient decoupled from to the AdalService unlike the Angular2 implementation where Http Interception was not yet supported.
Figure 7: Frame HttpRequest to WebAPI with Authorization header in auth-interceptor.ts
Handling Redirect and processing id_token
Upon successfully authenticating, OpenId Connect will redirect back to our application using the redirect_uri setting in Client-App. Route frameredirect is configured to handle this callback which contains the id_token in the URI hash. The frameredirect component simply calls ADALs AuthenticationContext.handleWindowCallback to extract and cache id_token from URL. You can do additional work here but, in this sample, we simply redirect back to the home route.
Figure 8: FramedRedirect HomeComponent invoking ADAL.js handleCallback
The End Result
Figure 9: Initial State without authentication
Figure 10: Authenticated State after user clicks Sign-In
Figure 11: Calling WebAPI with Authorization header for Server-App resource
Clone the complete sample here.



 Light
Light Dark
Dark
7 comments
Can i get code for this?
Check out the last link in the article: https://github.com/vsaroopchand/angular-adal-sample
This is super helpful!! we’re going to try to implement this example. I’m doing it locally now… Everything is great, but here is my concern. When I run ng test, I am getting ‘adal’ namespace isn’t found.. Did you do anything special to make the tests work??
Fix added for this issue. Essentially import adal from adal-angular and delete the adal.ts file in /services folder.
unit tests don’t seem to work :((((
i need help getting the unit tests to work
Hi,
I am getting this error using angular 8.
ERROR in src/app/shared/services/adal.service.ts(5,36): error TS2503: Cannot find namespace ‘adal’.
src/app/shared/services/adal.service.ts(6,26): error TS2503: Cannot find namespace ‘adal’.
src/app/shared/services/adal.service.ts(10,22): error TS2503: Cannot find namespace ‘adal’.