Hosting Python packages in Azure DevOps
App Dev Manager Herald Gjura demonstrates how to host Python packages using Azure DevOps.
Problem to solve
I started to build a solution based on the Microsoft’s recommended architecture on Modern Data Warehouse. It is going well, and most likely will be a topic for another blog post very soon.
In the early stages of this project, while building some transformation and analytics Python scripts in Databricks, I asked myself if I could build some custom python libraries and store them as private artifacts in the Azure DevOps Org for my organization. And then (this part is still uncertain) install them directly in a Databricks cluster.
So, I set out to try to solve at least the first part of this issue: creating and managing Python packages in Azure DevOps. And here it goes.
“A requirement of this self-imposed challenge is to build 100% of it in a Windows environment with tools used by Microsoft developers. This is a tough one. Python developers, with all their tools and documentation, perform much better in a Linux-based environment. But for the sake of this exercise, I went with a Windows-only setup. Let see how far I get!”
Setting up the Azure DevOps environment for the packages
Let’s get started and partially setup out Azure DevOps CI/CD. We will come back to it later to complete it. But for now, we need the git repo to be setup and configured.
– Go ahead and create a project for your Python packages. If the packages will be part of a larger project, than go ahead and select that project and head to the Repos section.
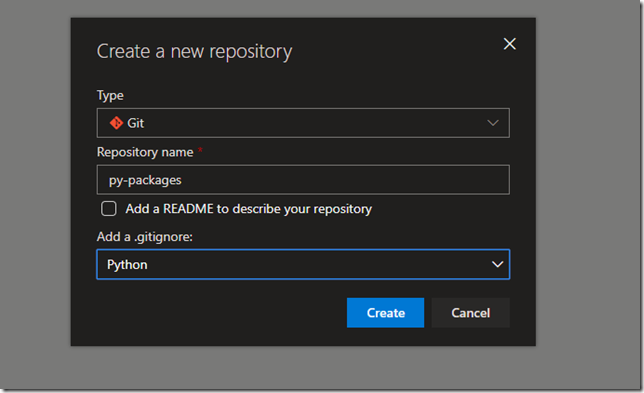
– In the Repos section, create a new git repo and enter these basic items. Namely, a repo name (in my case: py-packages) and a .gitignore file prefilled with Python-type entries.
– Click on ![]() in top-right of the screen, and go for
in top-right of the screen, and go for ![]()
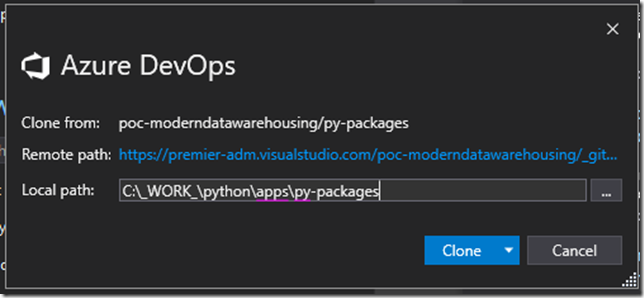
– Clone the repo in a local folder. Your VS 2017 clone repo window should look like this:
– Chose the path carefully. Later we will talk about creating Python virtual environments, which will need their paths as well. In my local environment, these are created as follows:
- Apps: C:\_WORK_\python\apps\….
- Environments: C:\_WORK_\python\env\….
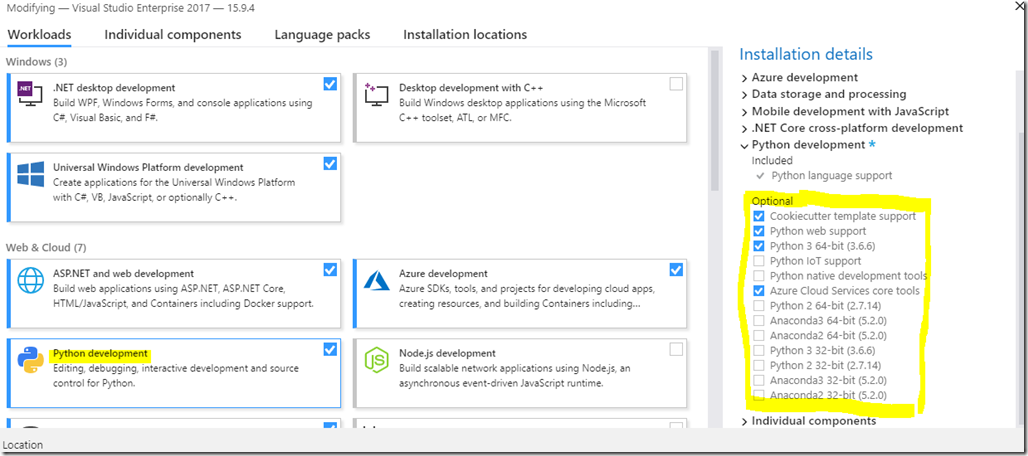
– In Visual Studio 2017, make sure you have installed the Python development tools. (Open up Visual Studio Installer; click Modify; check the box in Python development section; and check the boxes in the Optional components as shown below.)
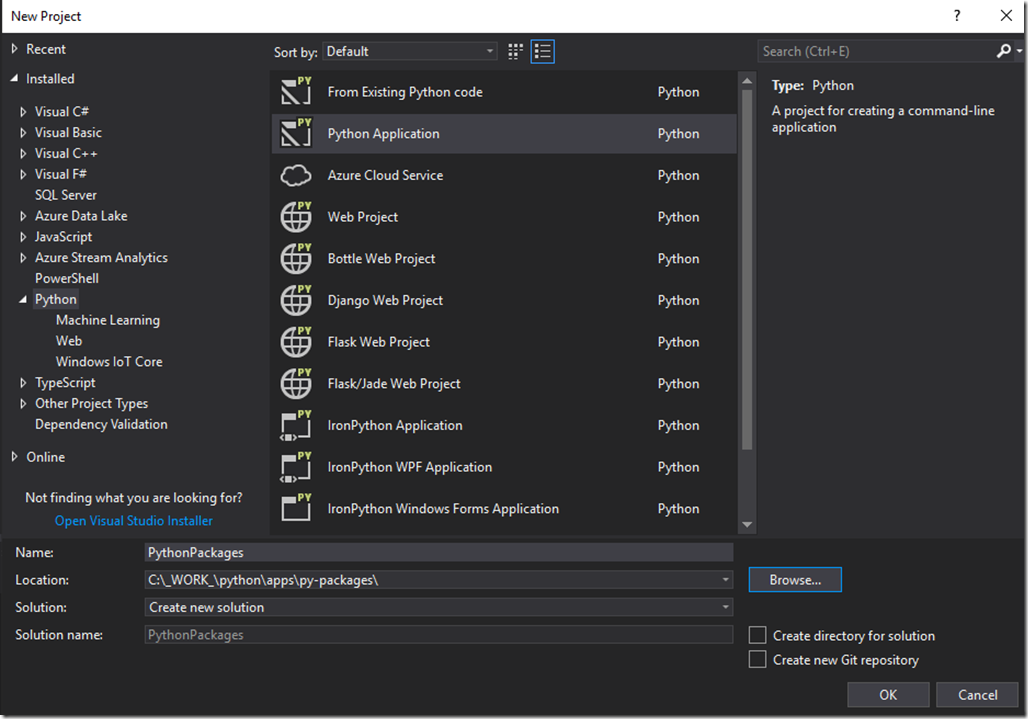
– Once the Python development tools are created, go ahead and restart VS 2017 and create a Python application: File -> New -> Project -> Python Application. Note that “Create directory for solution” and “Create new Git repository” are unchecked. And, obviously, we are creating the app inside the folder we created when we cloned the repo from Azure DevOps.
– A bit of optional housekeeping here.
- Close VS 2017.
- VS 2017 has created a folder called “PythonPackages” with a few files. We need these 2: PythonPackages.pyproj and PythonPackages.sln.
- Cut and paste these two files in the folder above (py-packages)
- Go ahead and delete the PythonPackages folder.
- The folder structure of the local repo now looks like this:

- Reopen VS 2017 by double-clicking on PythonPackages.sln
Setting up the python (local) environment for the packages
I would say that, when working with Python, having a Python virtual environment is a must. This helps in creating multiple environments, of different versions, for different application, which you can destroy when you are done with your development.
Otherwise, your local environment will become bloated with libraries and customizations and very soon will start creating problems for you. Also, you will not remember which library was installed and used for which application, so this is a very useful feature.
Here is a step by step guide for this part:
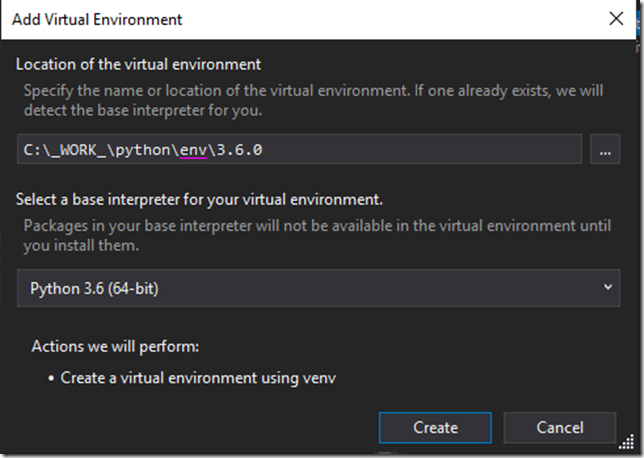
- Identify a path for the environment. Something you can remember easily (in my case: C:\_WORK_\python\env\3.6.5).
- Open the Python solution by double-clicking on PythonPackages.sln.
- Delete the orphan PythonPackages.py (with a yellow triangle next to it). That we deleted above but now we need to remove from the solution.
- In solution explorer, under the PythonPackages app, select and right click the Python Environments sub tree. Chose the option Add virtual environment. Enter a path, as recommended above. It should look like this:

- You have now a barebone Python solution and application; a virtual Python environment; and a git repository already hooked up with Azure DevOps. Let’s now install some libraries and add some code!
Installing additional Python packages
Go ahead and select the new Python virtual environment we just created in solution explorer. Right click and chose Install “Python Package”.
In the search books, search for and install the following packages:
- pytest
- wheel
- twine
I will explain their usage throughout the text to follow.
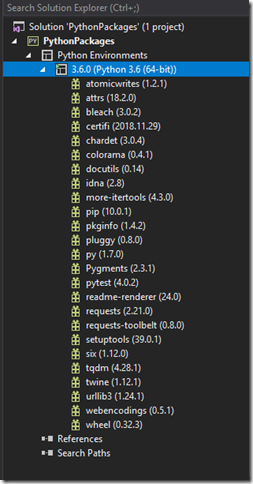
The virtual environment has the packages it needs, and looks like this:
Coding the Python packages
Packages in Python are any set of folders, and subfolders, that have an __init__.py file in it (each folder or subfolder needs to have an __init__.py file, even an empty one).
For example: Folder Pack1, can have an empty __init__.py file. It can also have a subfolder Sub1, with its own __init__.py file. We can then call functionality in Pack1 package and/or in Pack1.Sub1 package. Similarly, Pack1.Sub1 can also have a subfolder called SubSub1 with another __init__.py file and become its own sub-package.
As you can see the simplicity and flexibility of the whole process is phenomenal!
So, let’s go ahead and create a new package.
In solution explorer, right-click in the PythonPackage app; select Add; select New Item; and in the selection of items chose Python Package.
Chose a meaningful, but short (best a one-word), name for the top package. In my case I have selected: mdw (short for modern datawarehouse; as in the future I will add functionality used in the context of a modern datawarehouse application).
As you can see, the python package is just a folder with a __init__.py file in it. Select the mdw package; right click; select Add; select New Item and add a new Python package. Chose a name (no spaces) and short (in my case: databricks, as I intend to place some databricks related functionality in it).
Now you have a subpackage. Its functionality can be retrieved as mdw.databricks.<function>.
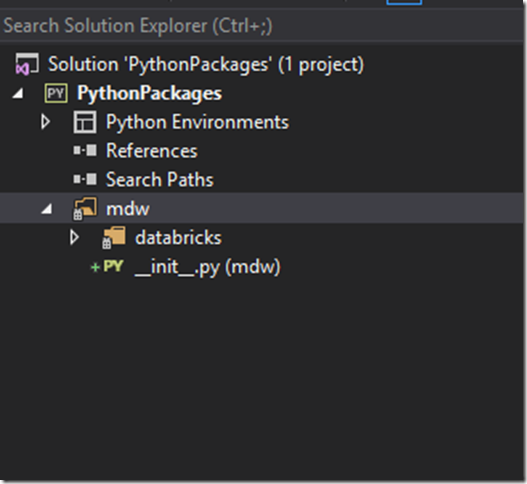
The app should now look like this:
Now let’s add some meaningful code.
You can write you functions directly in the __init__.py file. However, I prefer to write them in separate files and group them by functionality. At this time, I will add some databricks functionality that will help me with its configuration.
Go ahead and create a new .py file under the databricks folder and call it databricks_config.py.
In the __init__.py add the following line of code: from .databricks_config import *
In the databricks_config.py file add the following:
#a very useless function
def hi():
return “Hello World!”
We have now, a package; a subpackage; and a useless function that doesn’t do anything useful except return the string “Hello world!”
Testing the Python packages
Before we start compiling this package and deploy it as a package, we should write some unit tests. This way we will now that the functions we write are working. Note that Python is an interpreted language, if we make any errors, we will only catch them when we use it. You should write tests for every function you write and run the tests before any new version of your package. It is the best way to make sure you are not packaging code that doesn’t work.
At the package level (mdw), add a new folder called tests. In that folder add an empty __init__.py file.
In the tests folder, add a python file called, test_ databricks_config.py. Note: it is very important to prefix all your test files with “test_”, it will be used by the CI framework to identify the unit test files it needs to run.
Inside the test_ databricks_config.py file add the following:
import pytest
import mdw.databricks as db
def test_hi():
s = db.hi()
assert isinstance(s, str)
This section of code does very little in terms of testing. It adds a reference to the pytest library that handles unit testing framework; it imports the subpackage, with the functionality we want; it calls the function and it inspects that the return value is o the type we want. For now, that is all we need.
Now let’s run the tests. Switch to Python Environment tab (next to Solution Explorer), and click in Open in Powershell.
In the powershell window type: python -m pytest ..\..\apps\py-packages\mdw\tests. If you follow the file structure as described in this article this command will find the tests folder where the tests are for the mdw package and will run them all.
In our case, there is only 1 test, and that runs successfully. Add tests as you add functionality to the package.
Getting the Python package ready to be deployed
There are a few additional files we will need to add. At the root (application level) add the following files:
- LICENSE.txt – This is a text file with the language about the terms of usage and type of license you want to provide. For public packages this is important. In our case we will host this package in a private repo, so this may not be necessary. But in case the package makes to the public, you want to place here language stating that it is prohibited to use this package without permission.
- README.md – This is a markup file that will have the long description of the package; its functionality and how it is used. It will be bundled with the package.
- MANIFEST.in – This is a file used by the packager to include or exclude files. Now create the file, and add the following to it:
include README.md LICENSE.txt
- setup.cfg – Another file used by the packager. Create the file and add the following as text:
[metadata]
license_files = LICENSE.txt

[bdist_wheel]
universal=1
- .pypirc – This is an important file. This is a common file in Linux, but in Windows you cannot create (easily) a file with a starting dot. Follow instructions here to make it happen. Leave this file empty for now. We will get back at it.
- requirements.txt – In this file we will add all the packages that needs to be installed prior to our package, or that our package is dependent on. Add the following:
pip==18.1
pytest==4.0.2
wheel==0.32.3
twine==1.12.1
setuptools==40.6.3
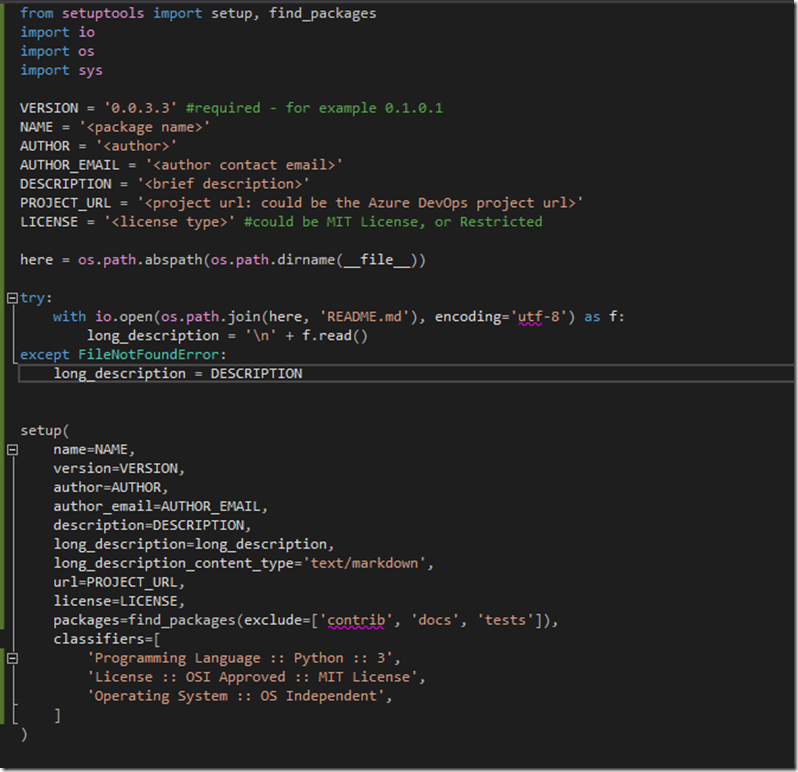
- setup.py – This is the file where the setup for the package creation goes here. A screenshot of the file is below. Copy and paste the text from the, Github link shared with this post. Obviously, replace the placeholder text on top of the file with your data.
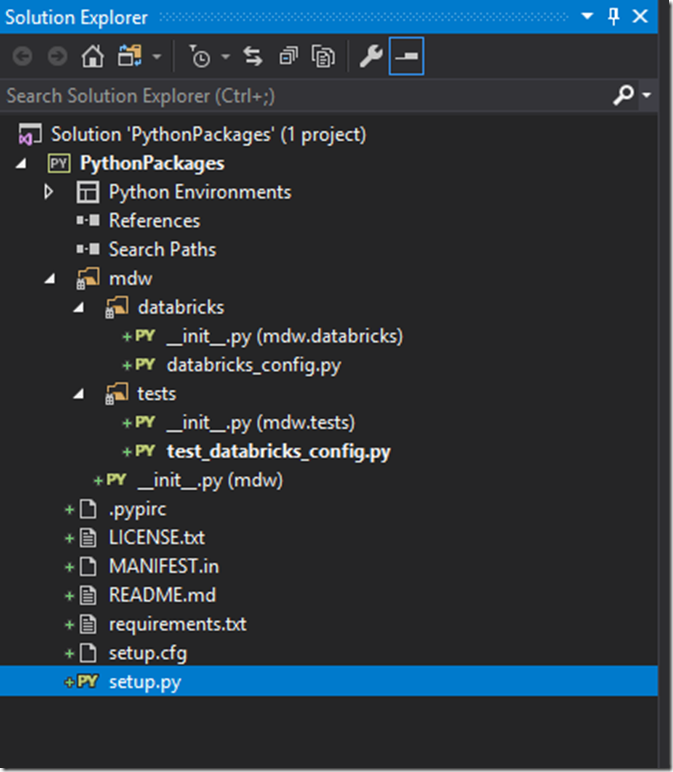
The final file structure of the project looks now like this:
Let’s head now to Azure DevOps and create the Build& Release pipeline for this package, as well as the Artifacts feed where we will serve this package from.
Finalizing Azure DevOps pipeline and feed
Let’s start with the build.
Go to Azure DevOps, where we created our git repo for this package, and then Pipelines -> Builds -> New -> New build pipeline.
Select the code repo of the package as source and click Continue.
Search into the templates for Python Package and click Apply. There will be quite some settings to go through.
In the Triggers tab, make sure the Enable Continuous Integration is checked.
In the Variables section make sure python.version includes 3.6. You may want to remove any version this package is not compatible with or is not tested against. Let’s keep only 3.6, 3.7 for now.
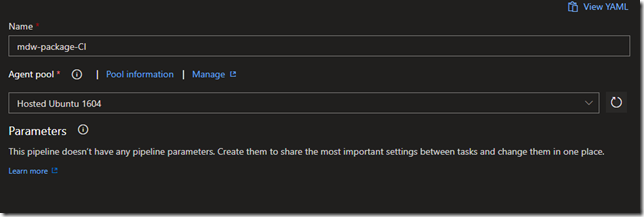
Back in the Tasks page, chose a name for the build (avoid spaces in the name; they are always trouble), and in Agent Pool, choose Hosted Ubuntu 1604.
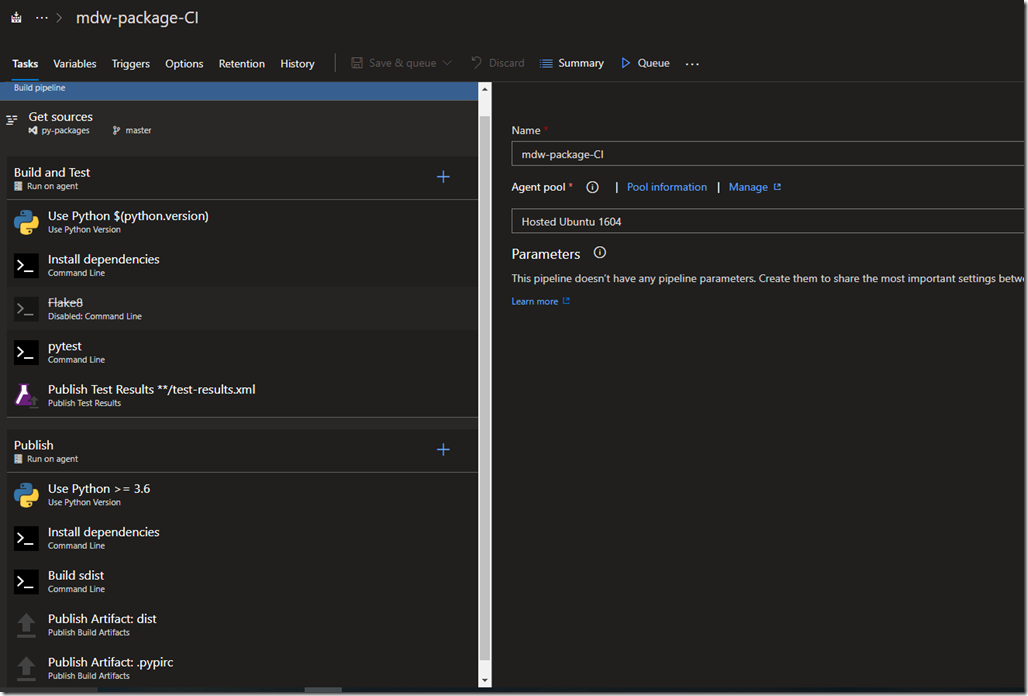
In the Build & Test section:
- Use Python – Keep the task as is and accepts all defaults.
- Install dependencies – Make sure the following is in the Scripts window: python -m pip install –upgrade pip && pip install -r requirements.txt.
- Flake – Is disabled. I don’t use it here. But is a personal choice. Turn it on if you prefer.
- pytest: Makesuer this is in the scripts window: pip install pytest && pytest tests –doctest-modules –junitxml=junit/test-results.xml.
- Publish Test Results – Leave as is and accepts all defaults.
In the Publish section:
- Use Python – Keep the task as is and accepts all defaults.
- Install dependencies: You need to add this task here. It is the same as the task in the Build & Test section.
- Build sdist – Make sure the Script line looks like: python setup.py bdist_wheel.
- Publish Artifact: dist – This publishes all the artifacts that will need to be used by the Release. Accept all defaults.
- Publish Artifacts: pypirc – This is important. In addition to all the files, the Release pipeline needs the .pypirc file to probably publish the package. Right now, this file is empty, but we will add to it very soon. We will just add this file to the rest of the distribution. In the Path to publish add: .pypirc. Leave Artifacts name as dist.
As a last step, go to the .gitignore file and add the following:
.vs/
*.user
For some reason the .gitignore that gets generated by Azure DevOps does not add these lines, which generate some unnecessary files.
At this time, make the first check in of the code, and see the Build automatically start and go through all the steps. Troubleshoot any of the steps that may fail. If it succeeds, you can check the Tests tab to see the published version of all your tests results and click in the Artifacts button for the build to see what has the build produced and published. You will see the .pypirc file and another file with the extension *.whl. This is our package.
The build definition looks like this:
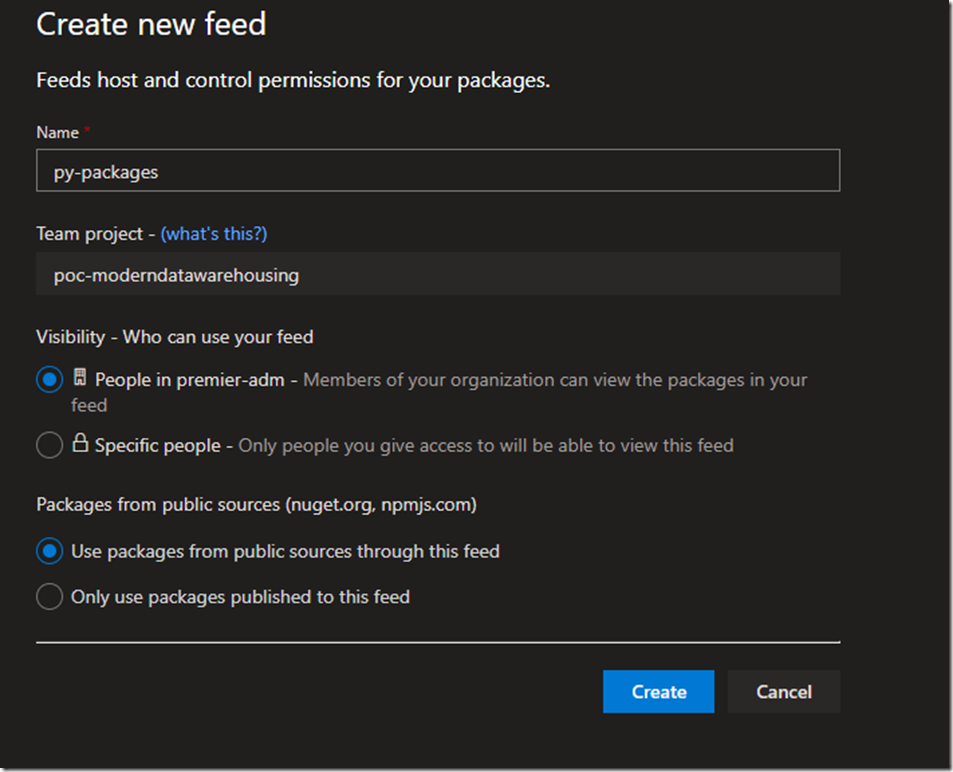
Now let’s skip a step and go and create the feed we will be publishing our packages from. It is a straight forward process. Go to the Artifacts section of the project; click New feed; chose a worthy name and click Create. Here is how the screen should look:
In the following screen click in the Connect to feed button. And make the Python choice. In the 2nd text section Upload packages with twine, click in the Generate Python credentials. Copy the text that is generated, and go ahead and add it to the .pypirc file in your local repo. Don’t check in the latest changes just yet.
Let’s go to the Pipelines -> Releases section and create a new Release definition. When the Templates list appears, chose Start with an empty job. There is no template for what we will do. But is a rather simple task!
Follow these steps:
- Add an artifact: Click that and select the successful build we just created.
- Continuous deployment trigger: Click and Enable the continuous deployment.
- Stage name: Add a meaningful name to this stage.
In the Variables tab, go ahead and add a variable python.version and set it at: 3.6.5
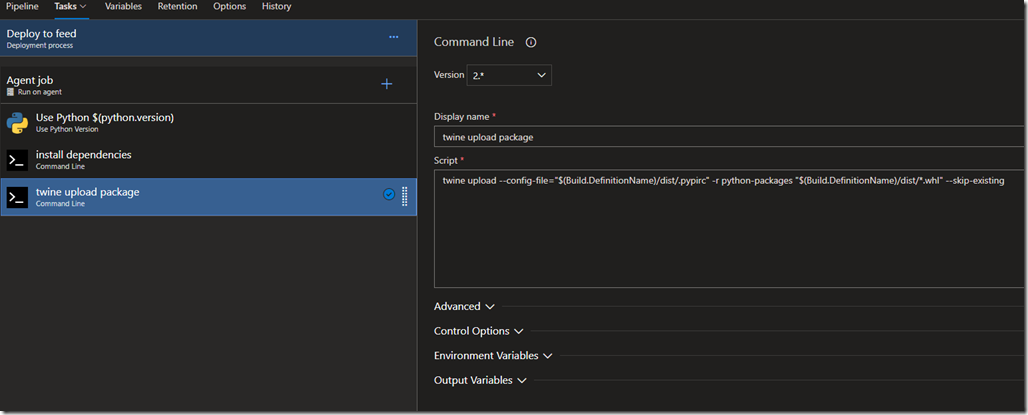
And let’s go to the Task tab and add some tasks:
- Agent job: Select Hosted Ubuntu 1604
- Python Version: Add a Use Python Version task. In Version spec, add $(python.version)
- Command line: Add a command line task. In Display name add: install dependencies. In Scripts window add: python -m pip install –upgrade pip && pip install twine.
- Command line. Add a command line task. In Display name add: twine upload package. In Scripts window add: twine upload –config-file=”$(Build.DefinitionName)/dist/.pypirc” -r python-packages “$(Build.DefinitionName)/dist/*.whl” –skip-existing.
The package definition looks like this:
This is the end of the process. What is left is to upgrade the version, to make it one increment higher (will need to do this every time you want to publish a new package). The .pypirc file has the address to our feed to where to send the package.
Check in the updated version and .pypirc and sync the repo with Azure DevOps. Watch the build compete and the release kick in and publish our package to the feed. Troubleshoot any issues an misconfiguration.
You have now a Python package you can distribute to anyone within your organization.
Final thoughts
What I wanted to accomplish here was simply to create a redistributable Python package. Also show some of the practices on how to work with Python in a Windows environment.
But I could not stop there.
I went ahead and built a complete CI/CD pipeline for the package, showing how easy it is and how well Python projects integrate with Azure DevOps.
Last, with Artifacts in Azure DevOps, you have a publishing hub for all such packages, being nuget, Python, Maven, npm, Gradle, or universal.
I hope you find this helpful. You can find the project source here.
Enjoy!


 Light
Light Dark
Dark
0 comments