
HoloLens Animations
This post is provided by App Dev Manager, Robert Schumann who explores the process of creating and animating avatars with HoloLens.
HoloLens Ambitious Beginnings
My first application on HoloLens involved animating a Marine Corps squad to do PT. Using voice commands, avatars would do sit-ups, push-ups, burpees, jumping jacks, etc. That was a year ago and a brutally naïve, overly ambitious learning curve to overcome. Since then HoloLens has its first “birthday”, seen huge interest and growth, and countless tutorials created. But few tutorials exist that provide straight-forward guidance about building animated apps for HoloLens.
This blog outlines steps I took to create, animate, and incorporate avatars into HoloLens. It involves the use of free, open source tools such as Adobe Fuse, Mixamo, Unity Editor, and Visual Studio. If you follow along and reach the end of this blog you should have a working HoloLens application of an avatar doing animation controlled by voice commands.
Here we go…
Setup
My setup is based on a Windows 10 Creators Update PC, so pictures and navigation may vary if you’re using a different platform and applications. Make sure your hardware supports the following soft resources needed for this blog;
- Adobe Fuse (Beta)
- Unity Editor 5.6
- Visual Studio Community 2017
- HoloToolkit-Unity from Github
You may also need online accounts from the following vendors;
- Adobe Creative Cloud (https://accounts.adobe.com)
- Unity (https://id.unity.com)
- Microsoft (https://signup.live.com)
If not already proceed to sign-up, download, install, and setup above resources. Some setup notes are provided below.
Additionally, the following links provide overviews of important concepts for completing this blog. Of note is how to correct Mixamo character eyelashes when importing into Unity.
- https://developer.microsoft.com/en-us/windows/mixed-reality/academy
- https://www.youtube.com/watch?v=gpvNBiBv_sI
- https://www.youtube.com/watch?v=4BX0oeCKf0w
- (eyelash fix) https://www.youtube.com/watch?v=YHlWcmmDNVg
- (optional, webinar, 55 min.) https://www.youtube.com/watch?v=wp9FB6NQu1U
Unity Editor
 When installing Unity Editor, there’s an option to also download and install Visual Studio Community 2017 (VSC2017). If you don’t already have VSC2017 go ahead and check that box. Otherwise, default settings will suffice.
Spin up
If you’re new to any of the tools used in this blog take a few moments to at least get a familiar grasp of navigating around and identifying key functional aspects.
Adobe Fuse (Beta)
Help: https://helpx.adobe.com/beta/fuse/topics.html
 Start Creative Cloud (CC) making sure you log on to your Adobe account. At CC console, select the Apps tab. Make sure your Fuse installation is up-to-date.
Once logged on and up-to-date, click the Open button on the CC console. When Fuse starts, you’ll see a dark canvas center and body parts at right. Pretty weird uh? Ok, so go ahead and drag-n-drop body parts to center canvas; choose a head, torso, leg, and arm.
![]()
Click the Customize link located above the 3D model. In the right window pane, feel free to randomize attributes of each body section, or modify the attributes individually.
 Next click the Clothing link located above the 3D model, next to Customize. Again, in the right window pane, chose clothing for each body section of the 3D model.
Next click the Texture link located above the 3D model, next to Clothing. Click on the 3D model skin anywhere. Now in the right window pane options appear to change specific attributes of the 3D model. Things like eye and hair color, skin tone, smoothness and age, and teeth condition and coloring, etc. To change specific attributes about other aspects of the model like clothing color, make sure you’re in Texture mode and click on that part of the model you’d like to modify, options appear in right pane. Throughout all your changes for now leave model resolutions at default values.
If you’re wondering how to change the model pose from being something other than a T-pose don’t worry about that. Just use Fuse to model your avatar for now. We’ll use mixamo.com for rigging and animating the model next.
In Fuse save your work but don’t close anything, leave Fuse running and model ready.
BTW – if you’ve ever wanted an 3D avatar of yourself check-out the following link: http://blog.mixamo.com/how-to-scan-yourself-into-a-game-ready-3d-model-using-kinect-and-fuse/
Mixamo
Help: https://community.mixamo.com/hc/en-us
Go to Mixamo.com and sign in with your Adobe account. Now go back to Fuse and located at the top right corner of the screen you should see the Send to Mixamo button. Click it. Give your model a name. Click Save. Fuse will now send your model over to Mixamo as an asset. Here’s where Fuse and Mixamo start to earn their keep.
 A new browser session should begin with your model loaded and ready for rigging. Rigging basically gives your model a skeleton by which movement can be applied, thus enabling animation. Fuse and Mixamo greatly simplify rigging, which can be very time consuming. On the Auto-Rigger screen, enable Facial Blendshapes, choose 65 joints for Skeleton LOD, then click Finish. (If you’re wondering why your model appears to have black-eyes this is “normal” and we’ll correct this later.)
A new window should load with your model in a T-pose. Again, hold off doing any animations. Click the Queue Download button. Then choose FBX for Unity (.Fbx) format and Original Pose (.Fbx) for Pose. Again, click Queue Download button. Once ready go ahead and download your new character. Ok. We just saved off our new character without any animations baked in, per se. Now let’s find animations we want to use.
(BEGIN REPEATABLE STEP)
Click Store link at top, then Animations link under the Search bar. Go ahead and peruse through the animations, but for this blog I’m going to use Standing Idle, Samba, Macarena, YMCA, and Salsa animations. Click an animation you’re interested in using. The screen should change and your character should display doing the animation selected. Click the “Add to Pack” button right of your character. Multiple animations can be added to an animation, but for demo purposes we’re going to add and save each animation individually. Since we’re going to use the same character it won’t necessarily matter that we’ll later apply different animations. If you were to use a different model/character, then you’d want to apply the animation to that character instead of trying to use the same animation across different models/characters. This is because animations as applied through Mixamo are based on the rigging of the character used. So if you have, for example, a one-arm Zombie doing the YMCA dance rigged to a two-arm character, the animation may not replay correctly.
Once an animation has been added to the pack, click the View/Download button. Click Queue Download button. Choose FBX for Unity (.Fbx), for Pose or Skin choose Without, Frames per second change to 60. Click Queue Download button and when ready download file. Repeat for each animation.
(END REPEATABLE STEP)
Alrighty; that should be it for Fuse and Mixamo. Before we switch gears to Unity, let’s do a quick assessment to make sure we’re ready to move ahead. By now you should have the Unity Editor installed. You should have the HoloToolkit for Unity downloaded. You should have an Fuse export of your character textures. And finally you should have at least 2 files downloaded from Mixamo– character.fbx file, and animation.fbx file(s). Additionally, if you haven’t done so already, you’ll need to make a Unity package of the HoloToolkit-Unity downloaded from Github. For instructions how see https://github.com/Microsoft/HoloToolkit-Unity/blob/master/GettingStarted.md.
Unity
![clip_image002[6]](https://devblogs.microsoft.com/wp-content/uploads/sites/31/2019/04/clip_image00262.png "clip_image002[6]") Help: https://docs.unity3d.com/Manual/index.html
Help: https://docs.unity3d.com/Manual/index.html
First time starting Unity you may get a prompt for firewall settings. Check all boxes to avoid complications with this blog.
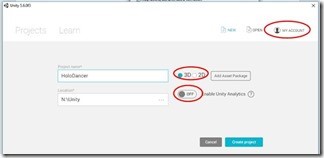
At the start splash feel free to log onto your Unity account by clicking “My Account”, provide a project name, turn off Unity Analytics, and make sure 3D is checked.
 |
When the new project begins delete the default camera from the Hierarchy tab. Import the HoloToolkit-Unity custom package, either choose defaults or at least the standard assets without any tests or examples. Now go ahead and replace the default camera with the HoloLensCamera prefab.
Once the toolkit is imported you’ll notice a new menu option called HoloToolkit. Under it are three (3) configuration options. From top-to-bottom choose and apply each one. For Capability Settings choose Microphone, Spatial Perception, and Internet Client.
Within the Project tab create four (4) new folders – _Animations, _Models, _Prefabs, and _Scripts.
 Let’s add our Mixamo character by dragging and dropping the downloaded character .fbx file to the _Models folder. You should get prompted to fix textures, choose Fix Now. Also drag-n-drop the Fuse textures you previously exported into the _Models folder. You should see one Material object named something like *_Packed0_Diffuse. Select that one Material, in the Inspector window change the Rendering Mode to Opaque and scale down Smoothness completely. In the same folder (still _Models) as this one Material create a new Material, name it Hair. Make sure this new Hair Material is selected in the Project tab. Then, using the exported Fuse textures drag-n-drop the BaseColor texture next to Albedo, MetallicAndSmoothness texture next to Metallic, and Normal texture next to Normal Map. Change the Rendering Mode to Fade, and ensure Smoothness is scaled completely down.
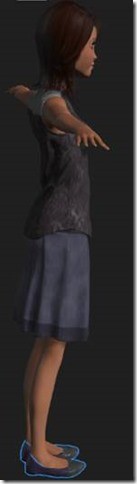
We now need to tweak the model as exported from Mixamo. Within the _Models folder should be a prefab of your model, as represented by the blue icon cube. Select it, and in the Inspector tab select the Rig button. Change Animation Type to Humanoid. Ensure Avatar Definition is Create From This Model. Click the Configure button, saving first if prompted. What you should see now is the skin of your model with bones inside of it. If so, cool, we’re good so far. Under the Inspector tab, the Mapping button should be selected, and just above the Transform properties section, right-side should be a Done button. Click Done. Now drag-n-drop your model prefab onto the Hierarchy window, doesn’t matter where. Then select it from the Hierarchy and expand it exposing all child objects. Click each child object and find the eyelashes and hair objects. As you do change the default Material to the new Hair Material you previously created. Simply select the object then in the Inspector window drag-n-drop the new Hair Material over the existing one to swap out. If all is correct your model should look normal at this point. Once correct, drag-n-drop the root object from the Hierarchy window onto the Project _Prefabs folder in the Project Window. You’ve now just created a prefab and can delete it from the Hierarchy window.
![]() Let’s add the Mixamo animations by dragging and dropping each downloaded animation .fbx file to the _Animations folder. Again, you should get prompted to fix textures, choose Fix Now. As you do each one, before starting the next, select the animation prefab and in the Inspector window choose the Rig button. Change the Animation type to Humanoid, but for Avatar Definition this time choose Copy from Other Avatar. Underneath, for Source click the round icon to select an avatar. A new window should pop with just one avatar to choose which should be from the character model you previously imported. Select that avatar, close the select avatar window, click the Apply button in the Inspector. While still in the Inspector window click the Animations button next to the Rig button. Scroll down; check Loop Time, check Bake Into Pose for Root Transform Position (Y), and make sure the Based Upon (at Start) is set to Original. Click Apply, bottom right. Repeat these steps for each animation .fbx file you import.
Let’s add the Mixamo animations by dragging and dropping each downloaded animation .fbx file to the _Animations folder. Again, you should get prompted to fix textures, choose Fix Now. As you do each one, before starting the next, select the animation prefab and in the Inspector window choose the Rig button. Change the Animation type to Humanoid, but for Avatar Definition this time choose Copy from Other Avatar. Underneath, for Source click the round icon to select an avatar. A new window should pop with just one avatar to choose which should be from the character model you previously imported. Select that avatar, close the select avatar window, click the Apply button in the Inspector. While still in the Inspector window click the Animations button next to the Rig button. Scroll down; check Loop Time, check Bake Into Pose for Root Transform Position (Y), and make sure the Based Upon (at Start) is set to Original. Click Apply, bottom right. Repeat these steps for each animation .fbx file you import.
 Once your model and animations have been imported and staged, we now need to create an Animator Controller. Select the _Animations folder in the Project window and create a new Animation Controller, call it Dancing. If the Unity Editor is not displaying the Animator window, go to the Window menu and choose Animations. Once visible, dock it where ever you like. Then drag the newly created Dancing animation controller onto the Animator window. Now drag-n-drop each animation prefab from the _Animations folder onto the Animator window. As you do you should see block representing each animation with a name on it. Pay attention to the name and text case. Once you have all animations on the controller, right-click the green Entry block and choose Make Transition. You’ll now notice your cursor has an arrow string attached to it. Place your cursor over the standing idle animation and click to lock. You should now see a line from the Entry block connected to the idle animation block.
We’re ¾ done with the hard parts taken care of. And are at the point of assembling everything together.
 Go back to the _Prefabs folder and select your character prefab. In the Inspector window, for the Animator properties drag-n-drop the Dancing animation controller you just created from the _Animations folder to the Animator Controller property. For the Animator Avatar, again click the round select icon next to the property field and in the pop-up choose your character avatar. Make sure the Apply Root Motion checkbox is checked.
In the Hierarchy window add two HoloToolkit prefabs – BasicCursor and InputManager. While still in the Hierarchy window select the HoloLensCamera and add 3 components to this object – Spatial Mapping Collider, Spatial Mapping Renderer, and New C Sharp script. Name the new C# script Manager. By default, the new script is created in the root Assets folder. Drag and drop the Manager script into the _Scripts folder, then double-click it to open in code editor. Replace the existing code with sample code provided below. Once saved go ahead and Build & Run the application from Unity Editor. When Unity finishes building the application and creating a Visual Studio solution deploy the application to your HoloLens device. When running the application, you should see the usual Made with Unity logo then a brief 3-5 second period of nothingness. At this point the spatial mapping functions of the application are beginning to scan the room. As orientation is established you should start to see wire mesh of room surfaces. At this point you should also see a gaze cursor. Find an open space on the floor and air tap. The avatar character should now be standing idle in that spot on the floor and facing you. You can say four voice commands to make the avatar animate. Say “Macarena Dance”, “Samba Dance”, “Salsa Dance”, or “YMCA Dance” to make the avatar dance. Say “Idle Dance” to make the avatar stand idle again.
Enjoy!
using System;

using System.Collections;

using System.Collections.Generic;

using UnityEngine;

using UnityEngine.UI;

using System.Linq;

using UnityEngine.VR.WSA.Input;

using UnityEngine.Windows.Speech;

using HoloToolkit.Unity;

using HoloToolkit.Unity.InputModule;

public class Manager : MonoBehaviour {

    public GameObject DancerPrefab;
     private Animator anim;
     private Boolean dancerExist = false;
     private GestureRecognizer gestureRecognizer;
     private KeywordRecognizer keywordRecognizer;

    delegate void KeywordAction(PhraseRecognizedEventArgs args);
     private Dictionary<string, KeywordAction> keywordCollection;

    private void Start()
     {
         gestureRecognizer = new GestureRecognizer();
         gestureRecognizer.SetRecognizableGestures(GestureSettings.Tap);
         gestureRecognizer.TappedEvent += Recognizer_TappedEvent;
         gestureRecognizer.StartCapturingGestures();

        keywordCollection = new Dictionary<string, KeywordAction>();

        keywordCollection.Add("Samba Dance", SambaDanceCommand);
         keywordCollection.Add("Salsa Dance", SalsaDanceCommand);
         keywordCollection.Add("YMCA Dance", YMCADanceCommand);
         keywordCollection.Add("Macarena Dance", MacarenaDanceCommand);
         keywordCollection.Add("Idle Dance", IdleDanceCommand);

        keywordRecognizer = new KeywordRecognizer(keywordCollection.Keys.ToArray());
         keywordRecognizer.OnPhraseRecognized += KeywordRecognizer_OnPhraseRecognized;
         keywordRecognizer.Start();
     }

    private void KeywordRecognizer_OnPhraseRecognized(PhraseRecognizedEventArgs args)
     {
         KeywordAction keywordAction;

        if (keywordCollection.TryGetValue(args.text, out keywordAction))
         {
             keywordAction.Invoke(args);
         }
     }

    private void Recognizer_TappedEvent(InteractionSourceKind source, int tapCount, Ray headRay)
     {
         RaycastHit hitInfo;

        if (!dancerExist && Physics.Raycast(Camera.main.transform.position, Camera.main.transform.forward, out hitInfo, Mathf.Infinity))
         {
             GameObject dancer = Instantiate(DancerPrefab, hitInfo.point, Quaternion.Euler(0, transform.eulerAngles.y + 180f, 0));
             anim = dancer.GetComponent<Animator>();
             dancerExist = true;

            Camera.main.gameObject.GetComponent<UnityEngine.VR.WSA.SpatialMappingRenderer>().enabled = false;
         }
     }

    private void MacarenaDanceCommand(PhraseRecognizedEventArgs args)
     {
         anim.Play("macarena_dance", -1, 0f);
     }

    private void YMCADanceCommand(PhraseRecognizedEventArgs args)
     {
         anim.Play("ymca_dance", -1, 0f);
     }

    private void SalsaDanceCommand(PhraseRecognizedEventArgs args)
     {
         anim.Play("salsa_dance", -1, 0f);
     }

    private void SambaDanceCommand(PhraseRecognizedEventArgs args)
     {
         anim.Play("samba_dance", -1, 0f);
     }

    private void IdleDanceCommand(PhraseRecognizedEventArgs args)
     {
         anim.Play("standing_idle", -1, 0f);
     }

    private void OnDestroy()
     {
         gestureRecognizer.TappedEvent -= Recognizer_TappedEvent;
         keywordRecognizer.OnPhraseRecognized -= KeywordRecognizer_OnPhraseRecognized;
     }

}
Premier Support for Developers provides strategic technology guidance, critical support coverage, and a range of essential services to help teams optimize development lifecycles and improve software quality. Contact your Application Development Manager (ADM) or email us to learn more about what we can do for you.
 Light
Light Dark
Dark
0 comments