DevOps for VMs with VSTS and Octopus Deploy
In this post, Premier Developer Consultant Jafar Jaffery shares insight into how to deploy web applications to virtual machines using Visual Studio Team Services and Octopus Deploy. You can use Octopus Deploy in conjunction with VSTS to deploy both on-premises or in the cloud in a repeatable and reliable way.
Problem Statement
The Development team just finished work on its new feature and now needs that feature deployed to the Testing environment so that the Product team can validate the changes. Enter the Operations team. They are going to remote into the individual web servers and download the package with the changes, extract it and copy it to the target folder. After that, they’ll make all of the IIS configuration changes on each individual box. But this raises a few concerns – how do other team members perform this deployment in a repeatable manner? And how can we make this manual and boring process less error-prone so that we don’t have to troubleshoot simple deployment mistakes? Additionally, do the developers have to wait for the Operations team to handle their deployments every time they have a change, or is there a fire and forget solution they can use to do this automatically whenever they are ready to push their changes? DevOps solves these problems for us by having teams work closer together and introducing these “auto-magic” mechanisms, which is what I’ll be covering that in this post.
Overview
In the world of DevOps, Visual Studio Team Services (VSTS) offers a very robust and versatile platform that will serve as a foundation for your application deployment and automation needs. It has the capability to do end-to-end pipeline deployments for both on-premises and Azure IaaS Cloud infrastructure. VSTS also has an extensive marketplace of 3rd party offerings to augment its capabilities.
In this post, I will walk you through an overview of how VSTS is used alongside Octopus Deploy to deploy .NET applications to a traditional VM server infrastructure, be it on-premises or in the cloud. This will give you repeatable and reliable deployments of your application every time, to every environment. As a note, this will be a basic setup consisting of a build (MVC web application), unit tests, automated deployment of code to a lower environment (“Testing” in our example), and promotion of that code to an upper environment (“Production” in our example). Database deployments will be covered in a subsequent post.
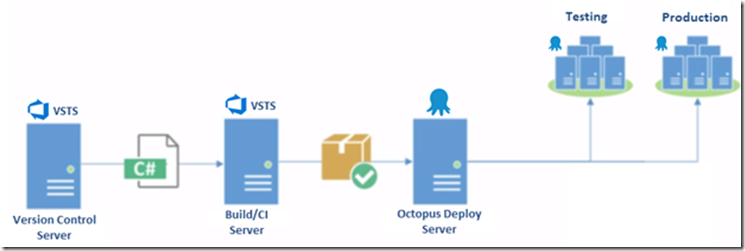
VSTS will be handling the build/CI automation part of the process and will work with Octopus Deploy to handle deployment orchestration. The Octopus ecosystem is comprised of a central deployment server, along with “Tentacle” agents that run on any target VMs where deployment will take place. The diagram below illustrates this flow:
VSTS
Setting up the VSTS/Octopus Connection
Inside VSTS, install the Octopus extension from the marketplace, and then add a new Service Endpoint for Octopus Deploy. You will need an Octopus API key for the endpoint, which can be generated from the Octopus Deploy web portal. Detailed instructions for these steps can be found here.
Setting up the Build
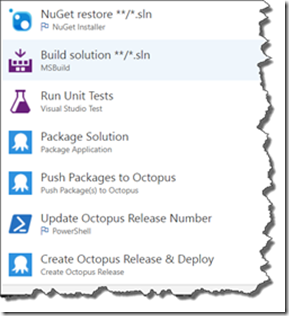
The VSTS build will consist of the following tasks:
- Restore NuGet Packages
- Build the solution
- Run Unit Test
- Package the solution into a NuGet package
- Upload the package to the Octopus Deploy server. Note that you can alternatively upload to a NuGet repository.
- Create the release number string for the Octopus release. We’ll go with a combination of a date/time stamp and build ID – [yyyyMMdd].[BuildId]
- Create the Octopus release and deploy to the lower environment (“Testing” in this example).
For Octopus specific steps, detailed instructions can be found here.
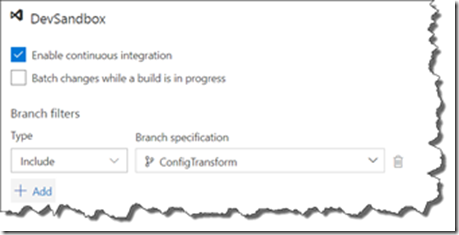
The build will be triggered using Continuous Integration within VSTS whenever any code changes are committed to the repository. This is significant as this will automatically do the deployment to the lower environment whenever any code is changed and checked in.
Octopus Deploy
Key Concepts
Before we setup the project that will deploy our application, let’s explore some of the key concepts within Octopus:
- Project-specific
- Project – The set of steps that define how the application is to be deployed. E.g., Deploy Package -> Run Smoke Test -> Notify Users
- Release – This ties a project to a package in order for it to be deployed.
- Deployment – The actual deployment of a created release.
- Global
- Environment – Where you deploy. E.g., Testing / Acceptance / Production.
- Role – The types of targets you deploy to, such as Web / DB / etc.
- Tenant – A segment within your environment that can be used for logically sub-dividing your environments into swim lanes. E.g., you might have tenants for different feature releases (parallel development channels), or tenants for different customers.
- Lifecycle – the deployment path through the environments.
- Package – This is the artifacts (collection of DLL’s, assets, scripts, etc) that will be deployed & promoted through the environments. In this post, we’ll host these on the Octopus Deploy server, but these can be kept on an external repository as well.
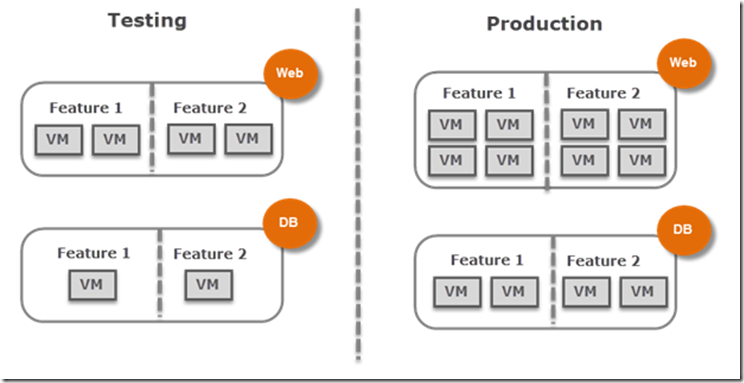
Scoping to Environment/Role/Tenant, a simple infrastructure might be configured as shown in the diagram below. Note that for our scenario we’ll be deploying to just the Web role, but it’s worth noting that this solution scales well as we add more VMs to our infrastructure.
Setting up the Octopus Project
- Create a new Octopus project. More detailed information on Projects can be found here.
- Within the Process section, add a new step using the “Deploy to IIS” step template. For this step, configure things like:
- The role (“Web”) and tenant (“Feature 1”) that this step applies to.
- The package name from where the content will be deployed.
- IIS specific settings (website/virtual directory, App Pool, bindings, authentication, etc.)
- Config transformation steps to be taken, be it variable substitution or traditional XML transformations.
- More detailed information on Steps can be found here.
- Within the Channels section, create a new channel for each parallel feature being worked on (Feature 1 & Feature 2 in our scenario). The Channel is the project’s association to the global lifecycles. More detailed information on Channels can be found here.
Once this is all in place, the VSTS build mentioned above will automatically deploy code changes to the Testing environment by first creating the Release for the given Project / Environment / Tenant / Package Version, and in turn deploying that Release. After the release is successfully deployed to the Testing environment, it can then be promoted (i.e., same package version) to the next environment, which in our scenario is Production. Because every environment is deployed to in the same manner, this solution scales well across all environment and to all underlying VMs, regardless of how many as long as they are tagged appropriately with Environment / Role / Tenant.


 Light
Light Dark
Dark
0 comments