
Converting PCL (Portable Class Libraries) to .NET Standard Class Libraries – Part 2
In Part 2 of this 3 part series, App Dev Manager, Herald Gjura covers upgrading the continuous delivery and Build/Release pipeline in VSTS.
-
Part 1: Migrating the libraries and project files
-
Part 2: Upgrading the Continuous Delivery and Build/Release pipeline in VSTS
-
Part 3: Integrating .NET Standard Class Libraries into existing projects (coming soon)
In order for the new .NET Standard Packages to build and release, we will need modify the build definitions.
Here is a step by step guide on all the changes using an existing build definition, and highlighting all the important changes along the way.
VSTS Build Definition
Setting the build variables
The only custom build variables I use for these packages is the $(ProjectName) variable, set at the name of the project of the package. In the case of the package I am using for this example it looks like this:

Setting the build tasks
Process tab: When creating the new build definition, or if you are modifying an existing one, make sure you select a hosted agent of type Hosted VS2017. This is found in the Process tab at the top of the tasks list. This is very important as this will not build if it is not in a VS 2017 environment.
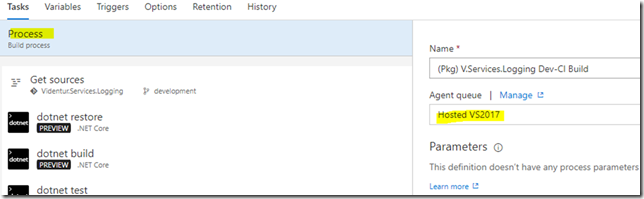
Get Sources task: This task remains unchanged. You can chose the default, or you can configure it to get the source code from wherever it is hosted. In my case this is form a Git repo in VSTS.

dotnet restore task: The old NuGet restore task it is not used in this scenario. The dotnet restore command is used instead. Configure it to pull the NuGet packages the solution needs in order to build successfully.
In my case the packages come from two sources: the main nuget.org package feed and a private VSTS package feed that I use to host all my packages.

dotnet build task: Here also the task to build a VS solution is replaced by the dotnet build task. Note the arguments: -c takes the build configuration we pass as a variable (in this case it is Debug), –no-restore means that we do not want to restore the packages again, as we did it in the step above, and –no-incremental means we are forcing the build to ignore any incremental builds.

dotnet test task: This task replaces the VSTest task that would compile a test project. It uses now the dotnet core to accomplish this.
The usage is rather simple: chose the command test and set the path to the project. In my case I use the $(ProjectName) custom variable. Since I have many of these packages to build, using a custom variable allows me to use the same tasks in a task group and reuse the task group across all the packages. For the sake of this exercise and in order to provide the inner details of each task I am not using the task group.
Also, to accomplish this successfully I make use of certain naming convention, as I mentioned in the Part 1 of this blog, that sees the test projects be named as <Project Name of the Package>.Tests.csproj and in the case of .NET Core tests as <Project Name of the Package>.Tests.Core.csproj.

Publish Test Results task: Unlike the previous VSTest task, the dotnet core test compiles and runs the test, but does nothing else. You will need to publish test results in order to be picked up by VSTS for reporting and analysis. You will do that with the Publish Test Results task. Configuration is as shown:

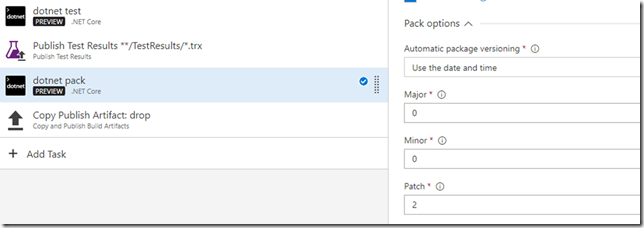
dotnet pack task: Now that we were able to build the projects and successfully run all the tests, we should package it into a NuGet package. The previous Nuget Packager task is of no use here. As of now it does not work with .NET Standard packages. We will use the dotnet core command line instead, and calling its pack command. There are 4 properties you will need to set carefully:
– Select pack in the Command field
– Chose the proper path to the csproj file. Note that the project file has now all the properties you would need, that were previously stored in .nuspec file. Our package does not have a nuspec file anymore.
– Chose a path were you want the package artifacts to be stored
– Check the Do not build checkbox. Since we have already build this project before and run its tests, we do not want to repeat that, but rather only output the package artifacts.

Package versioning (optional): As some of the screenshots do show this build definition it is for a Dev/Continuous Integration build. I have 4 types of build for each package: Dev/CI, Release/QA/UAT, Hotfix and Prod. As a Dev/CI build, this one runs very frequently. It does so every time a make any changes to the code.
The Dev/CI release pipeline is also set up a CI manner, so it will run and publish the package at the same time the build succeeds. At this frequency it is very difficult to manage the versioning of the package.
Because a package with the same version would fail when published into the feed, a mechanism for upgrading the version is needed. The dotnet pack task offers such mechanism. In the task you can set to override the version number in the .csproj file with an environment variable, a build number, or date/time. I have chosen to use date/time.
The settings for the automatic package versioning is in the Pack Options of the task.
As you can see I have chosen a predefined Major/Minor/Patch version, and during the build this task will add also another set of numbers depending on the date/time of the build. The result is a package stamped with a version as follows: <PackageName> 0.0.2-CI-2017731-23658, where the part -CI-2017731-23658 it has been added by the task.
This works very well for Dev/CI builds and scenarios, but it is not appropriate for UAT and Prod scenarios. In those situations you will need to set the PackageVersion and PackageReleaseNotes tags in the .csproj file and manage them appropriately.
Copy Publish Artifact task: This is the task that simply will copy all the outputted package artifacts in the artifacts staging directory ready for the release definition to pick them up for publication.

This completes all the needed tasks to build, test, package the NuGet artifacts and make them ready for the release. I will move now into completing the Release definition and the publication of the package into the private VSTS feed for my organization.
VSTS Release Pipeline Definition
The release pipeline definition for this package it is rather simple: it has only two tasks. Yet, it has some properties and details that I would like finalize properly.
Setting the release variables
In this release definition I do set one custom variable, and that is the physical path where the build artifacts are. It is as follows:

Setting the release tasks
Run on agent tab: For this one I take the default values.

.net core installer task. .NET Core 2.0 is not installed by default in the hosted agents. So you will need to install it manually before going any further. Eventually this task will become obsolete when the .NET Core 2.0 will be part of the agent. Make sure to choose to install the SDK including the runtime, and not only the runtime.

.net core push task. This task will push the newly created NuGet package into the private NuGet feed for the organization. Apart for the setting of the Path to NuGet Package via a variable, the rest of the settings are self-explanatory.

This completes the tasks for the release manager to publish the NuGet package into your organizations private feed. Next will look into how to use the .NETStandard packages into your applications.
Coming Soon – Part 3: Upgrading the Continuous Delivery and Build/Release pipeline in VSTS
Premier Support for Developers provides strategic technology guidance, critical support coverage, and a range of essential services to help teams optimize development lifecycles and improve software quality. Contact your Application Development Manager (ADM) or email us to learn more about what we can do for you.
 Light
Light Dark
Dark
0 comments