
Client Directed Authentication with Azure Mobile Apps
App Dev Manager Nicholas McCollum walks through creating an Azure Mobile App that uses client directed authentication via Azure AD.
Azure Mobile Apps are built on Azure App Services. Through the Azure portal you can configure your Azure Mobile App to provide sign in, push notifications, and data synchronization. When you configure sign in through the Azure portal for your Azure Mobile App by default you are leveraging the “server directed” or “server managed” authentication flow. While this approach will suffice for simple application scenarios “client directed” or “client managed” authentication is the preferred method for authenticating with an Azure Mobile App.
Using client directed authentication your mobile application independently contacts the identity provider and then includes the returned access token during login with your Azure Mobile App rather than relying on the Azure Mobile App service to handle the exchange with the identity provider. Client directed authentication is preferred to server directed authentication as the identity provider SDK provides a more native user experience, supports single sign-on, and refresh support.
In this article we will walk through using client directed authentication with Azure Active Directory to authenticate to an Azure Mobile App from a Xamarin.Forms mobile application.
Setting Up the Environment
Prior to writing our code we need to perform two actions in the Azure portal. First, we must create an Azure Mobile App and register that web application with Azure Active Directory. Second, we must register a native client application with Azure Active Directory and grant it access to call the Azure Mobile App. An example of each Azure Active Directory application registration is shown below.

While registering your applications also make sure to note the directory ID on the Properties blade of your Azure Active Directory. You will need this later.

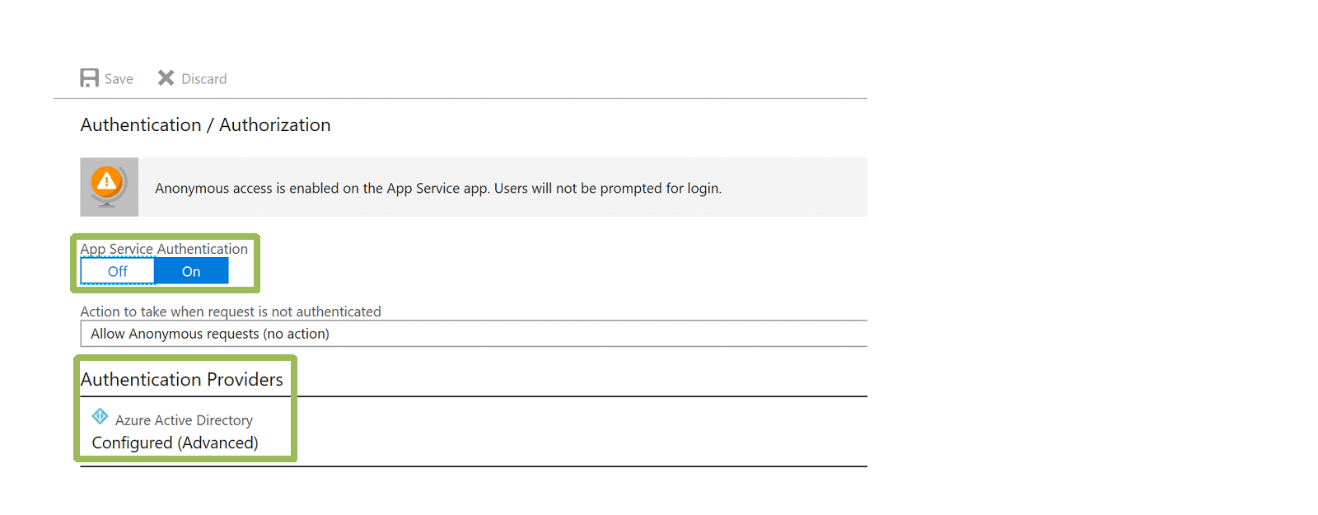
With our mobile app and native client registered in Azure Active Directory we need to enable authentication on our mobile app in the Azure portal. When configuring our Azure Mobile App we will enable App Service Authentication and then configure Azure Active Directory as an Authentication Provider. On the Active Directory Authentication blade we will select the Advanced option and enter the client ID of the web application registered earlier and the issuer URL. The issuer URL will be https://sts.windows.net/ followed by your Azure Active Directory ID. In the Allowed Token Audiences field we will enter the App ID URI of the web application registered earlier.

With our mobile app created, registered, and configured we are ready to begin work on our code.
The Visual Studio Solution
Our Visual Studio solution is made up of two projects. The first is an ASP.Net web application that leverages the Azure Mobile App project template. The second project is a Xamarin.Forms application that uses the Blank App project template with Shared Project as the Code Sharing Strategy.
Since the goal of this exercise is to authenticate with the Azure Mobile App using client-directed authentication we will only make a minor change to the ASP.Net application. Open the ValuesController.cs file in the Controllers folder and add an [Authorize] attribute to the class definition. This will ensure that only authenticated users can call the methods of the ValuesController class. Publish your application to the Azure Mobile App Service you created in your Azure subscription.
With work on the Azure Mobile App complete we can turn our attention to the Xamarin.Forms project. Prior to doing anything else open the NuGet package manager and update all of the packages used by the Xamarin.Forms project to their latest version. Once that is complete rebuild the solution and verify that it builds without errors. Open the NuGet package manager again and add a reference to Microsoft.Azure.Mobile.Client and Microsoft.IdentityModel.Clients.ActiveDirectory. Again rebuild the solution and verify that it builds without errors.
Open the MainPage.xaml file in the shared project and modify its contents as follows.
<?xml version="1.0" encoding="utf-8" ?>
<ContentPage xmlns="http://xamarin.com/schemas/2014/forms"
xmlns:x="http://schemas.microsoft.com/winfx/2009/xaml"
xmlns:local="clr-namespace:MobileAppClient"
x:Class="MobileAppClient.MainPage">
<StackLayout Orientation="Vertical">
<Button Text="Login" Clicked="OnLoginClicked"></Button>
<Label x:Name="lblHello"></Label>
<Label x:Name="lblMobileServiceStatus"></Label>
</StackLayout>
</ContentPage>
The Login button will be used to trigger our authentication with Azure Active Directory. The lblHello will display the user’s displayable ID when they authenticate successfully. The lblMobileServiceStatus will display the results of our calls to the Azure Mobile App.
Next we will create a simple class named ServiceManager in the shared project that provides a singleton instance of the Microsoft.WindowsAzure.MobileServices.MobileServiceClient class. The implementation of the ServiceManager class is shown below. Make sure to update the value of the _serviceUrl variable to contain the URL of your Azure Mobile App Service.
using Microsoft.WindowsAzure.MobileServices;
namespace MobileAppClient
{
public class ServiceManager
{
private readonly string _serviceUrl = @"https://your-mobile-app.azurewebsites.net";
private static ServiceManager _defaultInstance = new ServiceManager();
private MobileServiceClient _client;
private ServiceManager()
{
_client = new MobileServiceClient(_serviceUrl);
}
public static ServiceManager DefaultManager
{
get { return _defaultInstance; }
private set { _defaultInstance = value; }
}
public MobileServiceClient CurrentClient
{
get { return _client; }
}
}
}
With our ServiceManager created we can add implementation details to the MainPage.xaml.cs file. Open the MainPage.xaml.cs file in the shared project and make the following modifications.
1. Add private variables to store our Azure Active Directory settings and the default instance of our ServiceManager class.
private readonly string _authority = "https://login.microsoftonline.com";
private readonly string _tenant = "your-aad-tenant.onmicrosoft.com";
private readonly string _resourceID = "https://your-aad-tenant.onmicrosoft.com/mobiletest1";
private readonly string _clientID = "e1ab7561-e676-4ee0-bc30-5d3bc87c2fd9";
private readonly string _redirectUrl = "http://localhost";
private ServiceManager _manager = ServiceManager.DefaultManager;
2. Create a public property named PlatformParameters of type IPlatformParameters.
public IPlatformParameters PlatformParameters { get; set; }
3. Add code to the OnLoginClicked event handler to trigger authentication with Azure Active Directory.
JObject payload = null;
try
{
// Authenticate with Azure Active Directory and obtain an access token for the mobile app service
AuthenticationContext context = new AuthenticationContext(string.Format("{0}/{1}", _authority, _tenant));
AuthenticationResult result = await context.AcquireTokenAsync(_resourceID, _clientID, new Uri(_redirectUrl), PlatformParameters);
payload = new JObject();
payload["access_token"] = result.AccessToken;
lblHello.Text = string.Format("Hello {0}!", result.UserInfo.DisplayableId);
lblHello.TextColor = Color.Green;
}
catch (Exception)
{
lblHello.Text = "Login failed!";
lblHello.TextColor = Color.Red;
}
4. If authentication is successful, login to the Azure Mobile App using the access token returned by Azure Active Directory and call the default Get method on the ValuesController of the Azure Mobile App.
if (payload != null)
{
try
{
// Login to the Azure Mobile App Service
MobileServiceUser user = await _manager.CurrentClient.LoginAsync(MobileServiceAuthenticationProvider.WindowsAzureActiveDirectory, payload);
lblMobileServiceStatus.Text = "Connected to Azure Mobile App Service";
lblMobileServiceStatus.TextColor = Color.Green;
try
{
// Call the ValuesController
IEnumerable<string> values = await _manager.CurrentClient.InvokeApiAsync<IEnumerable<string>>("values");
lblMobileServiceStatus.Text = string.Join(",", values);
lblMobileServiceStatus.TextColor = Color.Green;
}
catch (MobileServiceInvalidOperationException ex)
{
lblMobileServiceStatus.Text = string.Format("Call to Azure Mobile App Service ValuesController failed with the following information {0} {1}", ex.Response.StatusCode, ex.Response.ReasonPhrase);
lblMobileServiceStatus.TextColor = Color.Red;
}
}
catch (MobileServiceInvalidOperationException ex)
{
lblMobileServiceStatus.Text = string.Format("Login to Azure Mobile App Service failed with the following information {0} {1}", ex.Response.StatusCode, ex.Response.ReasonPhrase);
lblMobileServiceStatus.TextColor = Color.Red;
}
}
That completes the changes to the MainPage.xaml.cs file. Now we need to make some minor changes to each platform specific project to support authentication to Azure Active Directory.
Add a new class named MainPageRenderer to each platform specific project (MobileAppClient.Android, MobileAppClient.iOS, and MobileAppClient.UWP). That class should inherit from PageRenderer. Add the following assembly attribute above the namespace declaration in each class
[assembly: ExportRenderer(typeof(MainPage), typeof(MainPageRenderer))]
The first parameter references the Xamarin.Forms page in the shared project and the second parameter identifies the page renderer that will be used to render the page on the platform. We use this approach because the implementation of the IPlatformParameters interface is slightly different on each platform.
Make the following changes to the MainPageRenderer.cs file in the Android project.
private MainPage _page;
protected override void OnElementChanged(ElementChangedEventArgs<Page> e)
{
base.OnElementChanged(e);
_page = e.NewElement as MainPage;
Activity activity = this.Context as Activity;
_page.PlatformParameters = new PlatformParameters(activity);
}
Make the following changes to the MainActivity.cs file in the Android project.
protected override void OnActivityResult(int requestCode, Result resultCode, Intent data)
{
base.OnActivityResult(requestCode, resultCode, data);
AuthenticationAgentContinuationHelper.SetAuthenticationAgentContinuationEventArgs(requestCode, resultCode, data);
}
Make the following changes to the MainPageRenderer.cs file in iOS project.
MainPage _page;
protected override void OnElementChanged(VisualElementChangedEventArgs e)
{
base.OnElementChanged(e);
_page = e.NewElement as MainPage;
}
public override void ViewDidLoad()
{
base.ViewDidLoad();
_page.PlatformParameters = new PlatformParameters(this);
_page.DeviceRegistration = new DeviceRegistrationManager();
_page.NotificationHandle = AppDelegate.Instance.DeviceToken;
}
Make the following changes to the MainPageRenderer.cs file in the UWP project.
private MobileAppClient.MainPage _page;
protected override void OnElementChanged(ElementChangedEventArgs<Page> e)
{
base.OnElementChanged(e);
_page = e.NewElement as MobileAppClient.MainPage;
_page.PlatformParameters = new PlatformParameters(PromptBehavior.Auto, true);
}
With these changes in place the PlatformParameters property will be correctly populated on each platform before the code attempts to authenticate with Azure Active Directory. Rebuild the solution and run it on each platform. You should be able to successfully authenticate and invoke the Values API on the Azure Mobile App Service.


Wrapping Up
This post has provided you with the basic information needed to leverage client directed authentication with Azure Active Directory to authenticate with an Azure Mobile App Service. This approach can be used with any of the identity providers supported by the Azure Mobile App Service such as Azure Active Directory, Facebook, Google, Microsoft Account, and Twitter.
Premier Support for Developers provides strategic technology guidance, critical support coverage, and a range of essential services to help teams optimize development lifecycles and improve software quality. Contact your Application Development Manager (ADM) or email us to learn more about what we can do for you.
 Light
Light Dark
Dark
0 comments