
Build ML powered experiences with Windows Machine Learning (WinML) and Intelligent APIs!
Hello, fellow developers! Today I want to talk to you about Windows Machine Learning (WinML). I’ll also talk about how you can use Intelligent APIs, an abstraction over WinML to build Machine Learning powered experiences in your applications on Windows with very few lines of code.
Machine Learning and Artificial Intelligence are definitely not unfamiliar terms anymore, with ML based features sneaking into almost every popular application we use everyday. Most of the ML workloads for these applications are deployed in cloud datacenters. In recent times though, with the steady improvement of processors and AI accelerators, machine learning on edge devices is becoming more and more commonplace.
Windows Machine Learning (WinML) is a high-performance, reliable API for deploying hardware-accelerated ML inferences on Windows devices. It allows developers to use the capabilities of any Windows 10 (or higher) devices to perform model inference.
Hold on, what is model inference?
A machine learning model is an algorithm that learns from training data to identify patterns and perform predictions on real data. In order to create a machine learning model, it has to be “trained” with training data. Once a model is created, it is then used on real data to calculate an output. This process of running real time data through a model to capture a prediction is called model inference.
This is where WinML comes in. WinML is an API that enables developers to perform model inference by running the model on system hardware on Windows. It abstracts away a lot of the code you would need to otherwise write to interact with the hardware, perform ML computations and also optimize for performance.
There are many benefits to using WinML, and performing ML inference on device in general. Here are some of them :
- Ease of development: WinML is built into all devices running Windows 10 and above, so all you really need to get started is a pre-trained model and Visual Studio to build that ML powered app everyone needs on Windows!
- Hardware support and Optimizations: With WinML, you only need to write code for your workload once and you can get hardware optimizations across CPUs, GPUs and AI accelerators with consistent behavior.
- Low Latency, Real-Time Results: Since all the ML computations are performed on device versus the cloud, there’s little to no latency even for real-time analysis of large quantities of data. This can be extremely valuable in applications that require real time results like performance-intensive games.
- Offline Experience and Flexibility: Running your machine learning models on device requires no internet. This means your ML features can even work offline!
- Security: All your data remains on your device. This keeps the data extremely secure, incredibly useful for applications that involve sensitive data management.
ONNX models
We mentioned earlier that in order to use WinML, you need to have an existing model. This model needs to be in ONNX format. ONNX is an open format built to represent machine learning models that can work cross-platform and is tool/framework agnostic.
How does one obtain an ONNX model?
Most of the common ML use-cases have state-of-the-art models available for you to choose from! The ONNX model zoo is typically the one-stop shop for any such model.
You can also leverage existing ML frameworks like Tensorflow or Pytorch to train your model, and then export it to ONNX.
You could also use tools like Custom Vision that offer no-code experiences to create image classification or object detection models.
Intelligent APIs
Now that we’ve talked about WinML and ONNX models, let me tell you that we are working on a project that makes building ML powered applications on Windows even easier! This project is called Intelligent APIs, the goal of which is to make machine learning tasks easier for developers to leverage in their applications without needing ML expertise or creating a new model. By just importing a nuget package and calling a function, we want developers to be able to build intelligent app experiences without needing to deal with the complexities of using machine learning models on Windows.
So if you want to classify an image in your application, all you have to do is call a function in a single line of code. Easy peasy!
So far we have released two nuget packages that you can easily install into your application and start using.
CommunityToolkit.Labs.Intelligent.ImageClassification: This package exposes an API that performs Image Classification using SqueezeNet which can detect 1000 different classes.CommunityToolkit.Labs.Intelligent.ObjectDetection: This package exposes an API that performs Object Detection and Segmentation using YOLOv4. This model can detect objects of 80 different classes and also returns the co-ordinates of their location in the image.
Getting started with Intelligent APIs
Let’s go through installing and using the package that performs Image Classification.
To perform image classification, import the CommunityToolkit.Labs.Intelligent.ImageClassification nuget package.To use the ClassifyImage API, you will need to pass a StorageFile object which is the image file itself, and the number of top results that you want (optional) as arguments.
We’ll now walk through a step-by-step guide of how you can start using the nuget package that performs image classification in your UWP application.
- Open your UWP project on Visual studio.
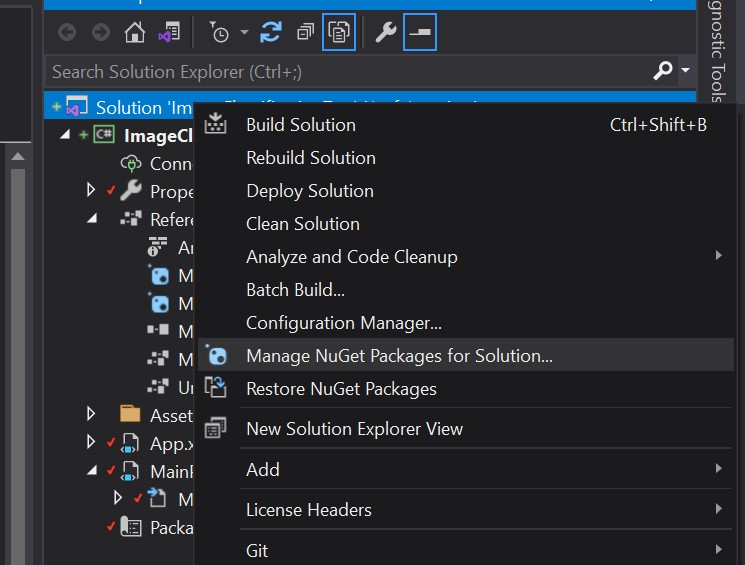
- Right click on your project in the Solution Explorer and click on “Manage Nuget Packages”.
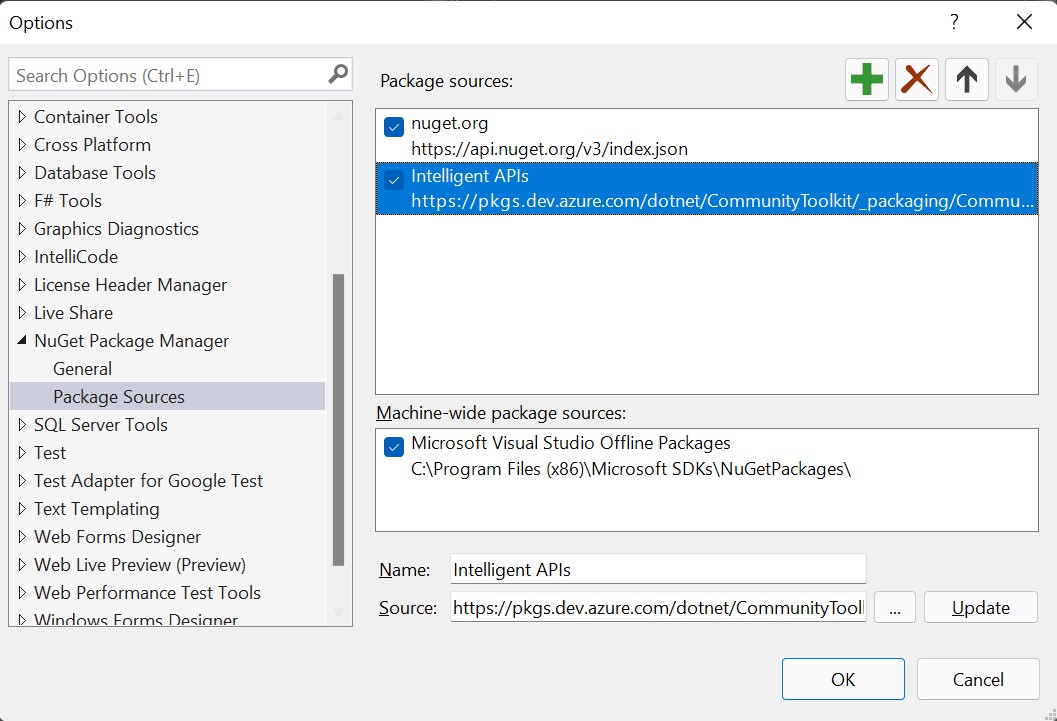
- Add a package source with the URL as https://pkgs.dev.azure.com/dotnet/CommunityToolkit/_packaging/CommunityToolkit-Labs/nuget/v3/index.json
- In this new source, there will be two nuget packages listed:
CommunityToolkit.Labs.Intelligent.ImageClassificationandCommunityToolkit.Labs.Intelligent.ObjectDetection. For this example let’s installCommunityToolkit.Labs.Intelligent.ImageClassificationin our project.
Now that the package has been installed, let’s use it in our app!
Let’s create a very simple button in our XAML file that opens up a filepicker so you can select a file that you want to be classified.
<button
  name="ButtonRun"
  ToolTipService.ToolTip="Pick and evaluate and image"
  Width="100"
  Height="40"
  Click="ButtonRun_Click"
  IsEnabled="True"
  VerticalAlignment="Bottom"
  RenderTransformOrigin="2.085,7.842"
  Margin="84,0,0,654"
>
  <Button.Content> Pick image </Button.Content>
</button>
Go to the code-behind C# file for the XAML to define the ButtonRun_Click function that will be called on-click of the button we just created.
We need to import the namespace CommunityToolkit.Labs.Intelligent.ImageClassification, so at the top of the file, along with the other imports, add this line:
using CommunityToolkit.Labs.Intelligent.ImageClassification;Next, create the ButtonRun_Click function that is called on click of the button.
private async void ButtonRun_Click(object sender, RoutedEventArgs e){}Inside this function, let’s create a FilePicker.
private async void ButtonRun_Click(object sender, RoutedEventArgs e)
{
    FileOpenPicker fileOpenPicker = new FileOpenPicker();
    fileOpenPicker.SuggestedStartLocation = PickerLocationId.PicturesLibrary;
    fileOpenPicker.FileTypeFilter.Add(".jpg");
    fileOpenPicker.FileTypeFilter.Add(".png");
    fileOpenPicker.ViewMode = PickerViewMode.Thumbnail;
    StorageFile selectedStorageFile = await fileOpenPicker.PickSingleFileAsync();
}
The above lines of code initialize a filepicker, restrict the files to be images and get the selected file stored in a StorageFile object called selectedStorageFile.
Now, all we have to do is call the ClassifyImage function and pass this file in to get the image classification result!
var list = await SqueezeNetImageClassifier.ClassifyImage(selectedStorageFile, 3);The list stores the top 3 classification results based on confidence that is determined by the SqueezeNet model. That’s all you need to do to get the ML part working. Now you can display this result or use it for anything your creativity comes up with!
Wasn’t that easy?
You can access the complete sample on GitHub
The two packages that are available right now are just the start of what Intelligent API aims to offer. The idea is to make machine learning model evaluation easier on windows and enabling developers to seamlessly create intelligent experiences on Windows without needing any domain specific knowledge. This is an open source contribution, so feel free to create issues for new ideas, or build your own packages and create a pull request!
 Light
Light Dark
Dark
0 comments