
Getting Started with DevOps and .NET MAUI
.NET Multi-platform App UI (.NET MAUI) unifies Android, iOS, macOS, and Windows UI frameworks into a single framework so you can write one app that runs natively on many platforms. In this post, we will look at how easy it is to implement basic DevOps pipelines for .NET MAUI apps using GitHub Actions and Azure DevOps.
Getting Started
Before setting up the pipelines, we need to make sure we have a few files ready.
- For
iOS, you need a signing certificate and a provisioning profile. This guide walks you through how to obtain these files. - (Optional for this post) For
Android, you need keystore file and value of keystore password and keystore alias. This guide walks you through how to obtain the files. - For
Windows, you need to create and export a certificate for package signing. You can follow this guide for the steps.

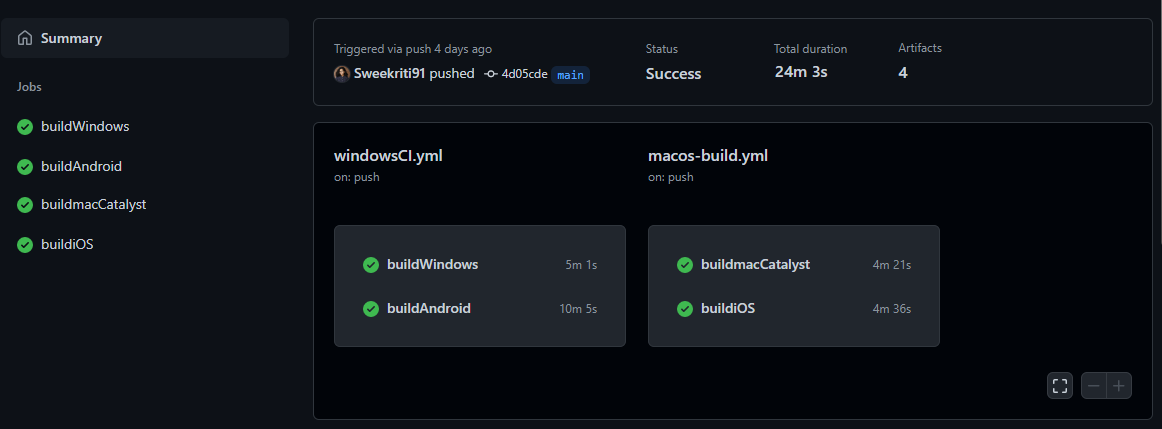
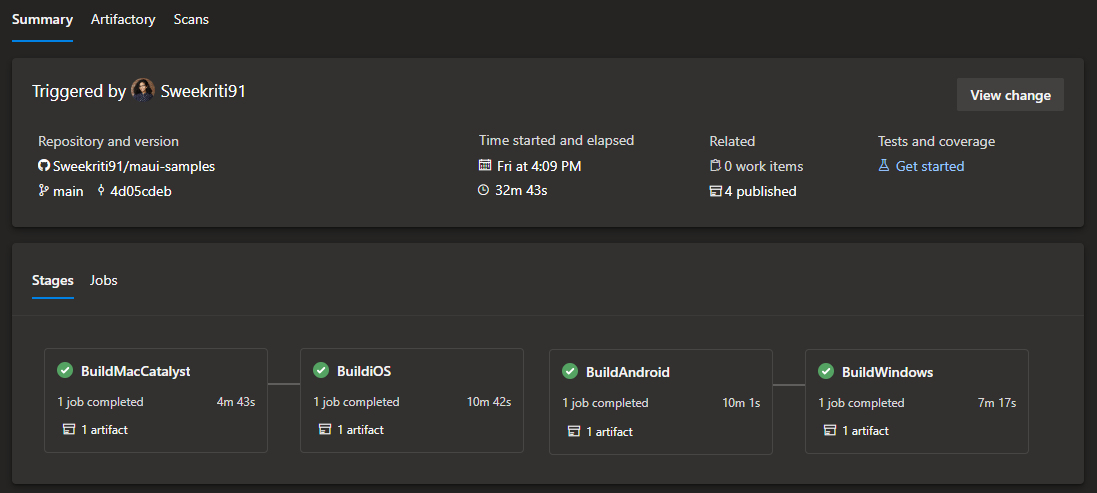
We are now ready to start creating the pipelines for the .NET MAUI app. We will be looking at the sample pipelines added to the dotnet/maui-samples repo as part of the Weather21 app, under the folder devops.
Pipeline Source Files
NOTE These are starter pipelines for a basic test and build, great to use for PR-checks. The steps do not cover publish to store or signing for distribution. That would be out of scope for this post, and will be covered in a future post.
GitHub Actions Samples
- MacOS Hosted Agent : macos-build.yml
- Windows Hosted Agent: windowsCI.yml
Azure DevOps Samples
- MacOS Hosted Agent : azdo_mac.yml
- Windows Hosted Agent: azdo_windows.yml
Pipeline Overview
We have 2 pipeline files for both GitHub Actions and Azure DevOps, one runs on the macos-12 VM building the iOS and MacCatalyst targets. The other runs on windows-2022 VM and builds the Android and Windows targets.
Each Pipeline is broken down into the follow sub-steps:
- Set .NET Version
- Install .NET MAUI Workloads
- Install Signing Files (as needed)
- Build/Publish App for TargetFramework
- Run Unit Tests (if required)
- Upload Artifacts
This simplified DevOps flow is all thanks to dotnet command line tool which we have access to now. We are able to dotnet build and dotnet publish for all TargetFramework types. No need for complex and convoluted scripts to manage msbuild and VS preview installations. Thank you to all the contributors for making this happen!
Let’s break down the tasks in each Pipeline.
Pipeline Tasks
Quick Tip Check available GitHub hosted VM images and installed software by checking this table.
Quick Tip Check available Azure DevOps hosted VM images and installed software by checking this table.
The common tasks for both pipelines are Setup .NET SDK Version and Install .NET MAUI.
This is how it looks like in GitHub Actions:
      - name: Setup .NET SDK ${{env.DOTNETVERSION}}
        uses: actions/setup-dotnet@v1
        with:
          dotnet-version:  '${{env.DOTNETVERSION}}'

      - name: Install .NET MAUI
        shell: bash
        run: |
          dotnet nuget locals all --clear
          dotnet workload install maui --source https://aka.ms/dotnet6/nuget/index.json --source https://api.nuget.org/v3/index.json
          dotnet workload install android ios maccatalyst tvos macos maui wasm-tools --source https://aka.ms/dotnet6/nuget/index.json --source https://api.nuget.org/v3/index.json
The first task uses the GitHub Action Setup .NET Core SDK and the creating a pipeline variable makes it easier to change versions in the future.
This is how it looks like in Azure DevOps :
    - task: UseDotNet@2
      displayName: .NET Version
      inputs:
        packageType: 'sdk'
        version: '$(DotNetVersion)'

    - task: Bash@3
      displayName: Install MAUI
      inputs:
        targetType: 'inline'
        script: |
          dotnet nuget locals all --clear
          dotnet workload install maui --source https://aka.ms/dotnet6/nuget/index.json --source https://api.nuget.org/v3/index.json
          dotnet workload install android ios maccatalyst tvos macos maui wasm-tools --source https://aka.ms/dotnet6/nuget/index.json --source https://api.nuget.org/v3/index.json
The first task uses the Azure Devops Use .NET Core task and the creating a pipeline variable makes it easier to change versions in the future.
The next task is Install .NET MAUI workloads via inline script. You can adjust the --source to target specific versions of .NET MAUI workloads, and you can learn more about changing sources in the .NET MAUI Wiki.
Mac Build Agent Pipeline
The build/publish task is explained in the .NET MAUI Documentation:
For example, the Publish MacCatalyst task in GitHub Actions :
 - name : Publish MacCatalyst App
        shell: bash
        run: |
          cd 6.0/Apps/WeatherTwentyOne/src
          dotnet publish -f net6.0-maccatalyst -c Release -p:BuildIpa=True -o ./artifacts
and the same task in Azure DevOps :
    - task: Bash@3
      displayName: Build MacCatalyst App
      inputs:
        targetType: 'inline'
        script: |
          cd 6.0/Apps/WeatherTwentyOne/src
          dotnet publish -f net6.0-maccatalyst -c Release -p:BuildIpa=True -o ./artifacts
To make it easier for dotnet publish, the first line navigates to the folder where the WeatherTwentyOne.sln exists. In a simpler repository structure, you would not require this first line.
Let’s look at the dotnet publish command:
dotnet publish -f <target_framework> -c Release -p:BuildIpa=True -o <path_to_output_folder>
<target_framework> |
is set to net6.0-maccatalyst or net6.0-ios based on what you build |
-o <folder_path> |
allows you to redirect the publish folder from default bin/../.. , instead to the folder path you specify. This is really useful for DevOps pipelines so it is easier to find the artifacts to publish. |
Last task is to publish artifacts to the GitHub Pipeline,which uses the GitHub Action Upload a Build Artifact.
In Azure DevOps, this is a two step process, fist the Copy Files Task copies the files to the $(Build.ArtifactStagingDirectory) and then the Publish Build Artifacts task publishes the artifact.
There is one extra step for iOS, where we install the Signing Certificate and Provisioning Profile.
This GitHub Documentation explains how to install these files as part of the pipeline for GitHub Actions. Following the instructions, this is the task:
- name: Install the Apple certificate and provisioning profile
        env:
          BUILD_CERTIFICATE_BASE64: ${{ secrets.BUILD_CERTIFICATE_BASE64 }}
          P12_PASSWORD: ${{ secrets.P12_PASSWORD }}
          BUILD_PROVISION_PROFILE_BASE64: ${{ secrets.BUILD_PROVISION_PROFILE_BASE64 }}
          KEYCHAIN_PASSWORD: ${{ secrets.KEYCHAIN_PASSWORD }}
        run: |
          # create variables
          CERTIFICATE_PATH=$RUNNER_TEMP/build_certificate.p12
          PP_PATH=$RUNNER_TEMP/build_pp.mobileprovision
          KEYCHAIN_PATH=$RUNNER_TEMP/app-signing.keychain-db

          # import certificate and provisioning profile from secrets
          echo -n "$BUILD_CERTIFICATE_BASE64" | base64 --decode --output $CERTIFICATE_PATH
          echo -n "$BUILD_PROVISION_PROFILE_BASE64" | base64 --decode --output $PP_PATH

          # create temporary keychain
          security create-keychain -p "$KEYCHAIN_PASSWORD" $KEYCHAIN_PATH
          security set-keychain-settings -lut 21600 $KEYCHAIN_PATH
          security unlock-keychain -p "$KEYCHAIN_PASSWORD" $KEYCHAIN_PATH

          # import certificate to keychain
          security import $CERTIFICATE_PATH -P "$P12_PASSWORD" -A -t cert -f pkcs12 -k $KEYCHAIN_PATH
          security list-keychain -d user -s $KEYCHAIN_PATH

          # apply provisioning profile
          mkdir -p ~/Library/MobileDevice/Provisioning Profiles
          cp $PP_PATH ~/Library/MobileDevice/Provisioning Profiles
On Azure DevOps, Azure DevOps Sign your Apple App guides you through the process of adding the Certificate and Provisioning Profile file to Secure Files Library. Once uploaded there, the Install Apple Certificate task and Install Apple Provisioning Profile task will install it as part of your pipeline task. The is what the pipeline would look like :
 - task: InstallAppleCertificate@2
      inputs:
        certSecureFile: 'DevelopmentCert.p12'
        certPwd: '$(iOSCertPassword)'
        keychain: 'temp'

    - task: InstallAppleProvisioningProfile@1
      inputs:
        provisioningProfileLocation: 'secureFiles'
        provProfileSecureFile: 'Development.mobileprovision'
Windows Build Agent Pipeline
The build/publish task is explained in the .NET MAUI documentation:
For example the Android Publish task in GitHub Actions :
- name : Build Android App
          shell: bash
          run: |
            cd 6.0/Apps/WeatherTwentyOne/src
            dotnet publish -f:net6.0-android -c:Release
and the same task in Azure DevOps :
    - task: Bash@3
      displayName: Build Android App
      inputs:
        targetType: 'inline'
        script: |
          cd 6.0/Apps/WeatherTwentyOne/src
          dotnet publish -f net6.0-android -c Release
The first step navigates to the folder with the WeatherTwentyOne.sln and run the dotnet publish task. Let’s look at the dotnet publish command:
dotnet publish -f <target_framework> -c Release -p:BuildIpa=True -o ./artifacts |
||
|---|---|---|
<target_framework> |
is set to net6.0-android or net6.0-windows10.0.19041.0 based on what you build |
For Github Actions, Publish artifact step remains the same, the GitHub Action Upload a Build Artifact works on both Mac and Windows agents.
For Azure Devops, Copy Files Task and the Publish Build Artifacts task works both on Mac and Windows agents.
For Windows, there are two additional tasks. The first is to store and decode the Signing Certificate file.
In GitHub Actions, the process for it is as following:
- The Signing Certificate file created needs to be encoded into Base64. This can be done using
certutilonWindows, follow the documentation. OnMac, you can runbase64 -i <cert_file>.pfx | pbcopy. - The Base64 encoded string needs to be stored in GitHub Actions Secrets by following the GitHub Actions Encrypted Secrets Documentation.
- Decode the secret in the Pipeline task:
- name: Create signing pfx file from secrets
        shell: pwsh
        id: secret-file
        env:
          SIGN_CERT: ${{ secrets.WIN_SIGN_CERT }}
        run: |
          $secretFile = "WinSignCert.pfx";
          $encodedBytes = [System.Convert]::FromBase64String($env:SIGN_CERT);
          Set-Content $secretFile -Value $encodedBytes -AsByteStream;
          Write-Output "::set-output name=SECRET_FILE::$secretFile";
In Azure DevOps, follow the CI/CD Pipeline Overview guide and upload the file to Secure Files Library. Then download and install the file using the Download Secure File task:
    - task: DownloadSecureFile@1
      inputs:
        secureFile: 'DevelopmentCert.pfx'
The second task is to use this Certificate file to sign the MSIX generated from dotnet publish. Following this Azure DevOps Guide, we get the following task in GitHub Actions:
- name: Sign Windows App
        shell: pwsh
        env:
          CERT_PASSWORD: ${{ secrets.WIN_CERT_PASSWORD }}
        run: |
          '"C:Program Files (x86)Windows Kits10App Certification KitSignTool" sign /a /fd SHA256 /f WinSignCert.pfx /p ($env:CERT_PASSWORD) 6.0AppsWeatherTwentyOnesrcWeatherTwentyOnebinReleasenet6.0-windows10.0.19041.0win10-x64AppPackagesWeatherTwentyOne_1.0.0.0_TestWeatherTwentyOne_1.0.0.0_x64.msix'
and the same task in Azure DevOps, directly using the code snippet provided in the guide:
    - script: '"C:Program Files (x86)Windows Kits10App Certification KitSignTool" sign /fd SHA256 /f $(Agent.TempDirectory)/XamCATFidCert.pfx /p $(WindowsCertSecret) $(Build.ArtifactStagingDirectory)6.0AppsWeatherTwentyOnesrcWeatherTwentyOnebinReleasenet6.0-windows10.0.19041.0win10-x64AppPackagesWeatherTwentyOne_1.0.0.0_TestWeatherTwentyOne_1.0.0.0_x64.msix'
      displayName: 'Sign MSIX Package'
In GitHub Actions for Android Signing, the sample pipelines contains the tasks, uncomment and follow the links as needed. Similar to Windows, first encode in Base64 and decode the Keystore file. The next task is to sign the generated apk file using jarsigner.
In Azure DevOps for Android Signing, this guide shows step by step how to Sign your Android App. It shows how to upload the signing files securely and then how to configure the Azure DevOps task for Android Signing.
Summary
I hope this helps you get started with setting up DevOps for .NET MAUI apps using GitHub Actions and Azure DevOps. The sample yaml files:
-
GitHub Actions Samples
- MacOS Hosted Agent : macos-build.yml
- Windows Hosted Agent: windowsCI.yml
-
Azure DevOps Samples
- MacOS Hosted Agent : azdo_mac.yml
- Windows Hosted Agent: azdo_windows.yml
Check out the more samples at dotnet/maui-samples. Please try out .NET MAUI, file issues, or learn more at dot.net/maui!
 Light
Light Dark
Dark
9 comments
Thanks for a great walk through of the build part of devops.
But what about testing and distribution? Those are also important steps in a DevOps workflow.
Is AppCenter still Microsofts preferred solution here, or what are our options for .Net MAUI apps?
Hi! This blog is a getting started, it is meant to help understand the basic build process. I’ll be sharing a follow up blog soon which would focus on testing and distribution. Thanks!
While I’m happy to get an official tutorial from Microsoft about this, you should really create something dedicated that take less execution time. Installig the workloads takes like 20 minutes, really? 20 minutes installation each time for a 1 minute build and deploy. And you have at least 2 different runs, so 40+ minutes wasted, for a single deploy
I second that, wouldn’t it make sense to install these workloads on the hosted agents already? Or some separate build task lets us pick workloads, which then loads it from some cache server? That would reduce the build time drastically.
Hi! This blog is a getting started, it is meant to help understand the basic process and not aimed for optimization. You can easily save on the time for installing workloads by combining all the builds into a single pipeline job and not break the builds into separate jobs. I hope this helps!
How to follow your video
Awesome thanks for sharing this, is good to have official documentation about this from Microsoft, unfortunately I think at this point this is a bit unpractical at least while we get a hosted machine with maui workloads pre-installed, specially taking in consideration that the dotnet workload install command takes a lot of execution time.
You could always create a docker container with all your dependencies and load that to save time.
Great blog post!
Hi! You can easily save on the time for installing workloads by combining all the builds into a single pipeline job and not break the builds into separate jobs. I hope this helps save a few minutes of your build time!