
Coming to DirectX 12— Sampler Feedback: some useful once-hidden data, unlocked
Why Feedback: A Streaming Scenario
Suppose you are shading a complicated 3D scene. The camera moves swiftly throughout the scene, causing some objects to be moved into different levels of detail. Since you need to aggressively optimize for memory, you bind resources to cope with the demand for different LODs. Perhaps you use a texture streaming system; perhaps it uses tiled resources to keep those gigantic 4K mip 0s non-resident if you don’t need them. Anyway, you have a shader which samples a mipped texture using A Very Complicated sampling pattern. Pick your favorite one, say anisotropic.
The sampling in this shader has you asking some questions.
What mip level did it ultimately sample? Seems like a very basic question. In a world before Sampler Feedback there’s no easy way to know. You could cobble together a heuristic. You can get to thinking about the sampling pattern, and make some educated guesses. But 1) You don’t have time for that, and 2) there’s no way it’d be 100% reliable.
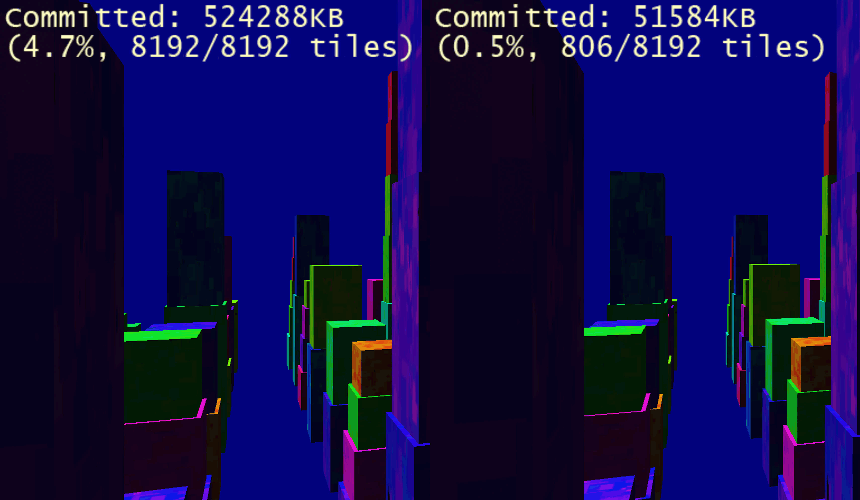
Where exactly in the resource did it sample? More specifically, what you really need to know is— which tiles? Could be in the top left corner, or right in the middle of the texture. Your streaming system would really benefit from this so that you’d know which mips to load up next. Yeah while you could always use HLSL CheckAccessFullyMapped to determine yes/no did-a-sample-try-to-get-at-something-nonresident, it’s definitely not the right tool for the job.
Direct3D Sampler Feedback answers these powerful questions.
At times, the accuracy of sampling information is everything. In the screencap shown below, this demo-scene compares a “bad” feedback approximation to an accurate one. The bad feedback approximation loads higher-detailed mips than necessary:
Why, continued: Texture-Space Shading
Sampler feedback is one feature with two quite different, but both important scenarios. Texture-spacing shading is a rendering technique which de-couples the shading of an object in world space with the rasterization of the shape of that object to the final target.
For context, texture-space shading is a well-established graphics technique that does not strictly require sampler feedback, but it can be made greatly more performant by it.
When you draw a lit, textured object conventionally to the screen- across what spatial grid are the lighting computations? The grid is locked to how the object appears in screen space, isn’t it. This coupling can be a real problem for objects with big facets nearly perpendicular to the viewer, for example. Lighting could vary a lot across the side of the thing in world space, but you’re only invoking the pixel shader a handful of times. Potential recipe for numerical instability and visual artifacts.

Setup of a scene using texture-space shading
Enter texture-space-shading, or TSS, also known as object-space shading. TSS is a technique where you do your expensive lighting computations in object space, and write them to a texture— maybe, something that looks like a UVW unwrapping of your object. Since nothing is being rasterized you could do the shading using compute, without the graphics pipeline at all. Then, in a separate step, bind the texture and rasterize to screen space, performing a dead simple sample. This way, you have some opportunities for visual quality improvements. Plus, the ability to get away with computing lighting less often than you rasterize, if you want to do that.
One obstacle in getting TSS to work well is figuring out what in object space to shade for each object. Everything? You could, but hopefully not. What if only the left-hand side of an object is visible? With the power of sampler feedback, your rasterization step could simply record what texels are being requested and only perform the application’s expensive lighting computation on those.
Now that we’ve discussed scenarios where sampler feedback is useful, what follows are some more details how it’s exposed in Direct3D.
An Opaque Representation
Sampler Feedback is designed to work well across different GPU hardware implementations. Even if feedback maps are implemented in different ways across various hardware, Direct3D’s exposure of them avoids platform-variation-related burdens on the application developer. Applications can deal with a convenient unified representation of sampler feedback.
While feedback maps are stored using an ID3D12Resource, their contents are never accessed directly. Instead, applications use ID3D12GraphicsCommandList1::ResolveSubresourceRegion to decode feedback into a representation they can use, in the form of R8_UINT textures and buffers. Feedback maps themselves have the format of DXGI_FORMAT_SAMPLER_FEEDBACK_MIN_MIP_OPAQUE or DXGI_FORMAT_SAMPLER_FEEDBACK_MIP_REGION_USED_OPAQUE.
Granularity
Feedback granularity is controlled through a mip region. The smallest possible mip region is 4×4, and they are powers of two. If you have a mip region of 4×4, then it’s as if “every texel in the feedback map corresponds to a 4×4 area in the texture it’s storing feedback for”.
If you use a small mip region, you get more fine-grained information but the feedback maps are a bit bigger. If you use a larger mip region, you get less-detailed sampler feedback information, but save a bit on memory.
Two Formats
Applications can choose between two kinds of sampler feedback depending on their needs.
MinMip
MinMip, also sometimes called MinLOD, stores “what’s the highest-detailed mip that got sampled”. If no mip got sampled, you’ll get a value of 0xFF when you decode. For streaming systems, this is the representation you’re most likely to use, since it will easily tell you which mip should be loaded next.
MipRegionUsed
MipRegionUsed acts like a bitfield of mip levels. It tells you exactly which mip levels were requested, not just “what was the most detailed one?” And yes, it’s strictly possible to get a MinMip representation from the MipRegionUsed one, it’d just be rather cumbersome. As a convenience, here’s both. Non-streaming applications such as texture-space-shading rendering scenarios may choose to use MipRegionUsed, since details about exactly which mips were requested could be used to inform level-of-detail settings in rendering.
Binding
First, some terminology: we say that the map contains feedback for a “paired” resource. Feedback maps, no matter what type, are bound rather like a special UAV. There’s an API to create the UAV against a descriptor:
| HRESULT ID3D12Device8::CreateSamplerFeedbackUnorderedAccessView( ID3D12Resource* pairedResource, ID3D12Resource* feedbackResource, D3D12_CPU_DESCRIPTOR_HANDLE dest) |
Once that’s done, and you have the corresponding descriptor heap set up for your pipeline, there’s the HLSL-side bind name. Use a type name like this:
| FeedbackTexture2D<SAMPLER_FEEDBACK_MIN_MIP> g_feedback : register(u3); |
That’s for u0, u1, or whatever register number you have set up. And for MIP_REGION_USED, it’d be
| FeedbackTexture2D<SAMPLER_FEEDBACK_MIP_REGION_USED> g_feedback : register(u3); |
There’s Texture2D, and you can bind FeedbackTexture2DArray as well for writing feedback for texture arrays.
Clearing
A cleared feedback map can be thought of as meaning “no mips have been requested for any mip region”. You clear feedback maps using ID3D12GraphicsCommandList::ClearUnorderedAccessViewUint.
Writing Feedback
Included in shader model 6_5 are some new HLSL constructs for writing sampler feedback:
- WriteSamplerFeedback
- WriteSamplerFeedbackBias
- WriteSamplerFeedbackGrad
- WriteSamplerFeedbackLevel
All four can be used from pixel shaders. Grad and Level can be used from any shader stage.
The semantics are awfully similar to the semantics for texture sampling. For example, one overload of WriteSamplerFeedback looks like:
| void FeedbackTexture2D::WriteSamplerFeedback( in Texture2D SampledTexture, in SamplerState S, in float2 Location); |
The semantics make it easy to get from “sampling a texture” to “writing the feedback for where that sample would’ve hit”.
Decoding
To get sampler feedback into a form your application can understand and read back, there’s a step to decode (or transcode) it. To do that, use ID3D12GraphicsCommandList1::ResolveSubresourceRegion with D3D12_RESOLVE_MODE_DECODE_SAMPLER_FEEDBACK.
For example:
| cl->ResolveSubresourceRegion(readbackResource, 0, 0, 0, feedbackTexture, 0, nullptr, DXGI_FORMAT_R8_UINT, D3D12_RESOLVE_MODE_DECODE_SAMPLER_FEEDBACK); |
You can decode feedback into textures (for ease of access by compute, or other GPU-based pipelines) or buffers for ease of readback.
The thing you’d most commonly do with feedback is decode it, but there’s also an encode (D3D12_RESOLVE_MODE_ENCODE_SAMPLER_FEEDBACK) for symmetry’s sake.
Getting Started
To use Sampler Feedback in your application, install the latest Windows 10 Insider Preview build and SDK Preview Build for Windows 10 (20H1) from the Windows Insider Program. You’ll also need to download and use the latest DirectX Shader Compiler. Finally, because this feature relies on GPU hardware support, you’ll need to contact GPU vendors to find out specifics regarding supported hardware and drivers.
You can find more information in the Sampler Feedback specification, located here.
 Light
Light Dark
Dark
0 comments