
Deploying an Azure Ubuntu Linux VM Running Apache Tomcat for use with Visual Studio Team Services and Team Foundation Server
Visual Studio Team Services and Team Foundation Server (TFS) now have at least three mechanisms (i.e. deployment and utility tasks) for deploying to a Linux host or virtual machine (VM). This walkthrough will show specifically how to setup and configure an Ubuntu (v16) VM on Azure to run Tomcat and other necessary services to support three different and distinct Team Services deployment tasks to enable continuous integration and deployment (CI/CD). We will configure the VM to enable the Apache Tomcat Deployment task, the Copy Files over SSH task, and the FTP Upload task (using ftps) to enable deployment of web applications from Team Services and TFS.
The Apache Tomcat Deployment task is available on the Visual Studio Marketplace. The Copy Files over SSH and FTP Upload tasks have just been released with their respective blog announcements below:
- https://blogs.msdn.microsoft.com/visualstudioalm/2016/08/18/copy-files-over-ssh-during-continuous-integration-and-deployment/
- https://blogs.msdn.microsoft.com/visualstudioalm/2016/08/18/upload-files-with-ftp-ftps/
Get going quickly
If you want a quick and simple method for deploying an Azure Ubuntu Linux VM with Tomcat, SSH and FTP for use with Visual Studio Team Services and TFS, then you can use the Azure QuickStart ARM template found here:
Using the above template and script, you can configure and deploy a new Azure Ubuntu Tomcat server in a matter of minutes by providing a few required parameters. Be sure to allow the full Azure deployment to complete before logging into the VM (as logging in to soon can cause permission issues).
On the other hand, if you want to setup and tailor the Azure Ubuntu VM yourself, then follow the detailed instructions below. Following these instructions, you can setup Tomcat for deploying from Team Services / TFS with either or all of the Apache Tomcat extension deployment task, the built-in Copy Files over SSH deployment task or the built-in FTP Upload task.
If you would prefer to setup an Azure Red Hat VM (instead of or in addition to Ubuntu) running Tomcat, then follow the instructions in this sister blog post:
Deploy a Linux Ubuntu VM on Azure
The first step for our walkthrough is to create a Linux Ubuntu VM running in Azure. If you don’t yet have an Azure account, you can sign up for one free.
Login to Azure and go to the Azure Portal, https://portal.azure.com. In the left-hand navigation panel, click on Virtual machines. Under the Virtual Machines panel, click “+ Add”. This brings up the Virtual Machines marketplace window. In the search window (by the magnifying glass), enter “Ubuntu” and press Enter. Find and click on the line containing “Ubuntu Server 16.04 LTS”. Ensure the “Resource Manager” deployment model is selected and press the “Create” button.
Under the “Basics” panel, choose and enter a “Name” for your VM and a “User name”. Select “Password” as the Authentication type, and enter and confirm a password for your VM. Create a new Resource group (e.g. “demo”) and select a Location nearest to your physical location. Other values can remain as their defaults. When you are ready, press the “OK” button.
Under the “Choose a size” panel, click on the option to “View all.” For the purposes of this walkthrough, we recommend choosing a size of “F1S Standard” but any will work. It is easy to upgrade to a more powerful VM later if you like. Click on the size you want to use and then press the “Select” button at the bottom of the panel.
Under the “Settings” panel, the defaults should all work for this demo, so just press the “OK” button at the bottom of the panel.
Assuming all the parameters for the VM are OK, you should see a blue banner stating “Validation passed”. If you are satisfied with the setup displayed, press the “OK” button at the bottom of the panel to actually start the deployment of the VM.
To view the progress with deploying the VM, you can click on the bell looking icon in the upper right of the dark blue menu bar and then click on the “Deployment started…” message. A panel will be displayed showing the status of the deployment, likely with a blue banner stating the VM is “Deploying.” You can “Refresh” to see current status or even “Cancel” the request to create the VM from this panel. After a few minutes, press “Refresh” to see of the deployment is finished (i.e. Status is Succeeded). Once the VM is deployed, click on the “Virtual machines” in the far-left navigation panel and then click on your newly created VM in the list under the Virtual machines panel.
Note (and record) the Public UP address of your new VM. We will use it to login and configure the VM. If you like, you can give your VM a public DNS name. To do this, click on the word “<none>” which appears beside the public IP address. Then click on “Configuration”, and finally enter the DNS name label in the text box provided. You should write down and note the name you entered as well as the data center (i.e. myVM.southcentralus.cloudapp.azure.com). When you have entered the name of your choosing, press “Save” by the disk icon near the top of the panel. You can use either the public IP address or DNS name to refer to your VM using popular tools. If you have noted and saved the IP and DNS names, you can close the Azure portal in the web browser.
Login to your Apache Tomcat Azure Linux Ubuntu VM
Using a tool of your choosing, log in to your newly created Ubuntu 16 Server VM. Free tools are available such as MobaXterm. You can also use a Windows Command prompt and use the command: ssh <hostname> -l <username>
You will need to know how to use a basic text editor (such as ‘vi’, ‘vim’ or ‘nano’) in order to edit files to configure your server.
0. Install Apache Tomcat On Your Azure Linux Ubuntu VM
To get Tomcat running, we will install the standard Apache2, Tomcat7, and mod-jk packages.
0.1: From a terminal window running on your newly created Ubuntu 16 Server, enter the following commands (you will need to allow each command to complete before entering the next command):
sudo apt update
sudo apt upgrade -y
sudo apt-get install -y apache2
sudo apt-get install -y tomcat7
sudo apt-get install -y tomcat7-admin
sudo apt-get install -y libapache2-mod-jk
Now that the required packages are installed on your VM, you need to configure the services.
0.2: Edit the file /etc/tomcat7/server.xml (e.g. sudo vi /etc/tomcat7/server.xml) and
Uncomment the following line and save the file:
<Connector port=”8009″ protocol=”AJP/1.3″ redirectPort=”8443″ />
0.3: Create a new file /etc/apache2/workers.properties (e.g. sudo vi /etc/apache2/workers.properties) and
Add/insert the following 5 lines and save the file:
# Define 1 real worker using ajp13
worker.list=worker1
worker.worker1.type=ajp13
worker.worker1.host=localhost
worker.worker1.port=8009
0.4: Edit the file /etc/apache2/mods-available/jk.conf (e.g. sudo vi /etc/apache2/mods-available/jk.conf) and
Change the line for the JkWorkersFile property and save the file:
JkWorkersFile /etc/apache2/workers.properties
0.5: Edit the file /etc/apache2/sites-enabled/000-default.conf (e.g. sudo vi /etc/apache2/sites-enabled/000-default.conf) and
Add the following line just above the </VirtualHost> tag line (near the bottom of the file) and save the file:
JkMount /* worker1
0.6: Create a symbolic link to the Tomcat manager:
cd /var/lib/tomcat7/webapps
sudo ln -s /usr/share/tomcat7-admin/manager manager
0.7: Update the permissions on the Tomcat webapps and install directory:
sudo chown -R tomcat7.tomcat7 /var/lib/tomcat7/webapps
sudo chown tomcat7.tomcat7 /usr/share/tomcat7
0.8: Set the default Tomcat umask to enable owner and group access by editing /etc/init.d/tomcat7 (e.g. sudo vi /etc/init.d/tomcat7):
Change the line containing “umask 022” to instead be:
umask 002
Save the file.
0.9: Restart the Tomcat7 and Apache2 servers:
sudo systemctl daemon-reload
sudo /etc/init.d/tomcat7 restart
sudo /etc/init.d/apache2 restart
Each service should have reported OK for the above restart commands when they started successfully.
0.10: Your Ubuntu Server is now running Tomcat, but Azure needs to be configured to allow incoming traffic to reach your server. To do this:
- Open Azure portal: https://portal.azure.com
- Select “Virtual machines” in the left-hand navigation panel (not Virtual machines (classic))
- Under the “Virtual machines” panel, select the machine you want to update
- Click on “Network interfaces” under Settings
- Click on the network interface to be updated
- Click on “Network security group” under Settings
- Click on the network security group to be updated
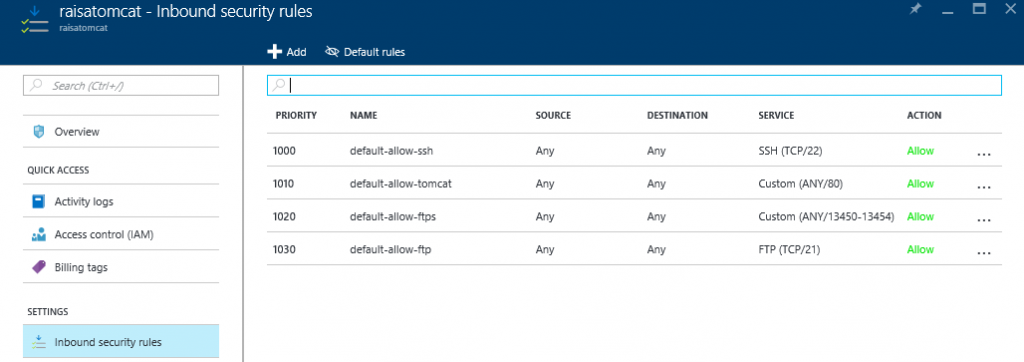
- Click on “Inbound security rules” under Settings
- “+Add” a new rule with Name “default-allow-tomcat” on Destination port range 80, and click the “OK” button. The other default values should be sufficient.
The VM will show as “Updating” and then reports back the rule has been added. Your Azure Ubuntu 16 Server is now fully configured for Tomcat.
The image below shows the final state for the Inbound Security Rules at the completion of this entire walkthrough. Only the first two rules (default-allow-ssh and default-allow-tomcat) will be configured initially after step 0.10 is completed. The “default-allow-ftps” and “default-allow-ftp” rules are configured later in steps 3.6 and 3.7 and are only needed if you want to deploy using FTP (ftps).
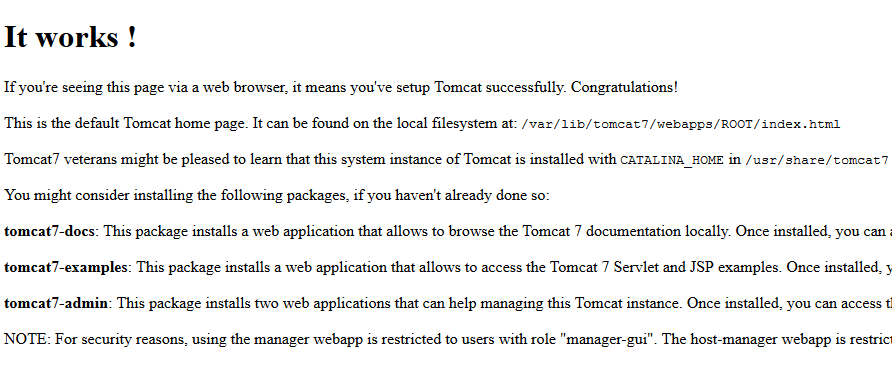
0.11: To verify the operation, open a web browser window pointing to your new server…
Example: http://raisatomcat.southcentralus.cloudapp.azure.com/
The webpage should display “It works !” with some other text (as shown below). If not, go back and make sure all of the above steps were completed in the order specified.
In the next sections, we will describe three different deployment methods for deploying web applications to this Tomcat server in Azure from Team Services (or TFS). Each section is independent of the other section so you can choose to configure only one option, any two options, or all three as your needs require. That is, Option 2 is not dependent on Option 1, Option 3 is not dependent on options 2 and 3, etc.
Option 1: Configure Tomcat Azure VM for Web UI Manager Access and the Team Services Apache Tomcat Deployment Task
Add permissions to be able to access the Tomcat manager (Web UI and/or Team Services task).
1.1: Edit the file /etc/tomcat7/tomcat-users.xml (e.g. sudo vi /etc/tomcat7/tomcat-users.xml) and add the following lines between the <tomcat-users> and </tomcat-users> tags and save the file:
<role rolename=”tomcat”/>
<role rolename=”manager-script”/>
<role rolename=”manager-gui”/>:q
<role rolename=”manager”/>
<role rolename=”admin-gui”/>
<user username=”tomcat” password=”tomcat” roles=”tomcat”/>
<user username=”manager” password=”bitnami” roles=”tomcat,manager-script,manager-gui,admin-gui”/>
Use your own values for the Tomcat username and password. You will need to note and save these values as you will need to them to access the Tomcat manager web UI and also to setup Team Services to deploy with the Tomcat Deployment Task.
1.2: Restart the Tomcat7 and Apache2 servers:
sudo /etc/init.d/tomcat7 restart
sudo /etc/init.d/apache2 restart
Each service should have reported OK for the above commands when they started successfully.
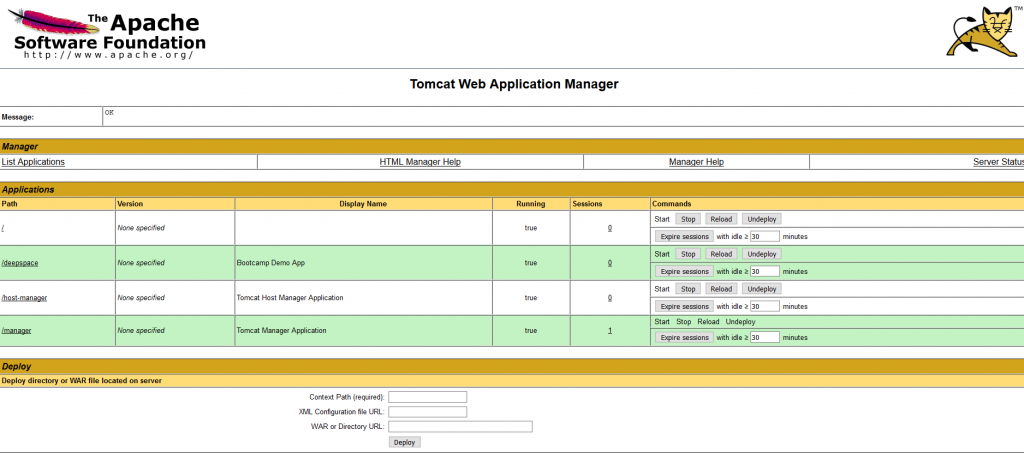
1.3: To verify you have Tomcat manager permissions configured, open a web browser to the your host’s URL but add “manager” to the end…
Example: http://raisatomcat.southcentralus.cloudapp.azure.com/manager
When prompted, enter the username and password you used when editing the /etc/tomcat7/tomcat-users.xml file above.
The webpage should successfully display the Tomcat Web Application Manager page as partially shown below:
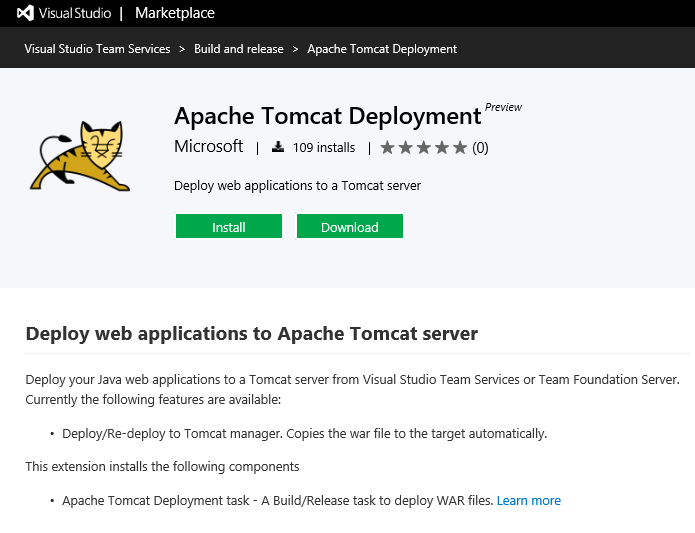
You can now install the Apace Tomcat Deployment task from your Team Services project to deploy to your Tomcat server:
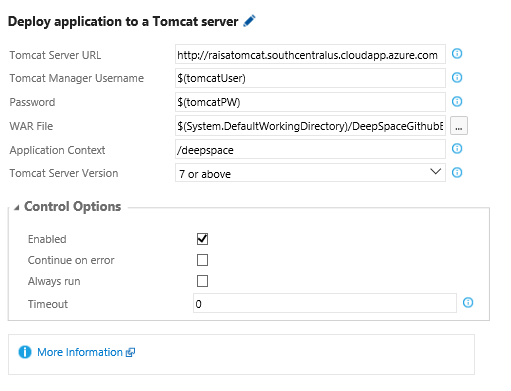
Then create a build or release definition containing the Deploy Application to a Tomcat Server deployment task — you should not specify port 8080 as the task documentation mentions (you do not need to specify a port at all) and use the username and password from step 1.1 above (note: most applications have an Application Context of “/” which is different than what is shown below):
Option 2: Configure Tomcat Azure VM for Team Services Built-in Copy Files Over SSH Deployment Task
2.1: Create an account (tcdeploy) on the server with the same group ID as the Tomcat service to enable easier deployments into the Tomcat webapps directory:
sudo adduser –ingroup tomcat7 tcdeploy
(select a password and then hit enter to default other options/parameters and then type ‘Y’ when asked if the information is correct)
2.2: Configure the default umask for SSH to enable RW for user and group
sudo vi /etc/pam.d/sshd
Add the following line right after the line containing “@include common-session” and then save the file:
session optional pam_umask.so umask=002
2.3: Then restart the SSH daemon:
sudo systemctl daemon-reload
sudo service sshd restart
2.4: Create an RSA public and private key for SSH:
su tcdeploy (enter password you selected for the tcdeploy account above in step 2.1)
cd
ssh-keygen (use defaults for all prompts except DO pick a passphrase and choose one that you will remember)
cd .ssh
cp id_rsa.pub authorized_keys
cat id_rsa
You will need to cut-n-paste this RSA private key to save later. You will need this private key and the passphrase when setting up your SSH endpoint in Team Services.
The key will look something like this:
—–BEGIN RSA PRIVATE KEY—– Proc-Type: 4,ENCRYPTED DEK-Info: AES-128-CBC,D4E587DECFADB218703A5431F7CFD6F7
PwkwPlFpm7JAT8Oc7pLpTzXEL9bl8LiDl8nnhuC9VZSOU58+cyR5m/e+6Odfx9eU RUyhInyFm2D9y9ud79GgCW9aUR2aH61L1TgoZjM1aNWlIYvDr+Eq63yNfZHvz1C/ plDkEPp0qOrmYdzL38hxG8c8y8TPjpqSxeITVu9Ql+S5Jz/BodNQPvqOnR//3SgI E3ur2XxSkgvLg02k4XS8q4J3jJksZ5SW+qvkdpeGIl1GwBeHBlqBs9xjcRoZhdOZ 6/QSor0RkbKaUUCQ9cLouSkIKCqVzDqecjOsIC4QdcXI6jP1MBQSdmsRylIa1KXC htxyBpB4sQc+wnEBiMy7dzPC9mBKb5Yc816jPTS54kfUZgvOsJNpe/5GMDjyV5r8 MjNkyguEFC35fgNeTBXZFI/JumQcWRt8A8myFv73ETUKRZ9//tICclTO3uE6ZJD+ K6KohoYWRvj3dMrPPu/PP2091ygwO2BRO4vEC3qIoIis4tR0X3jM/HOtzARDXdVG 6k13CSQDq7zBj4zmHu4XVoaIA1mFpYuqYOR5hRMDhV5UTIEiKKDCh+YREaD6EEFE lB6cy4tuLnbcOdj7xphXkCh+tWUD+MVAPmBk/EcDH1efKl8Iv4RK2UYRJyQi5nx/ bhU621WlO8jQTs9yHWjkc4/eJIzCPvmfZDFYpF+vSDQz9U/X/XhFfJQs0JCIBQgU /ZLIdIrQiSylVsviQmQKfxLtO28YxvVYWZZwqVWwnviDF3XCWCin6FNSGOXRzchS cvTp+Srp5i3ON0I+ZlVI4JW7EccrjTQa+ZK/1p1s06JhBbt8dlL8rgbbGBeJ/L3w o878ZRq+LRjlCCwwS4xhSQJkOtd9sJ/kzfOB+UIEkp6nGUmTjp9uC+Ca5T6EYn6Z a7AZyZrkW9gM0CFiBG/aVTnE70bcTKxLwi4CppUGddyVBjY+7LcD9fPEtqujxr6z f+ARCuJpwlRa7PVdfKrOHOHppZfbnRObWFu7qjhIan02hm3lUiZ4ndVThcjsXVD+ c/XEWVbqd1w1tGzJ2FJC8yLxCb4cY7H0Uoi8/iq0vLs912Wi8Fe6J0f4/3Mh1c/y YgvIUNZi8keJhxONgBjKCRDrtn6LB//VmBYfLlTY6G9rMoPrjDM4Q5DA60X7nUbI FyieUIV46KZhk1RrPKtvF8NhJhZcHHTlbd1yUCKRR58ygMwBuKtwvhTjvf/dkm/6 taBED4hhjPCJ/1fF0zcYmcbAMzB6wY1+EHuUgPyOouvZvagTipJBe6o/6R1gSCIE glNXmTozK4Gz1D42JnNog2O3p/5NdCZ6vdiwQLNFHOM38z9OM6l0SXuxgEXBImoC tmRMbuM8ag+PtN8LnZGDDgv4ez7B1UQ5b0V7aZ6Dk5biU6YrGLAD6d/7BN5MWgSL +ZoF7SUYJF/E8FUy0i6ZLtMHnLEnlroCOH0D4p/yJuCbgTKyrnn+taW6lNNKxaFT xERRRIaV+bdo07NkHpFTBYNy6biTR5Mht1uZmBZbDqDhCcP1uCJCTUUqSh5tMSNi AHajG40V+sJjDCvlOmbvd0rTK8XRMn4WAEnbHWoZx93GuZNMhQdLfsDRPKZshpTV —–END RSA PRIVATE KEY—–
Your VM is now setup and configured to enable deployment using the Team Services Copy Files Over SSH built-in deployment task.
To learn more about the Copy Files Over SSH task, read the announcement blog and the how-to video.
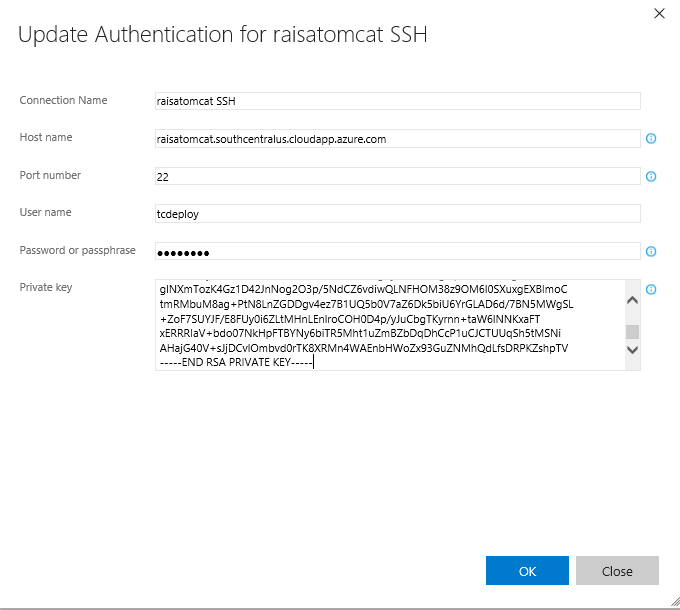
To use Copy Files over SSH with this server in Team Services, first, setup an SSH endpoint (using the SSH endpoint option) – make sure to use User Name “tcdeploy” (from step 2.1 above), the passphrase you chose in step 2.4 above, and cut-n-paste the entire RSA private key you generated in step 2.4 above into the Private key field:
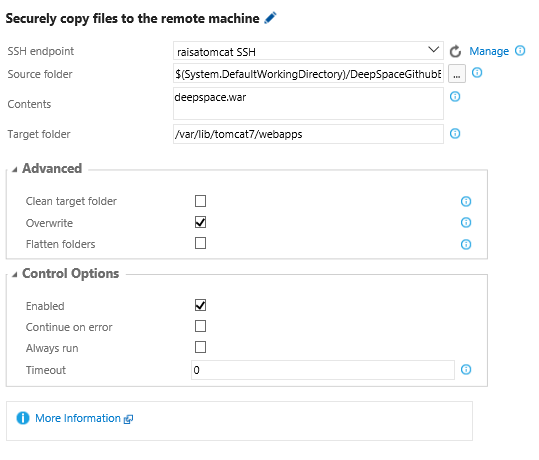
Then create a build or release definition containing the Copy Files over SSH deployment task – make sure the Target folder is “/var/lib/tomcat7/webapps” to deploy to the Tomcat server:
Option 3: Configure Tomcat Azure VM for Team Services Built-in FTP (ftps) Upload Utility Task
3.0: ONLY IF you are proceeding here as a continuation from Option 2, make sure you have “exited” the shell for the tcdeploy account login:
exit
whoami
The output of the whoami command should indicate you are the Username you initially selected when you setup the VM (not ‘tcdeploy’).
SKIP this first step IF you already created the tcdeploy account as the first step in Option 2 (i.e. Step 2.1) above…
3.1: Create an account (tcdeploy) on the server with the same group ID as the Tomcat service to enable easier deployments into the Tomcat webapps directory:
sudo adduser –ingroup tomcat7 tcdeploy
(select a password and then hit enter to default other options/parameters and then type ‘Y’ when asked if the information is correct)
You have now configured “tcdeploy” to be your ftps username and the password you entered in this step as your ftps password.
3.2: Install the vsftp package (i.e. FTP):
sudo apt-get install -y vsftpd
3.3: Generate an SSL self-signed certificate:
sudo openssl req -x509 -nodes -days 365 -newkey rsa:1024 -keyout /etc/ssl/private/vsftpd.pem -out /etc/ssl/private/vsftpd.pem
(answer all relevant questions when prompted as to your organization, name, etc.)
You will use the new SSL certificate filename you just created in two locations (shown in red) below when setting up the configuration file.
3.4: Edit the vsftpd configuration file /etc/vsftpd.conf to ensure the following parameters are set in the file (e.g. sudo vi /etc/vsftpd.conf):
(another option for this step 3.4 is to move the original /etc/vsftpd.conf file and then create a new one with the contents below).
listen=NO
listen_ipv6=YES
anonymous_enable=NO
local_enable=YES
write_enable=YES
local_umask=002 # this is different than the default 022
dirmessage_enable=YES
use_localtime=YES
xferlog_enable=YES
connect_from_port_20=YES
xferlog_file=/var/log/vsftpd.log
ls_recurse_enable=YES
secure_chroot_dir=/var/run/vsftpd/empty
pam_service_name=vsftpd
# ftps/ssl specific cofig stuff below this line
rsa_cert_file=/etc/ssl/private/vsftpd.pem
rsa_private_key_file=/etc/ssl/private/vsftpd.pem
ssl_enable=YES
allow_anon_ssl=NO
force_local_data_ssl=YES
force_local_logins_ssl=YES
ssl_tlsv1=YES
ssl_sslv2=NO
ssl_sslv3=NO
require_ssl_reuse=NO
ssl_ciphers=HIGH
debug_ssl=YES
pasv_enable=YES
pasv_address=168.61.54.109
pasv_min_port=13450
pasv_max_port=13454
Make sure to use the path/name of the self-signed certificate you created in step 3.3 above on the rsa_cert_file and ras_private_key_file lines in this config file.
Make sure to use the public IP address of your VM on the pasv_address line in the config file.
3.5: Restart the ftp service:
sudo service vsftpd restart
3.6: Open ports 13450-13454 on the Azure VM using a similar process to that used above as the final step (i.e. Step 0.10) in setting up Tomcat on your server.
Name the inbound security rule “default-allow-ftps” and set the allowed Destination port range to be 13450-13454 and specify “Any” protocol.
3.7: Open port 21 as well using the inbound security rule name “default-allow-ftp” and set the Protocol to “TCP” and the Destination port range to 21.
3.8: To verify your system is configured correctly, use a tools such as FileZilla to connect to your server using ftps. You would specify the Host name of your VM, the username of “tcdeploy” and the password you used when creating the tcdeploy account above in the first step in this section.
Your VM is now setup and configured to enable deployment using the Team Services FTP Upload built-in utility task.
To learn more about the FTP Upload task, read the announcement blog and the how-to video.
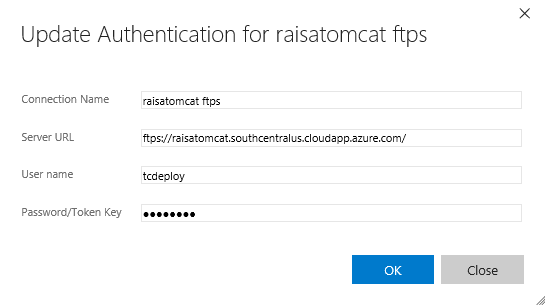
To use ftps with this server in Team Services, first, setup an sftp endpoint (using the Generic endpoint option) – make sure to prefix the Server URL to your server with “ftps” to use secure ftp:
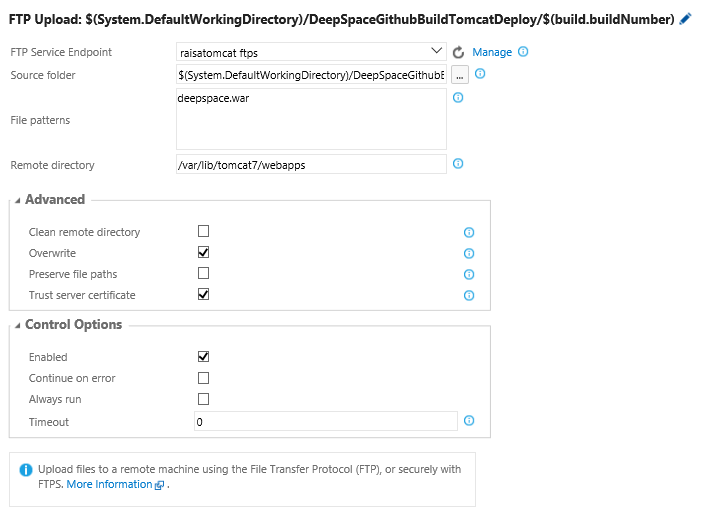
Then create a build or release definition containing the FTP Upload utility task – make sure the Remote directory is “/var/lib/tomcat7/webapps” to deploy to the Tomcat server and also that the “Trust server certificate” Advanced option is selected so that your self-signed certificate (from step 3.3 above) will be trusted:
 Light
Light Dark
Dark
0 comments