
Packaging an Electron app for managed distribution across devices
Introduction
A customer we were recently collaborating with came to us with an interesting problem regarding their cross platform codebase and managed distribution. We learned that they were planning to build an Electron-based application and needed help from Microsoft to understand how to build, deploy and manage the application on Windows using an MDM solution (eg. Microsoft Intune). Microsoft Intune is a cloud service that provides mobile device management and mobile application management capabilities. Together with the customer, Microsoft engineers built a sample electron application that could be opened in Kiosk mode and could be deployed through Microsoft Intune.
In this code story, we’ll explore the following aspects of our solution:
- Packaging Electron source into Windows binaries
- Setting the app in ‘Kiosk’ mode using PowerShell
- Building a Configurable Windows installer (.MSI) using WiX Toolset
- Cross-platform CI with AppVeyor and Travis
In order to focus on these aspects, we created a sample Electron app and iterated on it.
Windows Binaries
In perhaps the most straightforward part of our journey, we used the Electron Packager CLI tool to create OS-specific bundles from an Electron app.
electron-packager ./src --platform=win32 --arch=x64 --asar --overwrite --out ./dist
Kiosk Mode
Windows 10 Enterprise provides multiple ways to run an app in kiosk mode:
- Assigned Access method, which allows a single Universal Windows Platform (UWP) app to run in kiosk mode.
- Shell Launcher method, which allows a single classic Windows Application (e.g Electron app) to run in kiosk mode.
Intune provides a built-in Configuration Service Provider to remote-enable Assigned Access. It is as simple as providing a JSON with domain/local username and the UWP Application ID in Azure Portal.
{"Account":"contoso\\kioskuser","AUMID":"Microsoft.Windows.Contoso_cw5n1h2txyewy!Microsoft.ContosoApp.ContosoApp"}
Since Electron is a classic Windows app, we chose Shell Launcher as our way forward.
Shell Launcher
Because Intune does not provide a direct way to remote-enable Shell Launcher, we had to use an elevated PowerShell script. The script takes the local/domain username as well as the full path of the Windows executable (.exe) produced in the previous step as parameters.
We turned on the Shell Launcher feature in Windows 10 (Programs and Features -> Turn Windows features on or off -> Expand ‘Device Lockdown’ -> Select Shell Launcher). Below is the code to do the same in PowerShell:
Enable-WindowsOptionalFeature -online -FeatureName Client-EmbeddedShellLauncher -all -NoRestart
Then we created a Shell Launcher Object as provided by Windows Management Instrumentation (WMI).
$ShellLauncherClass = [wmiclass]"\\localhost\root\standardcimv2\embedded:WESL_UserSetting"
In order to set a custom shell, we had to first find out the Security Identifier (SID) of the Windows username. We wrote a helper function for this:
function Get-UsernameSID($AccountName) {
        $NTUserObject = New-Object System.Security.Principal.NTAccount($AccountName)
        $NTUserSID = $NTUserObject.Translate([System.Security.Principal.SecurityIdentifier])
        return $NTUserSID.Value
    }
Finally, we set the custom shell for the above SID and full application path:
# Last parameter is Default Action
# 0 - Restarts the shell application
# 1 - Restarts the device
# 2 - Shuts down the device
$ShellLauncherClass.SetCustomShell($Cashier_SID, $ExeName, ($null), ($null), 0)
For debugging purposes we also print modified shell settings:
$shellSetting = Get-WmiObject -namespace "root\standardcimv2\embedded" `
    -computer "localhost" -class WESL_UserSetting | Select-Object Shell, Sid

Write-Host $shellSetting
If ShellLauncher was successfully updated, the output of this command would be:
Shell                                                    Sid
-----                                                    ---
C:\kiosk-demo-electron-win32-x64\kiosk-demo-electron.exe S-1-5-21-XXXXXXXXXX-XXXXXXXXX-XXXXXXXXXX-XXXXXXX
Windows Auto-Logon
To provide a full kiosk experience, we decided to auto-login the kiosk user. For this step, we added another parameter $Password to the PowerShell Script and modify Windows Registry.
$RegPath = "HKLM:\SOFTWARE\Microsoft\Windows NT\CurrentVersion\Winlogon"
Set-ItemProperty $RegPath "AutoAdminLogon" -Value "1" -type String
Set-ItemProperty $RegPath "DefaultUsername" -Value "$UserName" -type String
Set-ItemProperty $RegPath "DefaultPassword" -Value "$Password" -type String
Windows Installer
For building Windows Installers for Electron apps, the most popular choice is the Squirrel-based electron-winstaller npm module. However, electron-winstaller does not allow custom parameters for the produced installer or executing elevated PowerShell; as a result, we chose to use WiX Toolset (specifically, we chose the npm module wixtoolset-compiler). When executed normally, the installer prompts for Windows elevation; however, apps distributed with Intune are installed without interruption via the SYSTEM user, which keeps the elevation prompt silent.
WiX Toolset
Building a Windows installer with WiX is a multi-step process. The first step is to configure it with an XML file (.wxs). We have provided a base config file product.wxs that contains app name, version, author, a unique upgrade code, installer parameters with default values, as well as custom actions that execute our PowerShell script.
<?xml version="1.0" encoding="UTF-8"?>
<Wix xmlns="http://schemas.microsoft.com/wix/2006/wi" xmlns:util="http://schemas.microsoft.com/wix/UtilExtension">
<Product Id="*" Name="Kiosk Demo Electron" Language="1033" Version="1.0.0.0" Manufacturer="Syed Hassaan Ahmed" UpgradeCode="a8d48e7b-86a0-4171-8db8-6fb3618dfdc6">
<Package InstallerVersion="500" Compressed="yes" InstallScope="perMachine" />
<MajorUpgrade Schedule="afterInstallInitialize" AllowDowngrades="no" DowngradeErrorMessage="ok" AllowSameVersionUpgrades="yes" />
<MediaTemplate EmbedCab="yes" />
<!-- Params passed to PowerShell script -->
<Property Id="KIOSK_USERNAME">kioskuser</Property>
<Property Id="KIOSK_PASSWORD">kioskpassword</Property>
<Property Id="EXE_NAME">kiosk-demo-electron.exe</Property>
<Directory Id="TARGETDIR" Name="SourceDir">
<Directory Id="ProgramFilesFolder">
<Directory Id="APPLICATIONROOTDIRECTORY" Name="Kiosk Demo Electron"/>
</Directory>
</Directory>
<Feature Id="MainApplication" Title="Main Application" Level="1">
<ComponentRef Id="InstallShellLauncher" />
<ComponentGroupRef Id="ElectronBinaries" />
</Feature>
<!-- Install Shell Launcher -->
<CustomAction Id="InstallShellLauncher"
Property="InvokeInstall"
Value=""powershell" -NoProfile -NonInteractive -InputFormat None -ExecutionPolicy Bypass -File "[APPLICATIONROOTDIRECTORY]Install-ShellLauncher.ps1" "[KIOSK_USERNAME]" "[KIOSK_PASSWORD]" "[APPLICATIONROOTDIRECTORY][EXE_NAME]""
Execute="immediate"/>
<CustomAction Id="InvokeInstall"
BinaryKey="WixCA"
DllEntry="CAQuietExec64"
Execute="deferred"
Return="check"
Impersonate="no" />
<InstallExecuteSequence>
<Custom Action="InstallShellLauncher" After="CostFinalize">NOT Installed</Custom>
<Custom Action="InvokeInstall" After="InstallFiles">NOT Installed</Custom>
</InstallExecuteSequence>
</Product>
</Wix>
Then we execute WiX steps in this order:
1) Heat
Heat is a binary harvester that scans through folders or .NET solutions (.sln) for Windows binaries and generates an XML output with a list of files.
heat.exe dir "<PATH_TO_ELECTRON_BINARIES>" -v -ag -cg ElectronBinaries -var var.SourceDir -dr APPLICATIONROOTDIRECTORY -srd -suid -sfrag -sreg -out ./dist/heat.wxs
Here is a part of the generated heat.wxs output:
<?xml version="1.0" encoding="utf-8"?>
<Wix xmlns="http://schemas.microsoft.com/wix/2006/wi">
    <Fragment>
        <DirectoryRef Id="APPLICATIONROOTDIRECTORY">
            <Component Id="kiosk_demo_electron.exe" Guid="*">
                <File Id="kiosk_demo_electron.exe" KeyPath="yes" Source="$(var.SourceDir)\kiosk-demo-electron.exe" />
            </Component>
            <Component Id="node.dll" Guid="*">
                <File Id="node.dll" KeyPath="yes" Source="$(var.SourceDir)\node.dll" />
            </Component>
            <Component>...Other Chromium binaries...</Component>
        </DirectoryRef>
    </Fragment>
    <Fragment>
        <ComponentGroup Id="ElectronBinaries">
            <ComponentRef Id="kiosk_demo_electron.exe" />
            <ComponentRef Id="node.dll" />
            <ComponentRef Id="...Other Chromium binaries..." />
        </ComponentGroup>
    </Fragment>
</Wix>
2) Candle
Candle pre-processes .wxs files and generates compiled .wixobj files. We passed the above .wxs files to Candle.
candle.exe -v -ext WixUtilExtension -dSourceDir="<PATH_TO_ELECTRON_BINARIES>" ./tools/product.wxs ./dist/heat.wxs -out ./dist/
3) Light
The Light tool processes the previously mentioned .wixobj files and produces the final installer (.MSI).
light.exe -v -ext WixUtilExtension ./dist/product.wixobj ./dist/heat.wixobj -out ./dist/KioskDemoElectron.msi
The previous WiX steps were wrapped inside npm scripts. Here is how the package.json looks:
"config": {
    "binaries": "./dist/kiosk-demo-electron-win32-x64"
  },
"scripts": {
    "clean": "rimraf ./dist",
    "pack": "cross-env DEBUG=electron-packager electron-packager ./src --platform=win32 --arch=x64 --asar --overwrite --out ./dist",
    "heat": "wixtoolset-compiler heat --args=\"dir %npm_package_config_binaries% -v -ag -cg ElectronBinaries -var var.SourceDir -dr APPLICATIONROOTDIRECTORY -srd -suid -sfrag -sreg -out ./dist/heat.wxs\"",
    "copyScripts": "cross-conf-env copyfiles -f ./tools/scripts/*.* npm_package_config_binaries",
    "candle": "wixtoolset-compiler candle --args=\"-v -ext WixUtilExtension -dSourceDir=%npm_package_config_binaries% ./tools/product.wxs ./dist/heat.wxs -out ./dist/\"",
    "light": "wixtoolset-compiler light --args=\"-v -ext WixUtilExtension ./dist/product.wixobj ./dist/heat.wixobj -out ./dist/KioskDemoElectron.msi\"",
    "build": "run-s heat copyScripts candle light",
    "dist": "run-s clean pack build"
  },
"devDependencies": {
    "copyfiles": "^1.2.0",
    "cross-conf-env": "^1.1.2",
    "cross-env": "^5.0.5",
    "electron": "^1.7.8",
    "electron-packager": "^9.1.0",
    "npm-run-all": "^4.1.1",
    "rimraf": "^2.6.2",
    "wixtoolset-compiler": "^1.0.3"
  }
Next, generate the installer in the /dist folder:
npm run dist
The installer can simply be invoked by:
KioskDemoElectron.msi KIOSK_USERNAME=<KIOSK_USERNAME> KIOSK_PASSWORD=<KIOSK_PASSWORD>
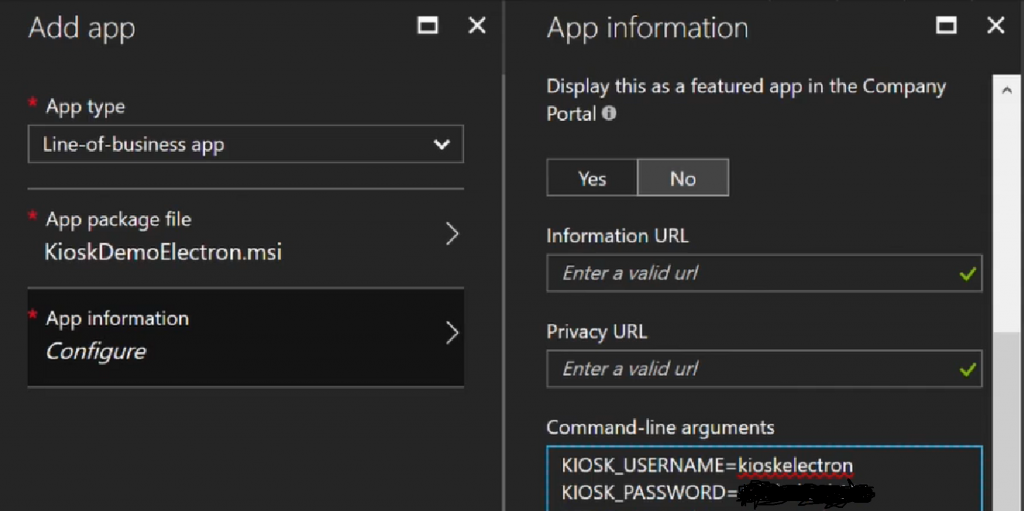 Distributing the generated .msi with Intune in the Azure Portal
Continuous Integration
AppVeyor
We wanted to make sure we had a way to verify that changes in Electron app or PowerShell script continue to produce an installer that correctly sets the app in kiosk mode, so we used AppVeyor CI to build and execute the installer on AppVeyor’s Windows build agent as well as produce an installation log file.
Here is the appveyor.yml:
image: Visual Studio 2017
install:
  - ps: Install-Product node 9
  - npm install npm@latest -g
  - npm install
build_script:
 - npm run dist
 - cd dist
 - msiexec /i "KioskDemoElectron.msi" /l*v "install.log" KIOSK_USERNAME=%username%
artifacts:
  - path: .\dist\*.msi
  - path: .\dist\*.log
Travis CI
Building Windows installers on a Linux environment is uncommon, and we ran into a few challenges.
- WiX Toolset is a .NET application. We used Winetricks to install .NET Framework 4.0.
- If the full path of any of the electron-packager output files were longer than 128 chars, we ran into error LGHT0103 : The system cannot find the file.
- Light tool has a known issue with MSI validation on Wine so it had to be turned off with -sval flag.
In order to isolate Wine and Winetricks setup, we used an existing Linux Docker image which contained WiX Toolset, Wine and Node.js, to create our app’s Docker image.
FROM syedhassaanahmed/wix-node
RUN mkdir /home/wix/src
WORKDIR /home/wix/src
COPY . .
RUN npm install
RUN npm run dist:wine
We then added these Docker commands to npm scripts which build the image, create the container and copy the artifacts from the container to host machine.
{
    "docker:build": "cross-conf-env docker build -t npm_package_name .",
    "docker:create": "cross-conf-env docker create --name npm_package_name npm_package_name",
    "docker:copy": "cross-conf-env docker cp npm_package_name:/home/wix/src/dist/ ./dist",
    "docker:remove": "cross-conf-env docker rm -f npm_package_name",
    "dist:docker": "run-s docker:build docker:create clean docker:copy docker:remove"
}
Here is the final Travis CI configuration:
language: node_js
node_js:
  - "9"
services:
  - docker
script:
  - npm run dist:docker
notifications:
  email: false
Conclusion
Through our collaboration with the customer, we were able to build a simple Electron-based app that we could deploy to a broad range of devices using Microsoft Intune. While we used a simple Electron app here, you can easily use the scripts and code that we developed here for other projects where you want to manage and customize the deployment of Electron apps.
Resources
You can reach out to us with feedback and questions in the comments below.
 Light
Light Dark
Dark
4 comments
This is awesome, and EXACTLY what i need for a very big project that i am on. I realize it is far too difficult to consistently supress the windows shell into a secure state, so replacing it is the only option.
I compiled and installed this solution and it landed me on the Kiosk User account completely black, as expected. where do i insert an actual Electron app that will load after the MSI installs? i am making KIOSK desktops that require just a few icons to open applications installed locally,and a browser locked down to a few sites.
Hi,
When you build the solution with
npm run distthe created installer already contains binaries from a sample Electron app. If you’d like to insert your own Electron app, you should modify the code in /src directory. Due to the sample app mentioned above, you should not see a completely black screen. When executing the installer, did you specify the correctKIOSK_USERNAMEandKIOSK_PASSWORDparameters? Also you should enable installer logging like below and check for errorsmsiexec /i "setup.msi" /l*v "msi.log" KIOSK_USERNAME=... KIOSK_PASSWORD=.... The PowerShell script which is executed by installer, creates a log atC:\Windows\SysWOW64\powershell.log. You should check the content of that log too.Tried your demo on a old laptop. Installation went fine, autologin was set up, but I also get a black screen.
Worst thing is that Kiosk mode seems to be enabled for all user, so I had to reinstall windows completely as I couldn’t get back to my dev session.
I passed the correct username and password during install though… Do you have any clue on what’s happening ?
Hi,
We discovered that the Windows Embedded Shell Launcher feature requires Windows 10 Enterprise version, hence we’ve updated the GitHub repo. Are you getting a black screen on the Enterprise version?
Kiosk mode shouldn’t be enabled for all users as the PowerShell script only works for a specific user. Have you checked the installer logs and PowerShell logs as specified in the GitHub readme?