
Cordova IoT Simulator
Overview of the Solution
Building Internet of Things (IoT) solutions often involves creating a complex pipeline of software that originates at a device and sends telemetry to the cloud. These devices also consume commands from the cloud to alter their configuration and operating behavior. Once this is done for a small number of devices, it can be scaled to any number needed to solve the problem our partners are facing.
During a recent hackathon with Stroeer, a clear pattern emerged to efficiently parallelize the construction of the IoT pipeline (more information can be found in “Real-Time Maps with Event Hubs and SignalR”. Following this pattern each piece of the pipeline can be built in parallel, then connected together and validated as a complete end-to-end system. One piece of this parallelized approach is to be able to generate and send simulated data into the pipeline at each stage. Our solution for creating simulated data while the device is being built is an Apache Cordova Application that can read from the sensors of a mobile phone and stream that data to the cloud simulating any device the pipeline needs.
Implementation
The PhoneIoTSimulator contains rich functionality, however it is implemented as simply as possible allowing developers to quickly customize the application and then focus on the data pipeline while their colleagues build real IoT devices to replace the simulator. There are only two screens in the application, the map screen and the configuration screen. Here is the map screen:
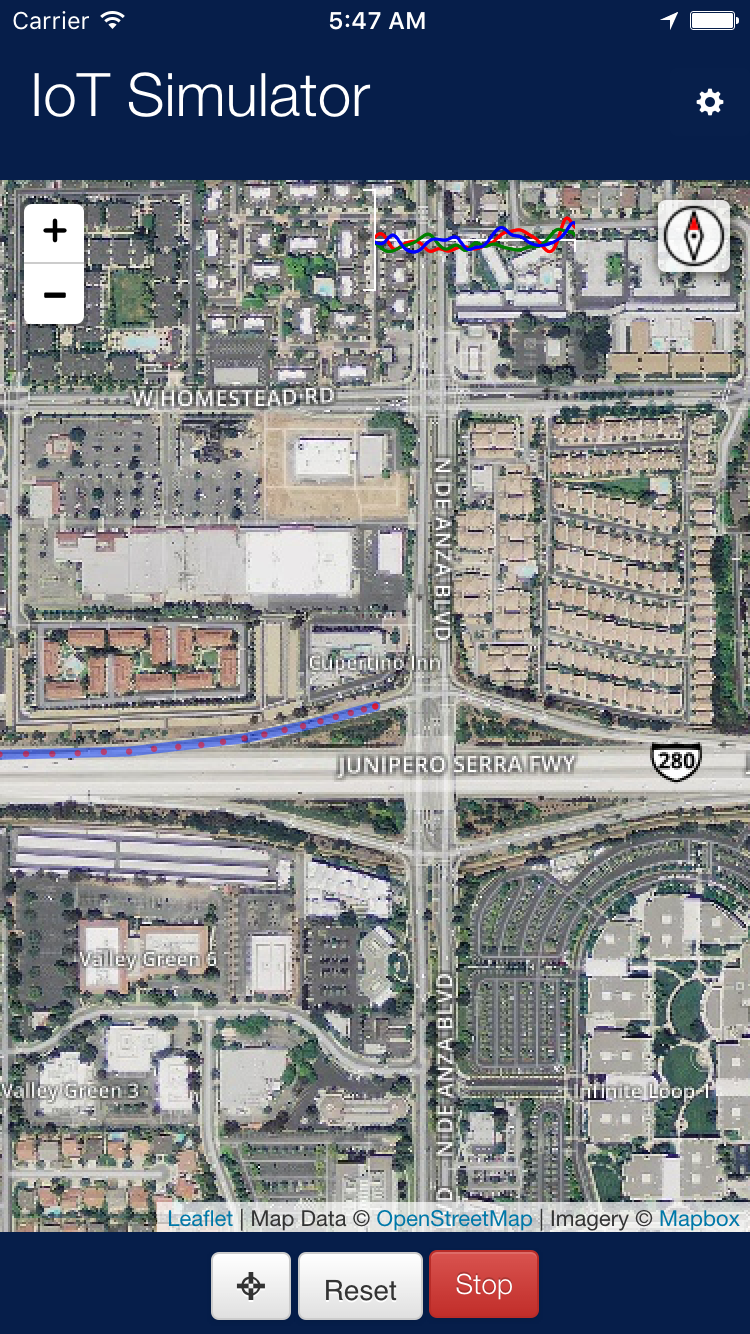
This shows the realtime data for the phone:
- Compass Heading
- Geolocation (Lat, Long)
- X, Y, Z Accelerometer Values
These values are packaged into a message with a Device ID, a UUID generated by the application, and a timestamp. The data is put into a JSON packet:
    var eventBody = {
        Timestamp: new Date(),
        UserID: app.deviceId
    };
    if (ENV.settings.sensors.geolocation && app.currentLocation) {
        eventBody['Latitude'] = app.currentLocation.latitude;
        eventBody['Longitude'] = app.currentLocation.longitude;
    }

    if (ENV.settings.sensors.accelerometer && app.acceleration) {
        eventBody['Acceleration_X'] = app.acceleration.x;
        eventBody['Acceleration_Y'] = app.acceleration.y;
        eventBody['Acceleration_Z'] = app.acceleration.z;
    }

    if (ENV.settings.sensors.compass && app.heading) {
        eventBody['MagneticHeading'] = app.heading.magneticHeading;
        eventBody['TrueHeading'] = app.heading.trueHeading;
        eventBody['HeadingAccuracy'] = app.heading.headingAccuracy;
    }

    var msg = new EventData(eventBody);
This eventBody object contains arbitrary JSON, however we tag it with the deviceId to mark this event data stream uniquely. We also include a timestamp with every event. The rest of the data contains, in our minimal implementation, the latitude and longitude from the GPS, accelerometer data for X, Y, and Z directions, the magnetic and true heading with accuracy from the compass. These constitute a basic event stream that is available across iOS, Android, and Windows phones.
This data is providing the real-time telemetry stream for the Azure data pipeline.
However, each of the sensor values is configurable. It is possible to send empty events, which include just the device id and timestamp, but this shows how others can extend the application to include other types of sensor data.
Capturing data is one of the key values, since this phone based simulator reads real sensors to provide the telemetry stream. In Cordova plugins provide access to platform specific APIs. Some plugins are cross-platform, some are not. We focus on using cross-platform plugins to provide a basic set of sensor telemetry for geolocation, compass, and accelerometer. Here is an example of how the application configures and captures geolocation data in a cross-platform way, using the Cordova Geolocation Plugin plugin:
    startPositionWatch: function () {
        if (app.locationWatchId) {
            app.stopPositionWatch();
        }
        // Watch foreground location
        app.locationWatchId = window.navigator.geolocation.watchPosition(function (location) {
            app.updateLocation(location.coords);
        }, function () { }, {
            enableHighAccuracy: true,
            maximumAge: 5000,
            frequency: 10000,
            timeout: 10000
        });
    },

    stopPositionWatch: function () {
        if (app.locationWatchId) {
            window.navigator.geolocation.clearWatch(app.locationWatchId);
            app.locationWatchId = undefined;
        }
    },
and later,
     updateLocation: function (location) {
        console.log('Called updateLocation');

        if (!app.mapLayers) {
            return;
        }

        var latlng = [location.latitude, location.longitude];
        if (!app.location) {
            app.location = L.circle(latlng, 5, {
                color: 'red',
                stroke: false,
                fillOpacity: 1.0
            });
            app.mapLayers.addLayer(app.location);

            app.locationAccuracy = L.circle(latlng, 10, {
                color: 'green',
                fill: false
            });
            app.mapLayers.addLayer(app.locationAccuracy);
        } else {
            app.location.setLatLng(latlng);
            app.locationAccuracy.setLatLng(latlng);
            app.locationAccuracy.setRadius(location.accuracy);
        }

        // Add a track of our history
        if (! app.path) {
            app.path = L.Polyline([latlng], 2, {});
        } else {
            app.path.addLatLng(latlng);
        }
        app.mapLayers.addLayer(app.path);

        // Drop a breadcrumb (along the track) of where we've been.
        if (app.currentLocation) {
            app.mapLayers.addLayer(L.circle([app.currentLocation.latitude, app.currentLocation.longitude], 3, {
                color: 'red',
                fillOpacity: 0.5,
                fill: true,
                stroke: false
            }));
        }

        // Update our current position marker and accuracy bubble.
        // If we're near an edge of the screen, we should probably zoom out (panning is visually disruptive)
        // app.map.panTo(latlng);
        app.previousLocation = app.currentLocation;
        app.currentLocation = location;
        this.sendToCloud();
    }
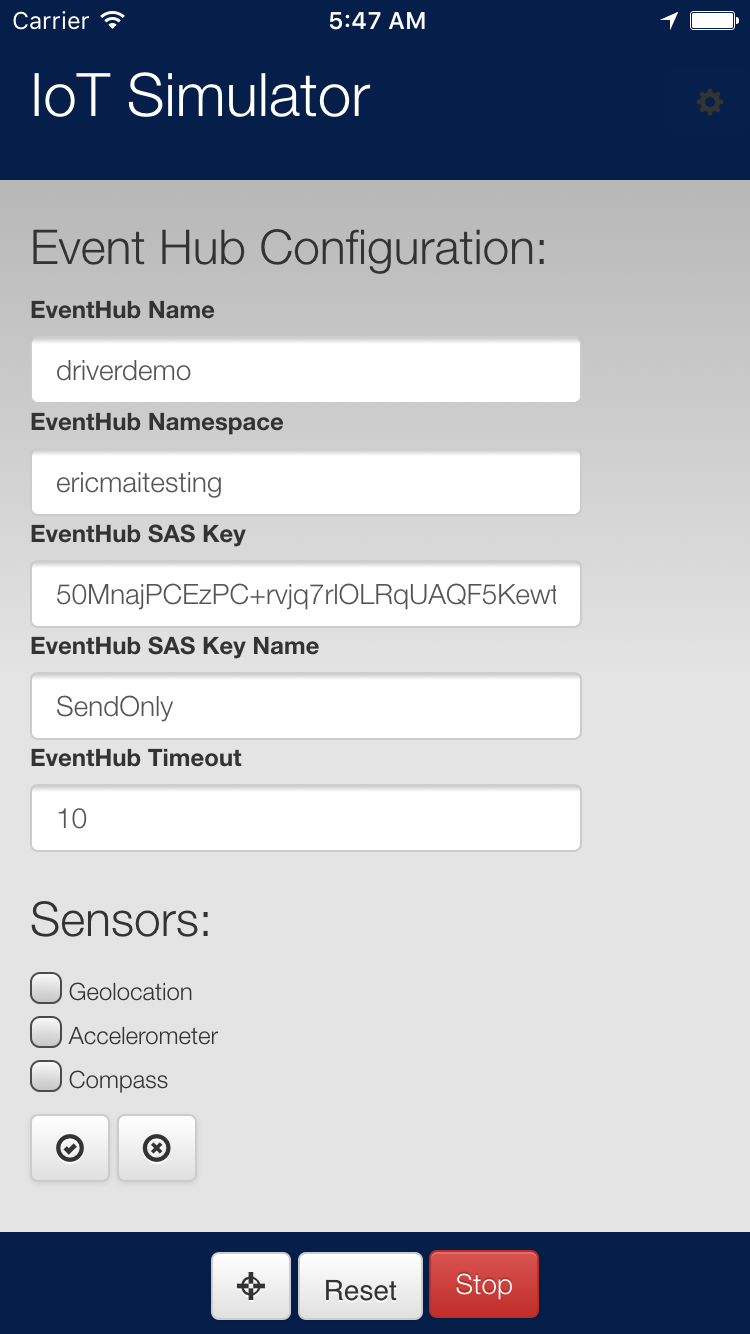
The second screen in the application is the configuration screen. This screen allows the user to enter the relevant Event Hub configuration data (we have an outstanding issue to enable both Event Hubs and IoTHub) and enable or disable various sensors that are configured. To talk to Event Hub, we’re using the ServiceBus Javascript SDK.
Challenges
One of the unique challenges of building this application is pushing the limits of complexity in component integration. To build this application for all three mobile platforms (iOS, Android and Windows) only a subset of modules and extensions can be used because they are not all available on all platforms. Additionally, the amount of time it takes to cross-validate that changes work on multiple devices is increased and it’s easy to find that you need to go back and use different tools to solve the problem because of undocumented insurmountable problems with a plugin on a platform.
Interestingly, Cordova has a relatively stable and solid ecosystem of plugins, tools, and platforms – so it is easier to write cross platform applications, but it’s not trivial – which should be unsurprising. The use of Microsoft’s Cordova Tools for Visual Studio makes building Cordova applications quite straight-forward.
The unique combination of map and real-time data drove the integration of using Leaflet.js which required MapBox and D3.js for real-time data overlays. The toughest challenges in integrating these technologies lies in getting the scale, zoom and pan behavior to be consistent. The leaflet map operates in one reference coordinate system, the d3js overlay has a coordinate system, and each SVG element has a coordinate system. Getting the transformations wired up so that they happened correctly between the three components have been difficult, but by following the sparse examples provided by Mike Bostock, one of the primary authors of d3js, we were able to configure these parts to work together.
Ongoing Work
We continue to add to and improve the PhoneIoTSimulator – Waffle, where we have issues filed for adding new sensors, recording sessions, playing back sessions, and other functionality.
Opportunities for Reuse
The PhoneIoTSimulator is available on GitHub, MIT licensed, and branded as a generic ThingLabs tool so that others can reuse the code and re-brand it by simply changing out the icon.png file in the root directory. Additionally, for those who want to use this generic implementation we plan to publish this generic version to the stores for all three mobile platforms.
 Light
Light Dark
Dark
0 comments