
Cloud Foundry: Elastic Containerized Applications on Azure
Cloud Foundry is an open source application platform that deploys, runs, and scales applications as containers. It enables developers to deploy and scale applications in minutes, regardless of the cloud provider or the development framework in use.
Cloud Foundry has a solid reputation in the enterprise space powering products such as IBM Bluemix and the Chinese mega search engine Baidu. You may have heard of the recent announcement for General Availability of Cloud Foundry Support on Microsoft Azure.
What is Cloud Foundry?
Cloud Foundry is an extensible, open source platform as a service that allows developers to build, deploy, and scale applications on both public and private cloud models. Similar to Heroku, developers can deploy applications using a variety of buildpacks to package the framework and/or runtime dependencies required for their application. Applications deployed to Cloud Foundry access external resources such as databases, messaging systems, files systems and so on, via Services. These features allow developers to develop applications with a loosely coupled services architecture.
What does this mean for you? Well as a developer, now you own the operation of the code you write while operations team handles the platform. You now have the autonomy to choose from various frameworks in the form of buildpacks for your application. You can deploy and scale your application to a variety of public and private cloud providers without bugging your operations team. You can even publish your services for other developers to consume or simply bind your application to services already in the marketplace. In this post, you will learn how to provision your own Cloud Foundry cluster and how to deploy and scale your application to Cloud Foundry on Azure.
The Problem
Prior to our engagement, installing and pushing apps to Cloud Foundry (CF) on Azure was almost impossible, thus making hybrid CF deployments between on-premises and cloud workloads difficult when using Azure. Deploying Cloud Foundry involves interfacing with the underlying infrastructure using BOSH, an open source tool-chain for release engineering, deployment, and lifecycle management of large-scale distributed services. The benefit of having BOSH, like many other infrastructure-as-code solutions, is that the operations team can use it to author and maintain a single cloud-agnostic solution across all different cloud and on-premises infrastructures. BOSH provides the abstraction layer on top of each cloud provider’s IaaS details. In order to deploy Cloud Foundry on Azure, we needed to implement a BOSH Cloud Provider Interface for Azure that enables BOSH to install and update software packages on Azure VMs.
Overview of the Solution
We partnered with Pivotal Labs, the maintainer of Cloud Foundry and BOSH, and the Azure Open Source Technology Center in Shanghai to enable Cloud Foundry deployments on Azure. As a result of our engagement, Microsoft recently announced the General Availability of Cloud Foundry Support on Microsoft Azure.
Deploying Cloud Foundry involves interfacing with the underlying infrastructure using BOSH. In order to deploy Cloud Foundry on Azure, we implemented an interface that enables BOSH to install and update software packages on Azure VMs. We then provided automation to provision the required storage, network, VM resources to deploy BOSH components on Azure. Once BOSH is deployed, we provide documentation for you to provision your own Cloud Foundry cluster on Azure using BOSH.
In detail, to deploy and manage a Cloud Foundry cluster on Azure, we needed to do the following:
- Develop a BOSH Cloud Provider Interface for Azure that enables BOSH to install and update software packages on Azure VMs
- Develop an Azure Resource Manager (ARM) template that can provision the following Azure resources required to deploy BOSH-managed infrastructure on Azure:
- A storage account
- Two reserved public IP addresses
- Two subnets
- A virtual network
- A dev virtual machine with a public IP address on the same VNET as BOSH VM and Cloud Foundry VMs
- A resource group (if one does not already exist)
- Create a script to install prerequisites on dev VM to prep it for deploying BOSH director and Cloud Foundry. For a list of prerequisites this installs, you can view the following scripts:
- init.sh: update package lists from repositories, update install prerequisites, updates Ruby, install gem prerequisites, and install BOSH CLI
- setup_devbox.py: copy scripts and configuration files, update parameters in definition file with current infrastructure value, create and copy cert and public key for SSH, and configure DNS
- Document how to deploy a BOSH director, the core orchestrating component in BOSH that controls VM creation and deployment, to manage infrastructure on Azure
- Document how to deploy Cloud Foundry through BOSH
Deploying Cloud Foundry on Azure – Simplified
Now that we have a BOSH Cloud Provider Interface for Azure and an Azure Resource Manager (ARM) template, it’s much easier to provision your own BOSH director and our very own Cloud Foundry cluster.
Provision with Azure Template
First we need to create all the Azure resources required to provision a BOSH director, which is required to deploy BOSH-managed infrastructure on Azure.
Navigate to Azure Resource Manager (ARM) template for BOSH, click the blue Deploy to Azure button.
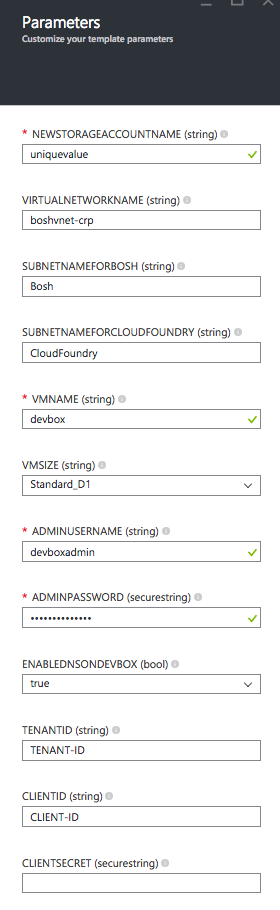
You will be taken to the Azure Portal to provide values for the parameters to create all the necessary resources. Please be sure to provide unique names for your values. We recommend providing TENANT-ID, CLIENT-ID, CLIENTSECRET as part of the ARM template deployment in the Azure portal. If you decide to leave them out, then you will need to update these three properties in ~/bosh.yml on the dev VM. To create CLIENT-ID and CLIENTSECRET, follow these steps. You should already have a TENANT-ID.
Deploy BOSH Director
The previous step copied scripts, keys, and configuration files we need to deploy BOSH Director.
Once the required resources are created from the previous step, SSH into the new dev VM. You can find the public IP of the VM in Azure Portal.
Run the following command in your home directory to deploy BOSH Director. This deploy_bosh.sh script uses BOSH CLI and the bosh.yml configuration file that contains values from your previous Azure template deployment to deploy a new BOSH Director.
$ ./deploy_bosh.sh
This step can take a bit of time to run since all the binaries need to be uploaded to Azure blob storage before the BOSH Director VM is created, and then bound to the private IP of 10.0.0.4. You can change these behaviors by modifying bosh.yml in your home directory on the dev VM. You can also view verbose logs in ~/run.log.
Once we have successfully deployed BOSH Director, we can use it to deploy Cloud Foundry.
Connect to BOSH Director for ongoing tasks
$ bosh target 10.0.0.4 # User name: admin; Password: admin
Get UUID of your BOSH director
$ bosh status
Get the value of UUID from the output that looks similar to the following and use it for next step
Director
  Name       bosh
  URL        https://10.0.0.4:25555
  Version    1.0000.0 (00000000)
  User       not logged in
  UUID       71fc4763-a2b3-40d5-8d40-dea03602c0f5
  CPI        cpi
  dns        disabled
  compiled_package_cache disabled
  snapshots  enabled

Deployment
  not set
Deploy Cloud Foundry
Now that we have a BOSH Director, we can use it to deploy Cloud Foundry. To deploy anything with BOSH, you are required to have a definition file that tells BOSH the OS to run, the binaries to install, the scripts to run, and the infrastructure resources to create.
Use BOSH CLI to upload the latest stemcell, a bare minimum OS image for Ubuntu with Azure specific configurations and agents. A stemcell is a versioned Operating System image wrapped with IaaS specific packaging. You can head over to bosh.io/stemcells for full list of all stemcells for all OS and cloud providers. Replace STEMCELL-FOR-AZURE-URL with the URL of the latest stemcell for Ubuntu on Azure.
$ bosh upload stemcell STEMCELL-FOR-AZURE-URL
Use BOSH CLI to upload the latest Cloud Foundry release. For example, if you want to use release version 212, you can upload that specific release.
$ bosh upload release https://bosh.io/d/github.com/cloudfoundry/cf-release?v=212
Update deployment file for your Cloud Foundry cluster with your current infrastructure values
Use this sample Cloud Foundry deployment cf-stub.yml file as a reference. You can update infrastructure values with your own, such as director_uuid, virtual_network_name, subnet_name, static_ips, ssl_pem, and domain.
Note this deployment is for CF release v212. For other CF release versions, you can refer to the official CF release templates to create your own cf.yml template for a specific cf release.
- For
director_uuid, use the same UUID you got from$ bosh statusin the previous step. - For
virtual_network_nameandsubnet_name, use the same values you provided at the time of provisioning Azure resources using the Azure template. - For
static_ips, use the public IP generated for Cloud Foundry in the previous resource provision step. From the Azure portal, under the resource group you have provisioned, use the public IP: XXXX_cf. Then look for the following in the cf.yml file and replace the IP with the public IP address created for Cloud Foundry.static_ips: [public ip] # <--- Replace with your reserved public IP address for Cloud Foundry - For
ssl_pem, you can concatenate the bosh certification in the bosh.yml file and the bosh private key on the dev VM and replaceSSL-CERT-AND-KEYin the cf.yml file.- To get the content of the bosh certificate, ssh into the dev VM, then run the following command and copy the entire content under
ssh_certificate:$ cat bosh.yml - Then to get the content of the bosh private key, run the following command and copy the entire output.
$ cat bosh - After concatenating the two values, place the content under
ssl_pem. The end result should look similar to the following:
- To get the content of the bosh certificate, ssh into the dev VM, then run the following command and copy the entire content under
ssl_pem: |
        -----BEGIN CERTIFICATE-----
        [omit for brevity]
        -----END CERTIFICATE-----
        -----BEGIN RSA PRIVATE KEY-----
        [omit for brevity]
        -----END RSA PRIVATE KEY-----
After you have updated all the necessary values in the cf_212.yml, scp to copy the file from local machine to the dev VM. Then from the dev VM, enter the following command on the dev VM to let BOSH use this file for your next deployment.
$ bosh deployment cf_212.yml
Use BOSH to deploy your Cloud Foundry cluster
$ bosh deploy
This step will take some time as Azure provisions all the components for Cloud Foundry.
Once this is completed successfully, we can now use CF CLI to communicate with our Cloud Foundry cluster to push apps and deploy services.
Deploy Your App in Minutes
Now that you have your own Cloud Foundry instance, let’s deploy a Java application.
First, let’s get the Cloud Foundry CLI on our dev machine
$ curl -L "https://cli.run.pivotal.io/stable?release=linux64-binary&source=github" | tar -zx
Once the CF CLI is on the machine, add it to your environment path.
$ export PATH=$HOME:$PATH
or add the below line to your $ vi ~/.bash_profile
export PATH=[[home directory path]]:$PATH
Check CF CLI version:
$ cf --version
Use CF CLI to connect to your new Cloud Foundry instance
$ cf api api.cf.azurelovecf.com --skip-ssl-validation
Login with CF
$ cf login
# If you used the reference configuration, login is Email: admin; Password: c1oudc0w
The output should look similar to this:
API endpoint:   https://api.cf.azurelovecf.com (API version: 2.29.0)
User:           admin
Org:            default_organization
Cloud Foundry has concepts of Orgs, Spaces, Roles, and Permissions. It uses role-based access control (RBAC) to grant permission to resources in either an org or a space. At this point, there is only one organization and nothing else is created. In order to push an app, we need to have a space.
$ cf create-space dev
Let’s clone a Java application from Cloud Foundry samples on github to our dev machine.
If the machine does not already have git installed, do the following:
$ sudo apt-get install git
$ git clone https://github.com/cloudfoundry-samples/spring-music.git
To learn more about how to prepare your application for Cloud Foundry deployment, you can follow this Java sample.
Next let’s build our Java app with Gradle. Change directory into the recently cloned Java project.
$ cd spring-music/
If the machine does not already have Java installed, for example if you get:
ERROR: JAVA_HOME is not set and no 'java' command could be found in your PATH, do the following:
$ sudo add-apt-repository ppa:webupd8team/java -y
$ sudo apt-get update
$ sudo apt-get install oracle-java8-installer
$ java -version         # Confirm your Java installation
Build the Java app with Gradle
If the machine does not already have Gradle installed, do the following:
$ sudo apt-get install gradle
$ ./gradlew assemble
Downloading https://services.gradle.org/distributions/gradle-2.3-all.zip
......
BUILD SUCCESSFUL
We are ready to push the app!
$ cf push
Using manifest file /home/ritacfvmadmin/spring-music/manifest.yml

Creating app spring-music in org default_organization / space dev as admin...
OK

Creating route spring-music-subnutritious-monolithism.cf.azurelovecf.com...
OK

Binding spring-music-subnutritious-monolithism.cf.azurelovecf.com to spring-music...
OK

Uploading spring-music...
...
At the end of the output, you should see the app has been deployed and is now in the running state. To confirm, you can always run the cf apps command to view all apps or just cf app [your app name] to view information about that specific app.
$ cf apps
Getting apps in org default_organization / space dev as admin...
OK

name           requested state   instances   memory   disk   urls
spring-music   started           1/1         512M     1G     spring-music-subnutritious-monolithism.cf.azurelovecf.com
Scale Your App with One Command
Now that your app is running happily in Cloud Foundry, what if we want to scale it up to provide high-availability? All you need to do is run the following command.
$ cf scale spring-music -i 2

Check app state
$ cf app spring-music
Showing health and status for app spring-music in org default_organization / space dev as admin...
OK

requested state: started
instances: 2/2
usage: 512M x 2 instances
urls: spring-music-subnutritious-monolithism.cf.azurelovecf.com
last uploaded: Thu Oct 29 21:24:47 UTC 2015
stack: cflinuxfs2
buildpack: java-buildpack=v3.0-https://github.com/cloudfoundry/java-buildpack.git#3bd15e1 open-jdk-jre=1.8.0_65 spring-auto-reconfiguration=1.10.0_RELEASE tomcat-access-logging-support=2.4.0_RELEASE tomcat-instance=8.0.28 tomcat-lifecycle-support=2.4.0_RELEASE to...

     state     since                    cpu    memory           disk           details
#0   running   2015-10-30 01:15:51 PM   0.1%   510.8M of 512M   153.6M of 1G
#1   running   2015-10-30 04:43:30 PM   0.2%   491.9M of 512M   153.6M of 1G
Register a Publicly Accessible Domain
This is all great, but if users can’t actually access the newly deployed app, it’s pretty useless. Cloud Foundry allows us to register as many domains as we want. Now let’s leverage that public IP address that was created for Cloud Foundry at the beginning. With the goodness of xip.io, you can use your public IP address as its own domain. We can now change your app domain from cf.azurelovecf.com to [Cloud Foundry public ip].xip.io.
First we need to create a new domain with our public IP address
$ cf create-domain default_organization 137.116.77.xx.xip.io
Creating domain 137.116.77.xxx.xip.io for org default_organization as admin...
OK
To verify that we now have a new domain
$ cf domains
Getting domains in org default_organization as admin...
name                    status
cf.azurelovecf.com      shared
137.116.77.xxx.xip.io   owned
To map existing apps to this new domain, we need to create a new route within our dev space
$ cf create-route dev 137.116.77.xxx.xip.io -n springapp
Creating route springapp.137.116.77.xxx.xip.io for org default_organization / space dev as admin...
OK
Now, Let’s map the new route to your app
$ cf map-route spring-music 137.116.77.xxx.xip.io -n springapp
Creating route springapp.137.116.77.xxx.xip.io for org default_organization / space dev as admin...
OK
Route springapp.137.116.77.xxx.xip.io already exists
Adding route springapp.137.116.77.xxx.xip.io to app spring-music in org default_organization / space dev as admin...
OK
Now if you view your app, you will see two routes/URLs mapped to it
$ cf apps
Getting apps in org default_organization / space dev as admin...
OK

name           requested state   instances   memory   disk   urls
spring-music   started           2/2         512M     1G     spring-music-subnutritious-monolithism.cf.azurelovecf.com, springapp.137.116.77.xxx.xip.io
From your browser, you can now view and perform basic CRUD operations in the app by using http://springapp.137.116.77.xxx.xip.io.
Challenges
There were lots of challenges bringing the Cloud Foundry PaaS onto Azure. Most issues were around its own tooling and providing certain workarounds due to Azure specific behaviors. To enable Cloud Foundry on Azure, we had to first make BOSH work on Azure and then make Concourse CI work to test each CPI (Cloud Provider Interface) release. To read more about how we enabled Concourse CI on Azure to perform end to end test of the Azure BOSH CPI (Cloud Provider Interface), head over to our post on Containerized CI with Concourse on Azure.
Another issue we uncovered is the lack of client-side timeouts for the Azure Ruby SDK which impacted the upload of large blobs to Azure blob storage, which resulted in deployment failures. We were able to work with the Azure engineering team to identify the issue and provided a fix to the Azure Ruby SDK to provide client-side timeouts for the rare instance when it’s necessary.
Opportunities for Reuse
The BOSH Azure CPI (Cloud Provider Interface) will be used by all customers who will be deploying Cloud Foundry or BOSH on Azure. It will be used for all things that need to be deployed and managed using BOSH on Azure. We have already started to leverage the BOSH Azure CPI to deploy Concourse CI to Azure to test new releases of BOSH Azure CPI. We were able to unblock Cloud Foundry deployments for a couple of our enterprise customers. In addition, the Azure Resource Management template is a huge time saver for anyone wishing to run their own Cloud Foundry cluster.
 Light
Light Dark
Dark
0 comments