
Upgrading to npm@3 on Windows
Despite it’s popularity, there were always two major issues with running Node.js on Windows: First and foremost, the operating system maintains a maximum length for path names, which clashes with Node’s traditional way of nesting modules in node_modules. The second issue was a bit more subtle: The npm installer had a set of steps it executed for each package and it would immediately start executing them as soon as it decided to act on a package. This resulted in a bunch of hard-to-debug race conditions and other problems which, from the outside, looked like black, evil magic.
Both issues will soon be history – we’re now looking at the first build of npm@3, a nearly complete rewrite of Node’s package manager, which will end both of these major issues. This is a huge deal for those of us who built and maintain big Node projects on Windows. This case study describes the development of a small upgrader script, enabling Node developers on Windows to easily upgrade their npm version.
The Problem: Nested Modules & Race Conditions
Previously, your project’s required modules would be installed in node_modules. If they themselves required modules, they’d be installed in node_modules/{package}/node_modules. The problem is obvious here, but it was surprisingly hard to work around – solutions involving npm shrinkwrap and module-flattening techniques existed, but it wasn’t pretty.
Flat Module Installation
Your dependencies will now be installed flat – by default. If possible, all of your dependencies, and their dependencies, and their dependencies will be installed in your project’s node_modules folder without nesting. Nesting will only occur when two or more modules have conflicting dependencies.
Moving forward, deduping is the standard – and a bunch of commands are dedupe-aware by default. The command npm ls will now show you a tree of module requirements and no longer how they are organized on disk. Conveniently, npm uninstall removes a package and all it’s requirements – previously, it just removed those packages that were in its node_modules folder.
Multi-Stage Installer
From time to time, we at Microsoft working in the Open Source world had to deal with random race conditions. And when I write “from time to time”, I mean “all the time”. Npm issue #5919 is now finally fixed, changing the way installation works quite fundamentally. Rebecca Turner from npm has been pivotal for the new multi-stage installer (which carefully waits for steps and processes to finish before moving on).
While none of these changes are glaringly obvious to the average user, they will come in handy every single time a developer running Windows executes a big npm build (especially if it involves a bunch of native code). Where npm@2 might run into race conditions and lock-file complications, npm@3’s new installer will succeed.
Upgrading npm on Windows
Installing a new version of npm on Windows is a tricky business: By default, npm is installed alongside node in C:Program Files (x86)nodejs. Npm’s globally installed packages (including, potentially, npm itself) are stored separately in a user-specific directory (which is currently C:Users<username>AppDataRoamingnpm). Because the installer puts C:Program Files (x86)nodejs before C:Users<username>AppDataRoamingnpm on the PATH, it will always use version of npm installed with node instead of the version of npm one installs using npm -g install npm@<version>.
To save Windows developers from this mess, we wrote a small upgrader tool simplifying the process.
Implementation
Since it is fair to assume that developers wishing to upgrade their npm version already have npm and Node installed, we opted for a NodeJS-based solution. The upgrader is installed using npm itself, executed in Node, and uses PowerShell scripts internally to move files, make backups, and upgrade npm.
Let’s look at the actual flow: First, we query npm for the available npm versions and let the user choose one. Then, we ask npm where it usually installs global modules. Once we have those to crucial pieces of information, we kick of a PowerShell script that backs up .npmrc (a npm configuration file) and upgrades npm. In a situation where npm actually does not reside in the global modules folder, we look for it in the NodeJS installation location and upgrade it there.
If you’re interested in some of the source code, you can find it all on GitHub. Some portions readers might be interested in include checking the PowerShell execution policy in Node, checking for Internet via DNS lookup, or the surprisingly simple npm upgrade written in PS1.
Running the Code: Installing npm@3
Before you install npm@3 and use it in production, be warned that this is still beta software, with potentially a bunch of breaking changes and unknown bugs. Obviously, the whole node community and npm are working hard to get it production-ready as quickly as possible. To quote npm: “During that time we will still be doing npm@2 releases, with npm@2 tagged as latest and next. We’ll also be publishing new releases of npm@3 as npm@3.0-next and npm@3.0-latest alongside those versions until we’re ready to switch everyone over to npm@3.”
If you’re using Node and npm in the most common ways (to install or publish modules, for instance), npm@3 will most likely improve your life – if you’re running complex builds, potentially involving a large amount native code, and you have no time to deal with any new issues, you might want to stay clear.
With that disclaimer in mind, here’s how to install and run the upgrader:
First, ensure that you can execute scripts on your system by running the following command from an elevated command prompt (either PowerShell or CMD.exe). To run PowerShell as Administrator, click Start, search for PowerShell, right-click PowerShell and select Run as Administrator.
Set-ExecutionPolicy Unrestricted -Scope CurrentUser
Then, to install and use this upgrader tool, run:
npm install -g npm-windows-upgrade
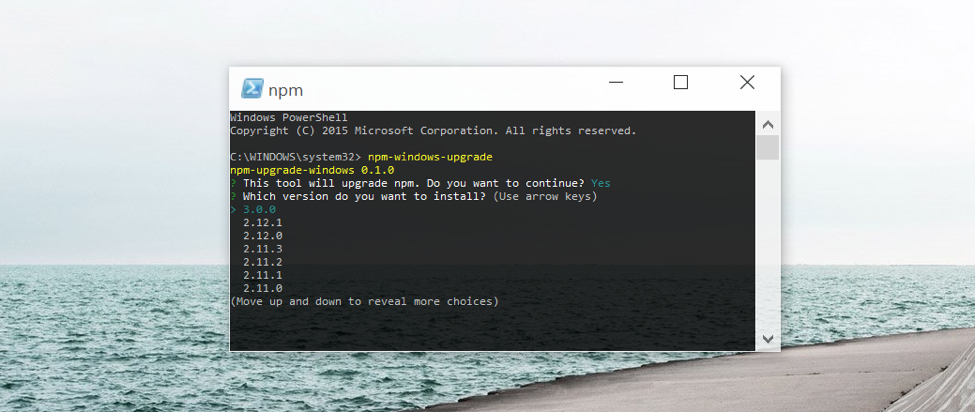
npm-windows-upgrade
The tool will show you a list of all the published and available versions of npm (including pre-release and beta versions). Choose 3.1.0 (or newer) and enjoy all the new benefits of npm@3!
 Light
Light Dark
Dark
0 comments