
vcpkg: Accelerate your team development environment with binary caching and manifests
 This post was updated on September 21, 2020 to add more information on the GitHub Packages binary caching example.
Please see our Visual Studio 2019 version 16.8 Preview 3 release notes for more of our latest features.
September is the biggest month for us in the Microsoft C++ team as it’s CppCon month! Our team has many exciting announcements for you this week, including a significant update to the vcpkg library manager for C/C++. We are excited to announce support for vcpkg binary caching and manifest files. These are key features that have been requested by our users from the beginning, and are intended not only to give everyone more flexibility with the tool, but to enable key scenarios for teams and professional developers. Our team is also actively working on versioning support and registries to allow you to install arbitrary library versions and bring your own libraries to vcpkg. These final two features are not ready yet, but expect an announcement on our blog soon with experimental support!
Announcing manifests and binary caching support
Manifests are files with the filename vcpkg.json that should be present in your project directory and can easily be checked into source control. Required library dependencies for your project can be declared in the file. Then, vcpkg is automatically invoked as a pre-build step to install missing dependencies for your active build configuration. Manifests currently work with CMake and MSBuild projects. For CMake projects, dependencies are installed during the CMake configuration step. For MSBuild, dependencies are installed when a build is requested, assuming the feature is turned on in the project system. You can also manually invoke vcpkg to install dependencies from a manifest using the command line by just running vcpkg install with no arguments in the context of the project folder. With manifests, dependencies are installed in a subfolder of your project called vcpkg_installed instead of the vcpkg installion directory. Manifests are also used for packaging dependencies for other developers to acquire with vcpkg, replacing CONTROL files going forward.
Binary caching allows you to share the compiled libraries you consume locally with your development team and continuous integration system, saving precious build time. Copies of your binaries are cached when they are compiled for the first time by vcpkg. The cache location can be set anywhere from your local filesystem to a remote fileshare or artifact storage location. Binaries can be packaged as .zip or .nupkg. In the .nupkg case, this allows you to use any valid NuGet server to cache your binaries, including Azure Artifacts and GitHub Packages. The benefit of this feature is that you can build your dependencies once, cache them, then install them in seconds on every other machine, continuous integration environment, or container from that point on. If you need to use the exact same dependencies on more than one machine or cloud environment, or if you are setting up a new machine to run builds, this feature will benefit you. You still need to build your dependencies once to populate the cache, but once that’s done, the headers and binaries can be deployed directly to other environments.
The rest of this post goes in-depth on how to get started with the new features in vcpkg.
Getting started with binary caching
Binary caching is on by default in new builds of vcpkg and will cache copies of your binaries on your local machine until it is redirected to cache them somewhere else.
This feature’s primary motivation is to accelerate two scenarios:
- Continuous integration
- Developer environment changes (first-time or branch changes)
Binaries can be cached using the .zip format or .nupkg (NuGet) format.
To get started, you need to choose a location that can host the binaries. This can be a folder in your local machine (the feature already does this by default), a file share server, continuous integration server, or NuGet server. You will need to know the path to the server to configure vcpkg to use it. You can have more than one source if you want to cache your binaries in multiple places. To configure a source, choose one of the following options:
- Set an environment variable called
VCPKG_BINARY_SOURCESto one or more sources separated by semicolons. E.g:<source>;<source>;… - Pass the option
--binarysource=<source>with every vcpkg command that modifies your active dependencies.
Note: Option 1 is strongly recommended as it means you don’t need to specify your source path every time you change your dependencies.
A <source>, as specified above, can be set with one of the following syntaxes. Items marked with square brackets [ ] are optional:
clear– Removes all previous sources. Use this as your first source if you intend to fully overwrite your existing binary sources with new ones, rather than just adding new sources to the existing list. This option also removes the default cache on your local file system. You can follow up the clear with new sources separated by semicolons (;).default[,<rw>]– Cache your binaries in the default path (this will be on your local filesystem). This will already be happening by default, so you only need to specify this if you removed it previously and want to add it back.files,<path>[,<rw>]– Adds a cache source accessible via a simple file path. This is useful if your cache source is on your local filesystem or a file share location you have access to.nuget,<uri>[,<rw>]– Adds a NuGet-based cache source. The URI should match the one registered with the -Source parameter in the NuGet command line interface.nugetconfig,<path>[,<rw>]– Adds a cache source based on a NuGet config-file. Equivalent to the -Config parameter in the NuGet command line interface. This config should specify defaultPushSource for uploads.interactive– Enable interactive credential management for NuGet. Also requires--debugon the command line.
The <rw> optional parameter controls permissions to the cache source. You can set a cache source to provide access to read <r>, write <w>, or read and write <rw>. If a cache source provides read access, cached binaries can be downloaded from that source when a package change is attempted by the user. If a cache source provides write access, binaries can be cached to that location for later use. In a typical scenario with only one cache, provide <rw> access to get the most out of the binary caching experience.
The nuget and nugetconfig source providers respect certain environment variables while generating NuGet packages. The metadata.repository field of any packages will be generated as:
<repository type="git" url="$VCPKG_NUGET_REPOSITORY"/>
or
<repository type="git"

url="${GITHUB_SERVER_URL}/${GITHUB_REPOSITORY}.git"

branch="${GITHUB_REF}"

commit="${GITHUB_SHA}"/>
Note: appropriate environment variables need to be defined with non-empty values for this to work. The second case is used to associate packages in GitHub Packages with the project being built (not the original package sources).
If you don’t want to use binary caching, you can turn it off by setting the environment variable VCPKG_FEATURE_FLAGS to -binarycaching (including the minus). You can alternatively pass the --no-binarycaching option on the command line.
Next, let’s go over some examples of back-ends that can be used with vcpkg binary caching.
Example #1: binary caching with GitHub Packages and GitHub Actions
GitHub Packages can serve as a back end for compiled vcpkg libraries stored as NuGet packages. Below is an example .yaml file that uses GitHub Actions for continuous integration with GitHub Packages for hosting. Before running this logic, vcpkg is added as a git submodule and its bootstrapper is run to install the package manager. The last section of the file can be omitted if a manifest is being used as well.
Note (09/21/2020): GitHub’s hosted agents currently come with an older, pre-installed copy of vcpkg on the path that does not support the latest binary caching. This means that direct calls to bootstrap-vcpkg or vcpkg without a path prefix may call an unintended vcpkg instance. We recommend taking the following two steps to avoid issues if you want to use your own copy of vcpkg:
- Run the equivalent of
rm -rf "$VCPKG_INSTALLATION_ROOT"usingshell: 'bash' - Always call
vcpkgandbootstrap-vcpkgwith a path prefix, such as./vcpkg,vcpkg/vcpkg,.\bootstrap-vcpkg.bat, etc
# actions.yaml
#
# In this example, Vcpkg has been added as a submodule (`git submodule add https://github.com/Microsoft/vcpkg`).
env:
  VCPKG_BINARY_SOURCES: 'clear;nuget,GitHub,readwrite'

matrix:
  os: ['windows-2019', 'ubuntu-20.04']
  include:
    - os: 'windows-2019'
      triplet: 'x86-windows'
      mono: ''
    - os: 'ubuntu-20.04'
      triplet: 'x64-linux'
      # To run `nuget.exe` on non-Windows platforms, we must use `mono`.
      mono: 'mono'

steps:
  # This step assumes `vcpkg` has been bootstrapped (run `./vcpkg/bootstrap-vcpkg`)
  - name: 'Setup NuGet Credentials'
    shell: 'bash'
    # Replace <OWNER> with your organization name
    run: >
      ${{ matrix.mono }} `vcpkg/vcpkg fetch nuget | tail -n 1`
      sources add
      -source "https://nuget.pkg.github.com/<OWNER>/index.json"
      -storepasswordincleartext
      -name "GitHub"
      -username "<OWNER>"
      -password "${{ secrets.GITHUB_TOKEN }}"

  # Omit this step if you're using manifests
  - name: 'vcpkg package restore'
    shell: 'bash'
    run: >
      vcpkg/vcpkg install sqlite3 cpprestsdk --triplet ${{ matrix.triplet }}
To learn more about GitHub Packages’ NuGet support, see the GitHub documentation on the subject.
Example #2: binary caching with Azure Artifacts and Azure DevOps
Azure Artifacts can serve as a back end for compiled vcpkg libraries stored in the NuGet format with Azure DevOps as the continuous integration system.
To get started with binary caching in Azure DevOps, enable Artifacts on your DevOps instance. This can be done by an Administrator through Project Settings > General > Overview > Azure DevOps Services > Artifacts.
Next, you need to create a feed for the project; see Azure DevOps Artifacts Documentation to learn more. Your feed URL will be an https:// ending with /nuget/v3/index.json.
The .yaml file below can be used to configure the NuGet feed:
# azure-pipelines.yaml
variables:
- name: VCPKG_BINARY_SOURCES
  value: 'clear;nuget,<FEED_URL>,readwrite'
Note: if you are using custom agents with a non-Windows operating system, you will need to install Mono to run nuget.exe. E.g. apt install mono-complete, brew install mono, etc.
More information about Azure DevOps Artifacts’ NuGet support is available in the Azure DevOps Artifacts Documentation.
If you want to learn more about binary caching, look up the syntax, or get stuck, run the command vcpkg help binarycaching. This command can also be used to see where your dependencies are cached by default on your local system.
Getting started with manifests
A vcpkg manifest file has the filename vcpkg.json. Before going forward, let’s define the two types of users that can make use of manifests:
- End users – developers using vcpkg to acquire other C/C++ libraries for their project.
- Library producers – developers working on libraries that will be made available for consumption using vcpkg.
End users can use manifests to declare their project dependencies and have them automatically installed when they run their build system. This is currently supported for MSBuild and CMake projects.
Library producers can package their libraries for use with vcpkg by including a manifest to describe their package. In this context, manifests will replace CONTROL files and describe metadata for the package along with its dependencies. CONTROL files are still supported today but are now considered deprecated and will be updated to the new vcpkg.json format in future updates. To see an example of a CONTROL file rewritten as a vcpkg.json file, see the Manifests specification (pango example). Note: in a future update to vcpkg, we will add Registries, which will make it easier to bring your own libraries for vcpkg, where you can use vcpkg.json to specify library metadata and upstream dependencies to vcpkg.
As implied by the file extension, the manifest follows a standard JSON syntax. The simplest possible manifest looks like this:
{
    "name": "mypackage",
    "version-string": "0.1.0-dev"
}
The name and version-string fields are always required at the top of a manifest. End users can set these fields to whatever they want, but the name must be all lowercase characters. One suggestion is to use them to describe their project (name & version). Library producers should use these fields to supply metadata about their library to vcpkg, so end users can access this information to learn about the library and download it. Note: in an upcoming update, we will add additional version fields to the manifest to support specifying versions of dependencies to install.
Below is an example of a vcpkg.json manifest for an application with multiple dependencies:
{
    "name": "supertux",
    "version-string": "1.3.1",
    "dependencies": [
        "boost-date-time",
        "boost-filesystem",
        "boost-format",
        "boost-locale",
        "boost-system",
        "curl",
        "freetype",
        "glew",
        "libogg",
        "libvorbis",
        "openal-soft",
        "sdl2",
        "sdl2-image"
    ]
}
Here, the dependencies field is used to list all libraries that should be installed by vcpkg to satisfy build requirements for this application. Next, let’s go over how to use vcpkg.json with MSBuild and CMake projects.
Using manifests with MSBuild projects
To enable manifests for MSBuild projects, you need to set a user-wide or system-wide environment variable called VCPKG_FEATURE_FLAGS to the following value: manifests. You should also run the vcpkg integrate install command to add vcpkg integration to MSBuild projects. Be sure to place the vcpkg.json file in the same folder as your solution (.sln) file, or in a project subfolder (where a .vcxproj file is).
In Visual Studio, right-click your project, choose Properties, and click Vcpkg. You should see something like this:
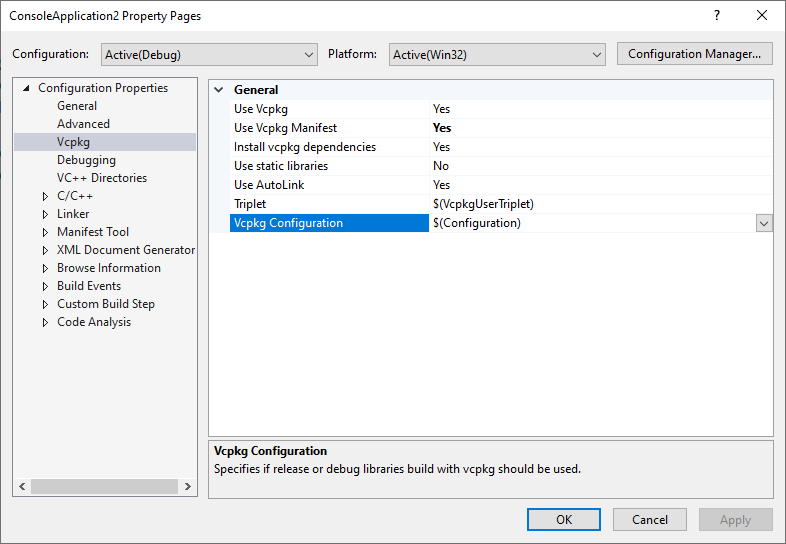
You can configure your dependencies here. Make sure Use Vcpkg and You can set your desired build configuration for your dependencies in the Triplet field. Click OK, then run a build. If everything was set up correctly, you should see vcpkg installing missing dependencies, as specified in the manifest, in the Output window logs. If everything builds correctly, you’re done! From now on, you can modify your vcpkg.json at any time and any time you build, your dependencies will be updated on the fly. on your #includes in the text editor after installing dependencies, even when builds successfully run. This is because the IntelliSense database is out of date. To fix this, right-click on your solution in Solution Explorer, and choose Rescan Solution. This is a known issue in the current experience that will be fixed in a future update.
Unlike installing libraries from the command line, with manifests, your libraries will get installed in a subfolder called vcpkg_installed. For MSBuild projects, this folder exists at the same path as the vcpkg.json file.
Using manifests with CMake projects
To use vcpkg with a CMake project, follow the instructions on our repo to reference the vcpkg.cmake toolchain file in your project. This enables CMake to understand vcpkg dependencies and allows its find_package() and target_link_libraries() functions to work with vcpkg-produced dependencies without additional configuration.
Then, make sure your vcpkg.json file is present in the root of your repo. Now, when you invoke CMake to generate your build system, it should automatically call vcpkg to install any missing dependencies, as specified in the vcpkg.json file. The binaries that get produced are based on your project’s available build target(s). If all went well, you should be able to successfully build your project. From now on, you can modify your vcpkg.json at any time and any time you build, your dependencies will be updated on the fly.
Unlike installing libraries from the command line, with manifests, libraries will get installed in a subfolder of your project. For CMake projects, dependencies are installed in the CMake build cache in a folder called vcpkg_installed.
Give us your feedback!
Try out vcpkg by visiting our GitHub repo. We welcome your feedback on the tool and the new features in our issue tracker. To see what’s next for vcpkg, including support for versioning and registries, check out our roadmap.
 Light
Light Dark
Dark
4 comments
Awesome, tried the CMake integration using manifests and it worked first time, unheard of!
For the Visual Studio integration you mentioned running “vcpkg integrate install”. We tired doing this when we first tried vcpkg and it caused all sorts of issues.
I think it was related to various path changes that it did. Is there any way to get the integration to work withough running “vcpkg integrate install”.
Also is there any documentation on what “vcpkg integrate install” actually does, this might make us more willing to try it again.
BTW My personal opinion is that vcpkg is the best thing happening in the C++ world, sure ranges and modules are great, but
Hey David, thanks for the feedback! The main thing `vcpkg integrate install` does for MSBuild projects is set up paths to vcpkg libraries so they are discoverable for builds and IntelliSense in the Visual Studio IDE. If you don’t want to run the command, you can try setting your library paths manually in the project properties to the vcpkg_installed folder that gets generated by the manifest being invoked. Let me know if that works for you or if you run into other issues.
We have a few TODOs for our docs, and adding more context on the `integrate install` command is definitely one of them. Hopefully we can clear that up soon.
Good addition, but it doesn’t appear to be configurable via included property sheets. This is a fairly significant limitation for usage in larger solutions, where you would need to configure the settings on a per-project basis.
Hopefully this is forthcoming, and not a design oversight.
Nice post ! Thank you.
I tried the binary caching feature with Azure. I managed to configure it and I am really happy with the results.
However I had some struggles. As Azure is new to me I could have missed something but here is what I have done to succeed.
1) Authentication issue, Azure pipelined failed with:
“WARNING: The plugin credential provider could not acquire credentials. Authentication may require manual action.”
Fixed with:
2) NuGet command line issue, Azure failed with:
Response status code does not indicate success: 400 (Bad Request – The request to the server did not include the header X-NuGet-ApiKey, but it is required even though credentials were provided. If using NuGet.exe, use the -ApiKey option to set this to an arbitrary value, for example ‘-ApiKey AzureDevOps'”
Fixed with:
Subject: [PATCH] [vcpkg][binarycaching] Build with fake api key as specified
 by Azure logs

---
 toolsrc/src/vcpkg/binarycaching.cpp | 2 ++
 1 file changed, 2 insertions(+)

diff --git a/toolsrc/src/vcpkg/binarycaching.cpp b/toolsrc/src/vcpkg/binarycaching.cpp
index 5512182c5..6e0921d29 100644
--- a/toolsrc/src/vcpkg/binarycaching.cpp
+++ b/toolsrc/src/vcpkg/binarycaching.cpp
@@ -393,6 +393,8 @@ namespace
                     cmd.path_arg(nuget_exe)
                         .string_arg("push")
                         .path_arg(nupkg_path)
+                        .string_arg("-ApiKey")
+                        .string_arg("AzureDevOps")
                         .string_arg("-ForceEnglishOutput")
                         .string_arg("-Source")
                         .string_arg(write_src);
--