
Side-by-side Minor Version MSVC Toolsets in Visual Studio 2019
Visual Studio 2019 version 16.1 Preview 3 ships with the first side-by-side minor versions of the v142 MSVC toolset. We first shipped minor side-by-side versions of MSVC toolsets with Visual Studio 2017, but a few things have changed in 2019. This post covers what’s new; primarily more granular versions of the toolsets in the installer and support for CMake projects.
For those not familiar with these minor version MSVC toolsets, I recommend checking out our previous post about minor side-by-side toolsets. It includes many more details about when and how you should use this feature. In general, you should not need to use these minor versioned toolsets. Instead, the feature is intended as an “escape hatch” for developers who find that there is a bug, either in their source code or in MSVC, that cannot be easily worked around or fixed in a timely fashion. If there’s a conformance issue in your source code, the best option is to apply the proper fixes to make your code conforming if possible (sometimes there are too many required changes in your code to fix it all immediately). If you believe that there’s a bug in MSVC, it’s best to talk with us so that we can fix the bug or supply a workaround.
Installing Minor Version Toolsets
The biggest change between Visual Studio 2017 and 2019 is in how these minor toolsets are factored. We began breaking toolsets apart by architecture in Visual Studio 2019 and minor toolsets follow this practice too. Whereas in 2017 there was only one minor toolset to install, in 2019 you will need to select all the architectures you build your projects for.
You can install minor versions of the MSVC toolset through the Visual Studio installer. The “Desktop C++ Development” workload will always install the latest version of the toolset. However, if you navigate to the “individual components” tab in the installer and scroll to “Compilers, build tools, and runtimes” you will see all of the available MSVC toolsets, including the minor versions.
For example, you may see both “(v14.20)” and “(v.14.21)” versions of the “MSVC v142” toolset. In the latest release preview release you will also see “(v14.22)” and “(v14.23)” the latest.

Using Minor Version Toolsets
If you are using C++ MSBuild projects, using a minor version of the MSVC toolset has not changed.
Side-by-side minor version MSVC toolsets don’t appear in the “Platform Toolset” options of the Project Configuration Properties. To enable them you need to edit the .vcxproj file for your project. Each side-by-side minor version MSVC toolset includes a .props file that can be included in your project’s .vcxproj file.
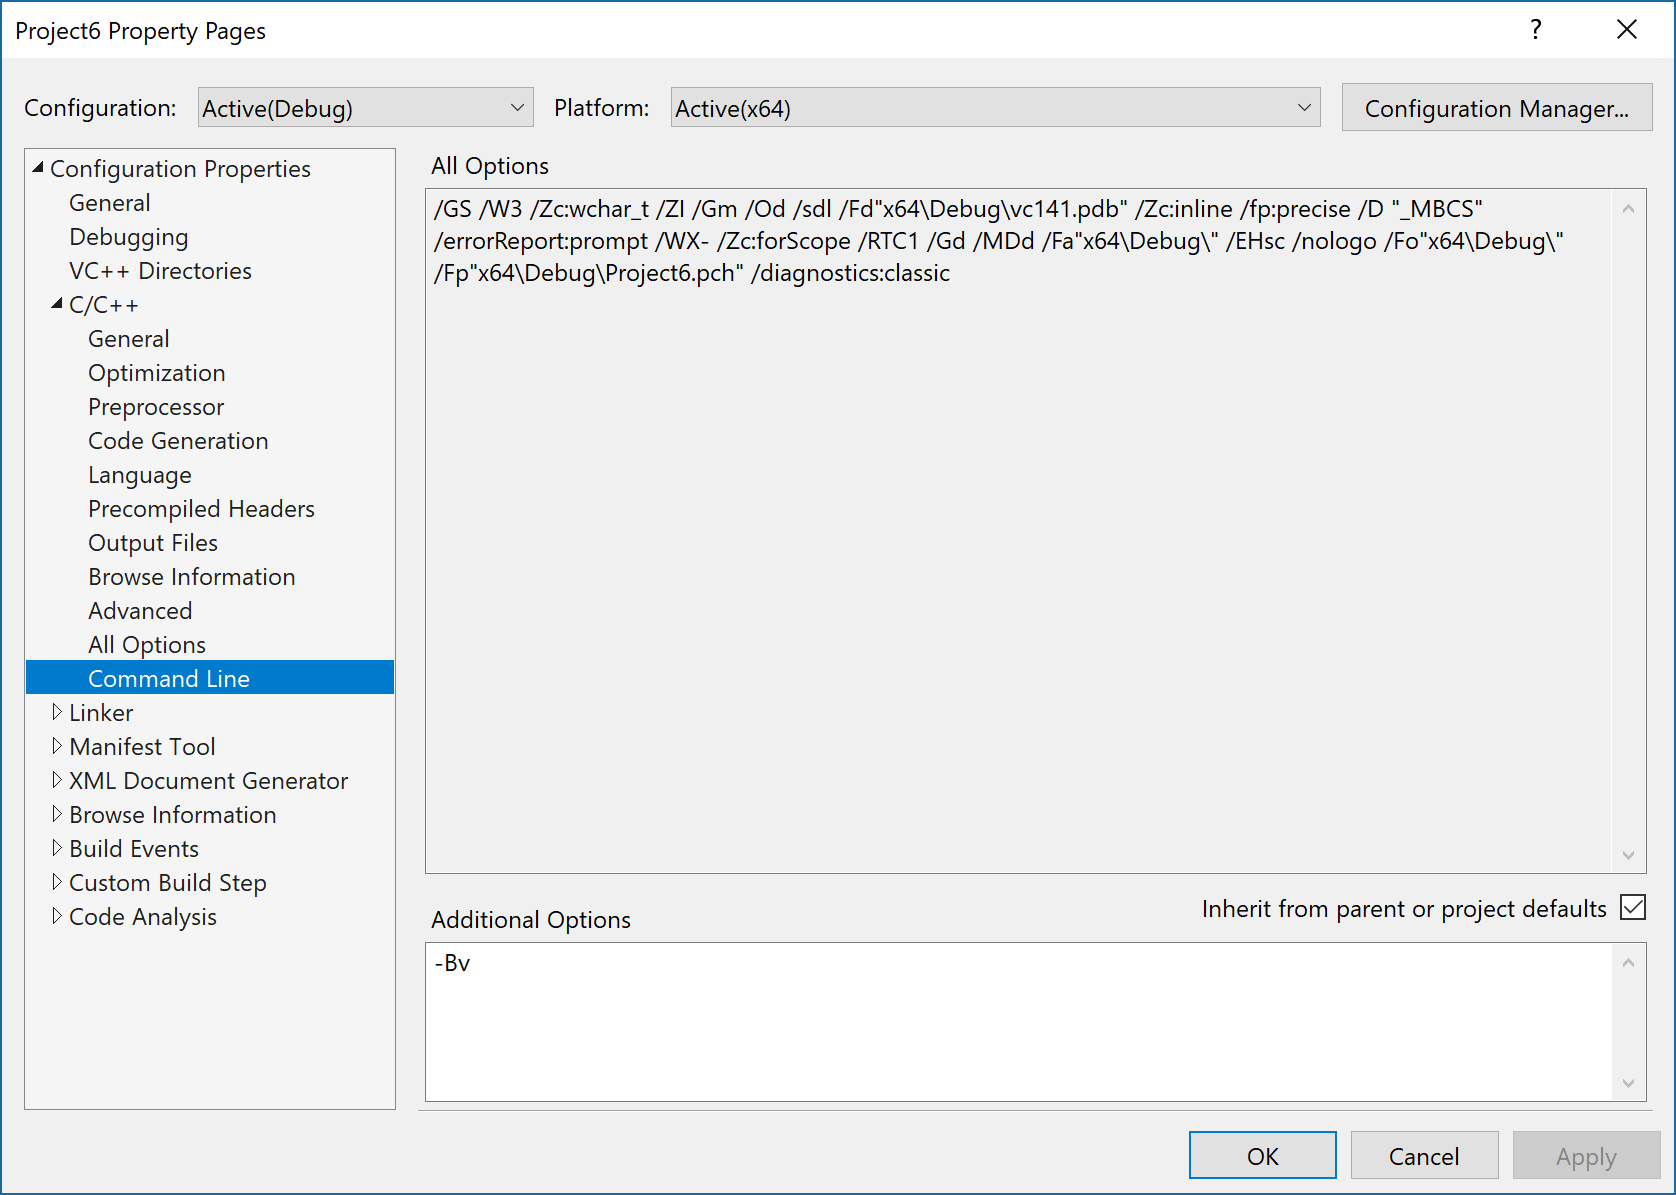
Before you start, you should add the -Bv compiler option as an Additional Option on the compiler command line. This will show the verbose compiler version information in the build Output box. Just enter “-Bv” in the Project Properties > C/C++ > Command Line edit box.
Now, open the “VC\Auxiliary\Build14.20” directory in the folder where you installed Visual Studio version 16.1 Preview 3. For example, using the default install location you’ll find it here: “C:\Program Files (x86)\Microsoft Visual Studio\Preview\Enterprise\VC\Auxiliary\Build14.20.” You should see three files in this folder. You’ll need to copy one of them, “Microsoft.VCToolsVersion.14.20.props,” into your solution directory.

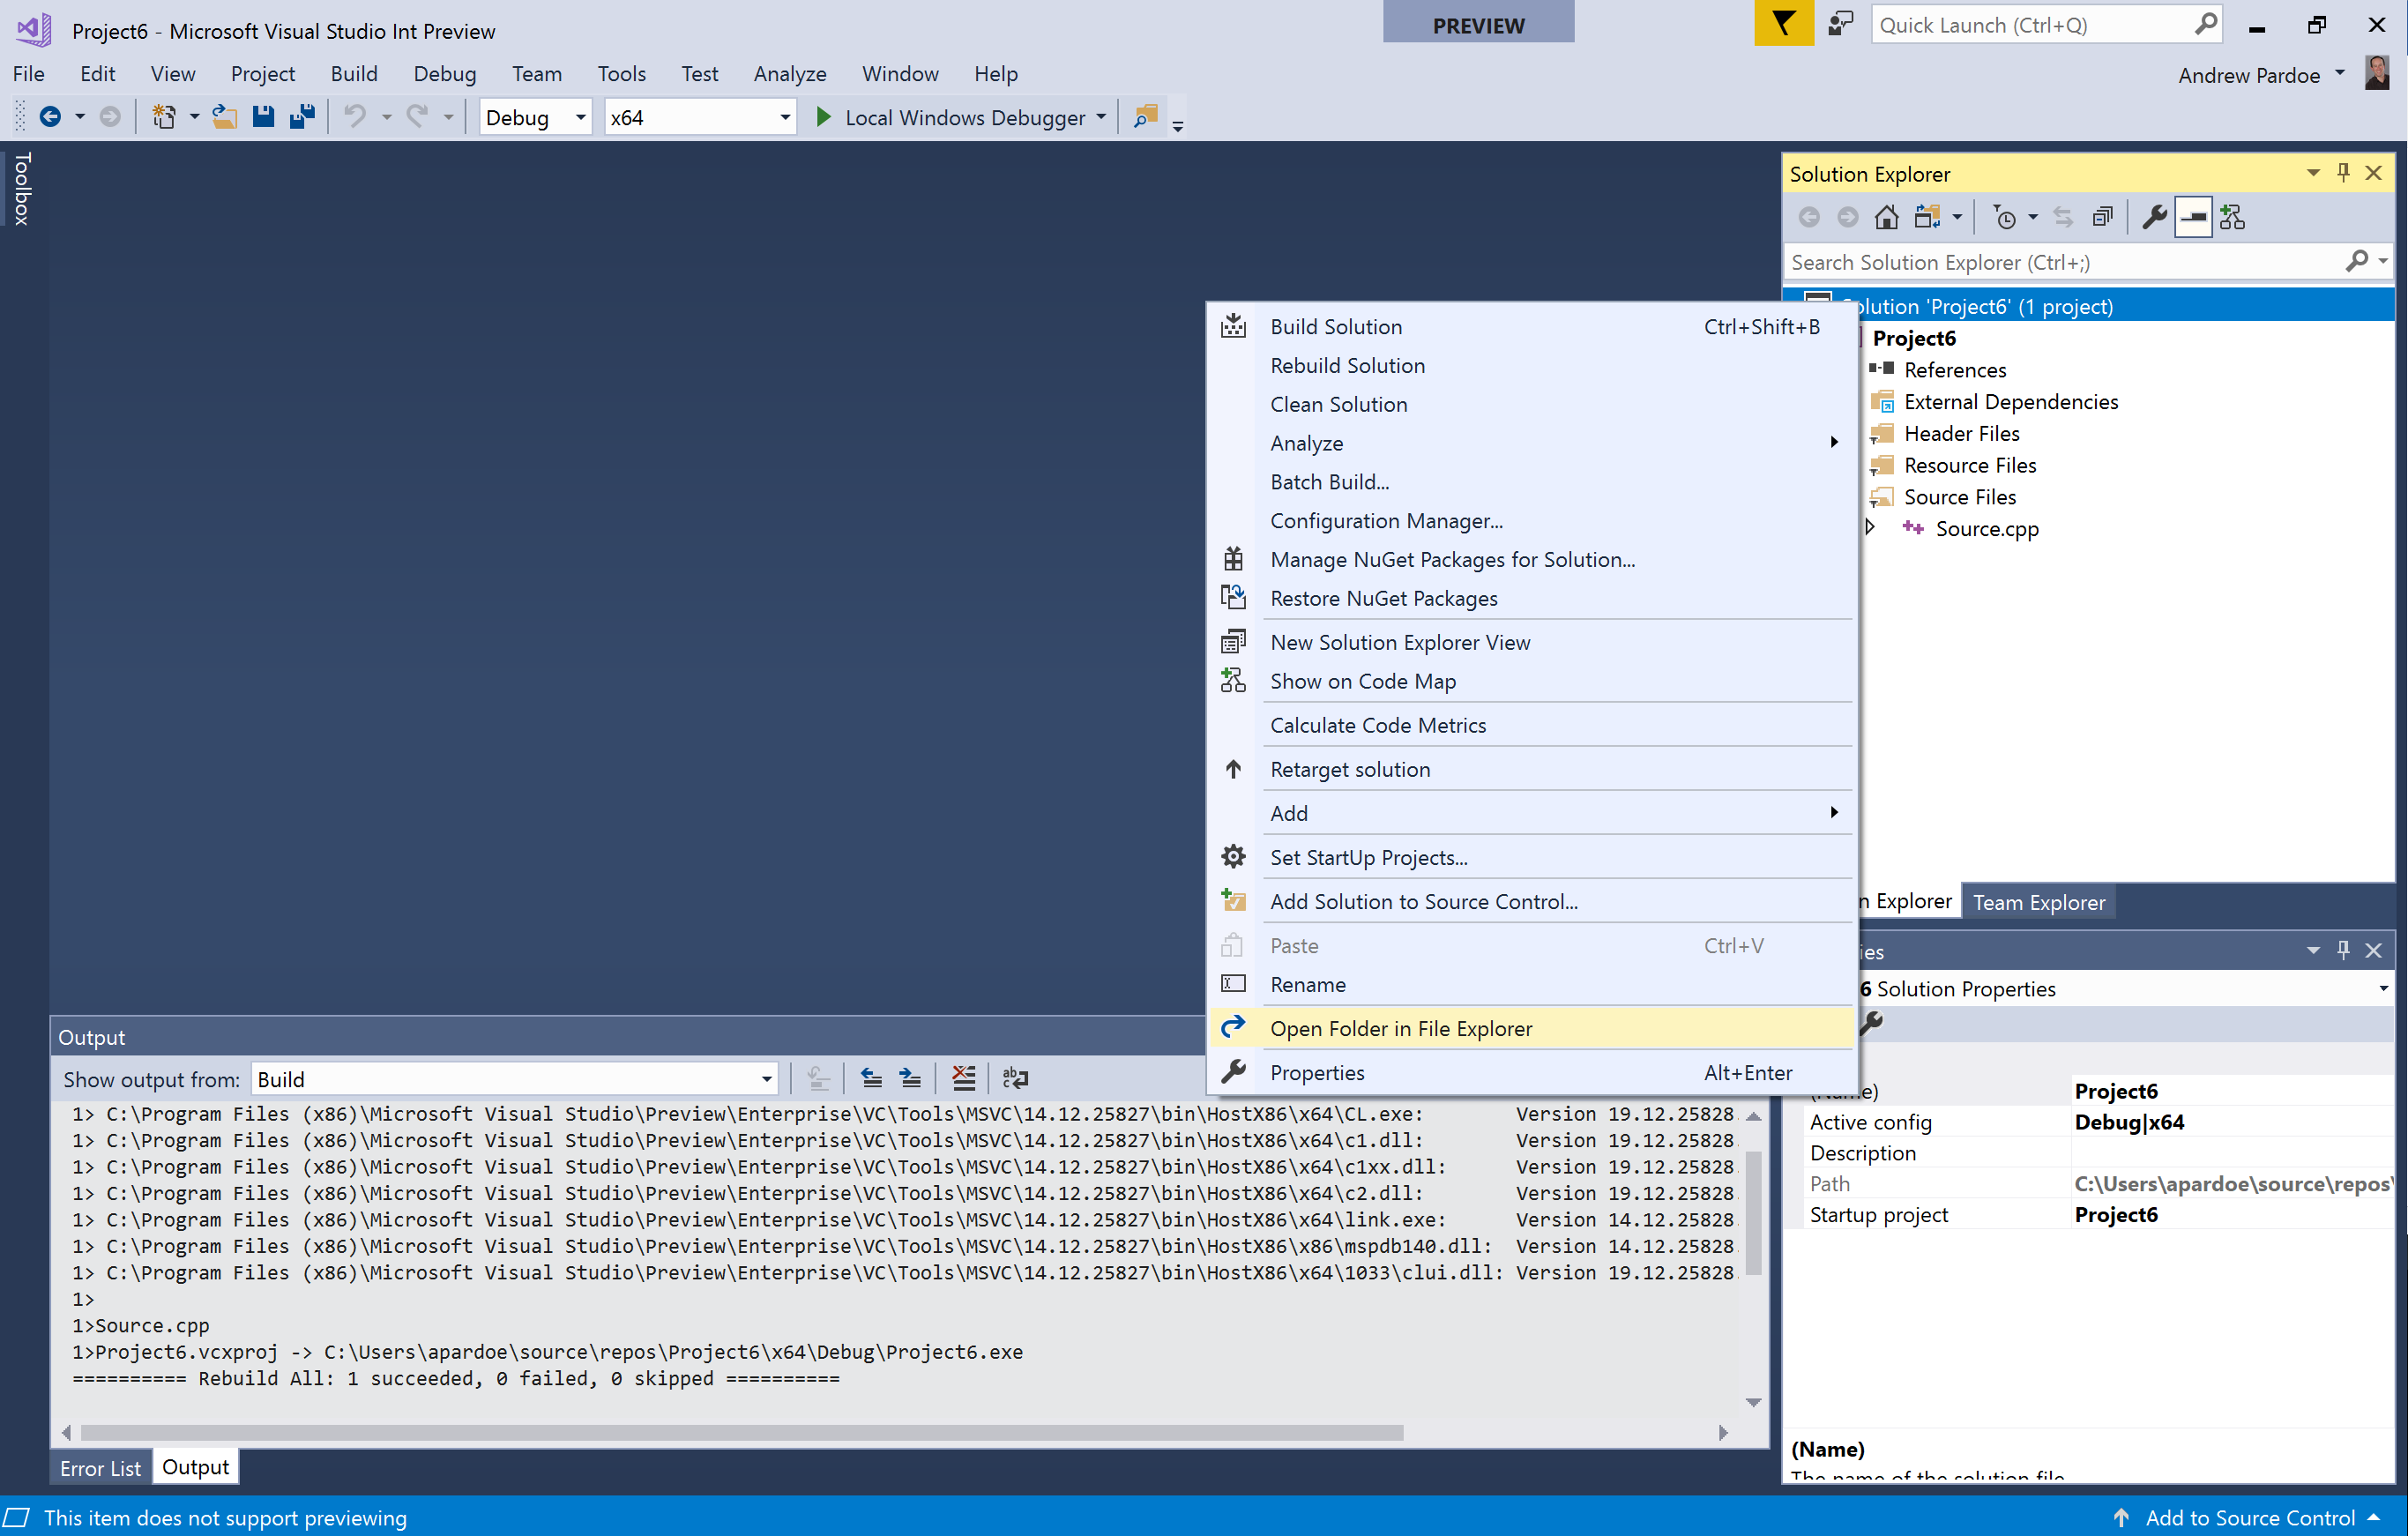
Next, open the folder containing your solution by right-clicking on the solution and selecting “Open Folder in File Explorer”.
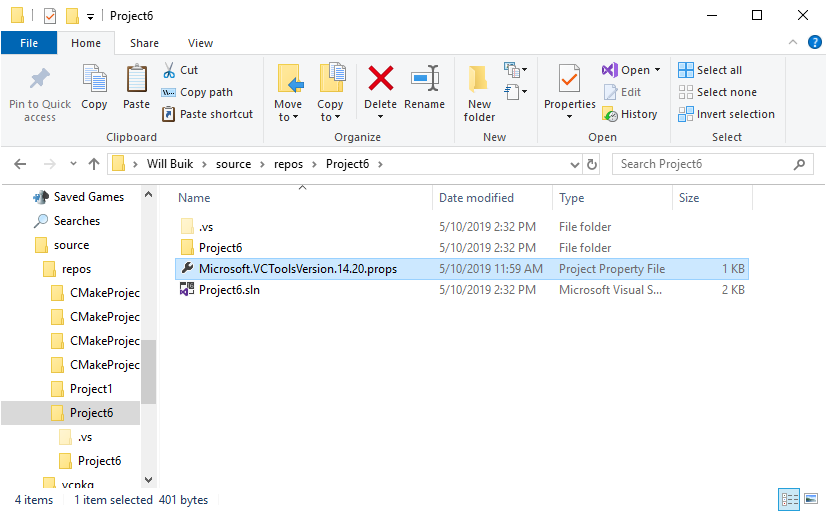
Copy the “Microsoft.VCToolsVersion.14.20.props” into your solution directory. The file should sit in the same directory as your project’s solution file, e.g., Project6.sln.
Now unload your project by right-clicking on the project and selecting “Unload Project”. Once the project is unloaded, you can edit the project by clicking on it and selecting “Edit [ProjectName]”. Locate the line that says:
<Import Project="$(VCTargetsPath)\Microsoft.Cpp.Default.props" />
Add a line directly above this line that imports the Microsoft.VCToolsVersion.14.20.props that you just copied into the solution directory:
<Import Project="$(SolutionDir)\Microsoft.VCToolsVersion.14.20.props" />
<Import Project="$(VCTargetsPath)\Microsoft.Cpp.Default.props" />
Now, save the file, then right-click on the project name and select “Reload Project”. If you haven’t already saved the file, you’ll be prompted to close the open .vcxproj file. Select “Yes” to close the file. Now when you rebuild the solution, you’ll see that you’re using the 14.20 MSVC compiler toolset.
Using Minor Version Toolsets with CMake
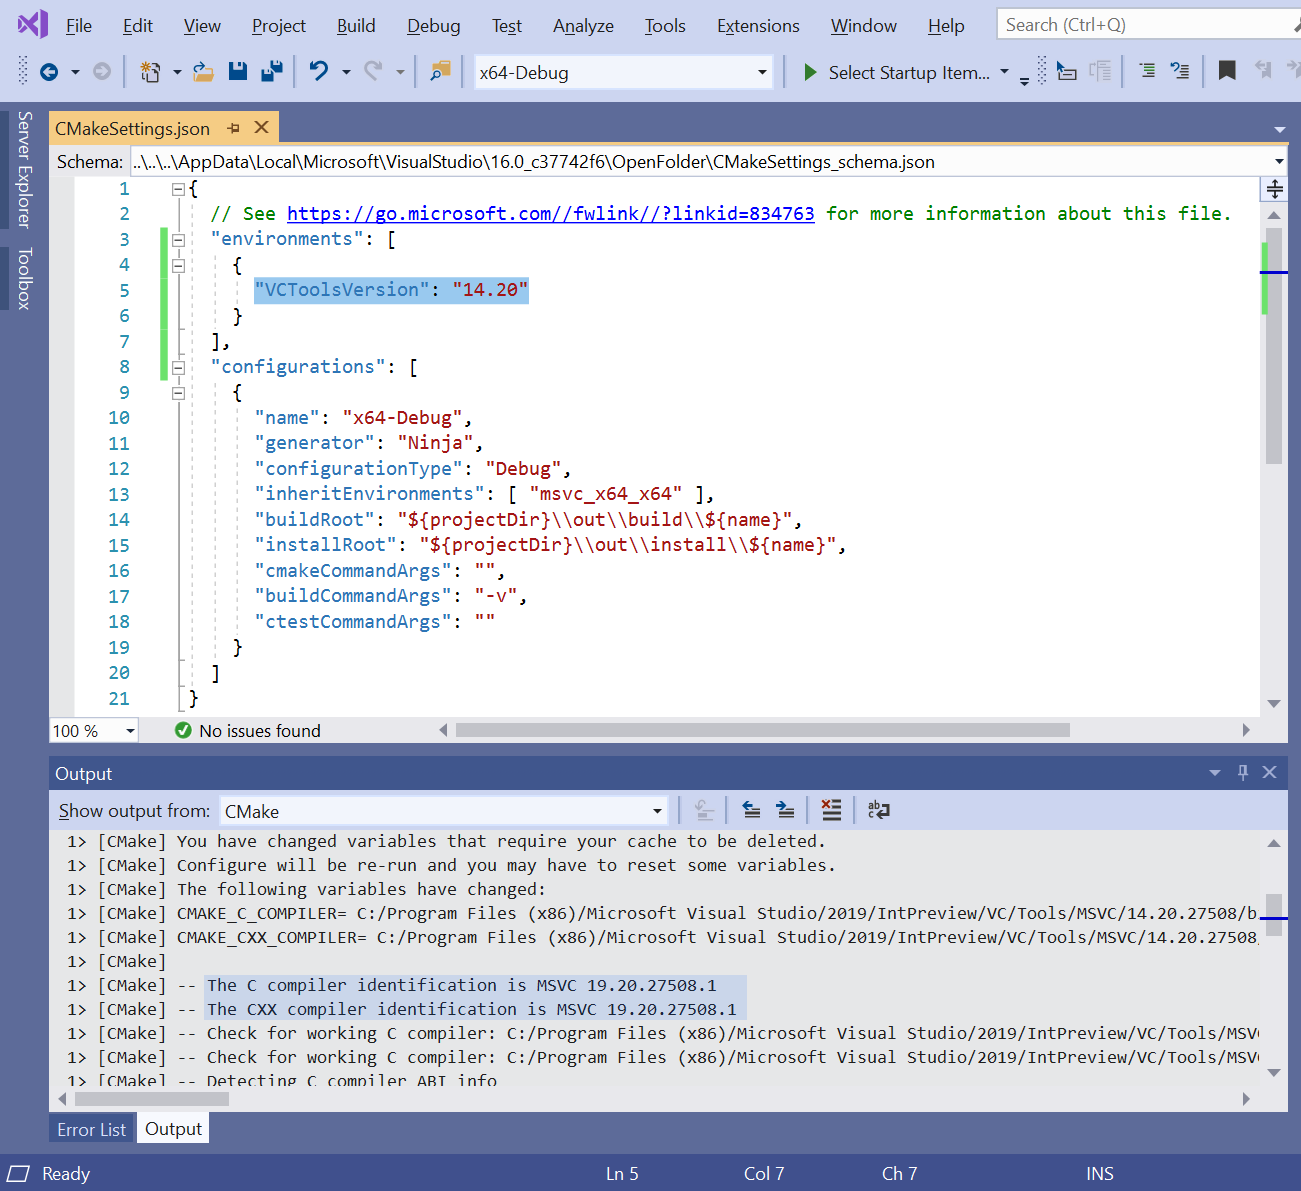
You can also seamlessly use these toolsets with CMake projects in Visual Studio too. To do this, you will need to create an environment variable in your CMakeSettings file called “VCToolsVersion” and set it to the minor version you need to use, for example “14.20.” To do this, you will need to modify the JSON of the CMake Settings file directly. If you are in in the CMake Settings editor, you can access the JSON with the “Edit JSON” button in the top right corner.
Now, you just need to delete the cache “Project > CMake Cache > Delete Cache” and regenerate it “Project > Generate Cache.” You can confirm that CMake is using the right toolset by examining the compiler path in the Output Window.
If you are working with CMake projects outside of the IDE, you can still use minor versions of the MSVC toolsets. Follow the instructions below for setting up a command line to use the toolset you need, and then just run CMake to configure the project. Once the project is configured, the minor toolset selected will be saved in the CMake cache and can then be used from any environment.
Using Minor Version Toolsets with the Command Line
If you need to use a side-by-side minor version MSVC toolset from the command line you just need to customize a developer command prompt. The command prompts installed with Visual Studio 2019 version 16.1 Preview 3 are located in the VC\Auxiliary\Build subdirectory of your VS install dir. For example, with the default installation path, they are located in the C:\Program Files (x86)\Microsoft Visual Studio\Preview\Enterprise\VC\Auxiliary\Build directory.
In that folder you’ll find four developer command prompts (named vcvars*.bat). Pick any one and create a copy to edit. The contents of these files are pretty simple: they all just invoke vcvarsall.bat with the proper architecture parameter. We’ll do the same, but add a new parameter that tells vcvarsall.bat to set up the environment for the v14.20 toolset: -vcvars_ver=14.20.
You can run “cl -Bv” to show that the environment is set up for the right version of the tools.
We’d love for you to download Visual Studio 2019 and give it a try. As always, we welcome your feedback. We can be reached via the comments below or via email (visualcpp@microsoft.com). If you encounter problems with Visual Studio or MSVC, or have a suggestion for us, please let us know through Help > Send Feedback > Report A Problem / Provide a Suggestion in the product, or via Developer Community. You can also find us on Twitter (@VisualC).
 Light
Light Dark
Dark
1 comment
I have a problem with the instructions for using the minor versions of the toolset in Visual Studio 2019.
The Visual Studio 2019 project properties changed when the toolset was set to v142. One of those changes included the ability to select the version of the toolset you want to use under Project Properties->Configuration Properties->Advanced. The property is MSVC Toolset Version, which is also documented.
If this isn’t available, it is also easier to edit the .vcxproj file and add the VCToolsVersion setting to the project file. This saves having to copy things around.