
Getting started with Azure Cosmos DB – end to end example
This is the first of two articles in which we will walk you through the steps for realizing your first Azure Cosmos DB implementation. In this post, we cover:
- Relational or NoSQL
- Identify access patterns
- Configure Azure Cosmos DB
- Using the Client SDK
Part 2 looks at performance tuning and monitoring.
Relational or NoSQL
For our scenario, we need to store data from sports events (e.g., marathon, triathlon, cycling, etc.). Users should be able to select an event and view a leaderboard. The amount of data that will be stored is estimated at 100 GB.
The schema of the data is different for various events and likely to change. As a result, this requires the database to be schema-agnostic and therefore we decided to use Azure Cosmos DB as our database. For more information, see Understanding the differences between Azure Cosmos DB NoSQL and relational databases | Microsoft Docs.
Identify access patterns
To design an efficient data model it is important to understand how the client application will interact with Azure Cosmos DB. The most important questions are:
- Is the access pattern more read-heavy or write-heavy?
- What are the main queries?
- What is the expected document size?
If the access pattern is read-heavy you want to choose a partition key that appears frequently as a filter in your queries. Queries can be efficiently routed to only the relevant physical partitions by including the partition key in the filter predicate.
When the access pattern is write-heavy you might want to choose item ID as the partition key. Item ID does a great job with evenly balancing partitioned throughput (RUs) and data storage since it’s a unique value. For more information, see Partitioning and horizontal scaling in Azure Cosmos DB | Microsoft Docs.
Finally, we need to understand the document size. 1 kb documents are very efficient in Azure Cosmos DB. To understand the impact of large documents on RU utilization see the capacity calculator and change the item size to a larger value. As a starting point you should start with only one container and embed all values of an entity in a single JSON document. This provides the best reading performance. However, if your document size is unpredictable and can grow to hundreds of kilobytes you might want to split these in different documents within the same container. For more information, see Modeling data in Azure Cosmos DB – Azure Cosmos DB | Microsoft Docs.
Let’s apply the considerations mentioned above to our scenario:
Our scenario
For our scenario, we expect far more reads than writes. Therefore we will optimize our Azure Cosmos DB instance for read access. The main queries for our scenario are:
Query 1: View top ranked participants for a selected event
SELECT * FROM c
WHERE c.Eventname = '<eventname>'
AND c.Eventdate = '<eventdate'
ORDER BY c.TotalScore asc
Query 2: View all events for a selected year a person has participated in
SELECT c.Eventname FROM c
WHERE c.Eventdate > '<startdate>' AND c.Eventdate < '<enddate>'
AND c.ParticipantId = <id>
Query 3: View all registered participants per event
SELECT c.ParticipantFirstname, c.ParticipantLastname, c.ParticipantId  FROM c
WHERE c.Eventname = '<eventname>'
Query 4: View total score for a single participant per event
SELECT c.ParticipantFirstname, c.ParticipantLastname, c.TotalScore FROM c
WHERE c.ParticipantId = <id>
AND c.Eventname = '<eventname>'
Except for query 2, all these queries are using Eventname as a filter. The amount of data stored per event is expected to be 1 GB which is well below the 20 GB limit of a logical partition. Therefore Eventname is a great fit as partition key. The document size for our sports events is small; less than 1 kb. Below is an example of such a document. Depending on the event the columns might change.
"id": "d5c137ae-5954-4eb2-9a7b-59ad3e65236d",
"Eventname": "Triathlon Amsterdam",
"Eventdate": "2021-03-04",
"ParticipantId": 4713,
"ParticipantLastname": "Visser",
"ParticipantFirstname": "Cyrille",
"Category": "Olympic",
"SwimmingScore": "03:17:16",
"CyclingScore": "03:25:48",
"RunningScore": "03:04:23",
"TotalScore": "09:47:27"
Configure Azure Cosmos DB
Now that we have a good understanding of the data model, we can create our Azure Cosmos DB account. For more information, see Create an Azure Cosmos account, database, and container from the Azure portal. Once the account is created a new database can be created using the Data Explorer:
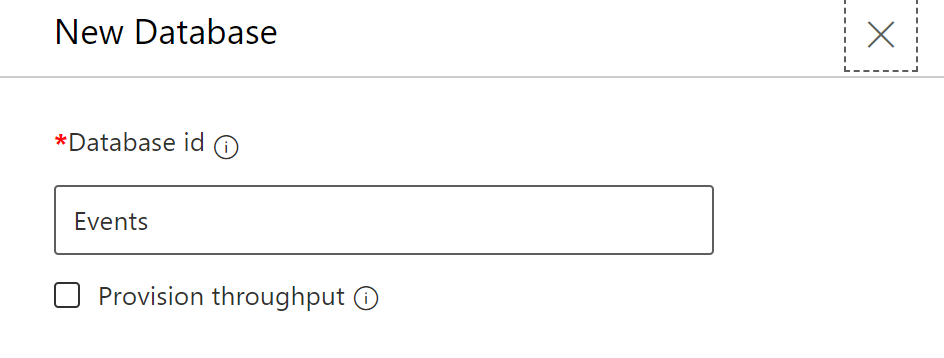
We will not provision throughput on the database level. Provisioning throughput on the database level is useful when you need multiple containers which have a different utilization pattern. Since we only use a single container and we want predictable throughput for our container, we will provision throughput on the container level. For more information, see Provision throughput on Azure Cosmos containers and databases
Once the database is created a new container can be created:
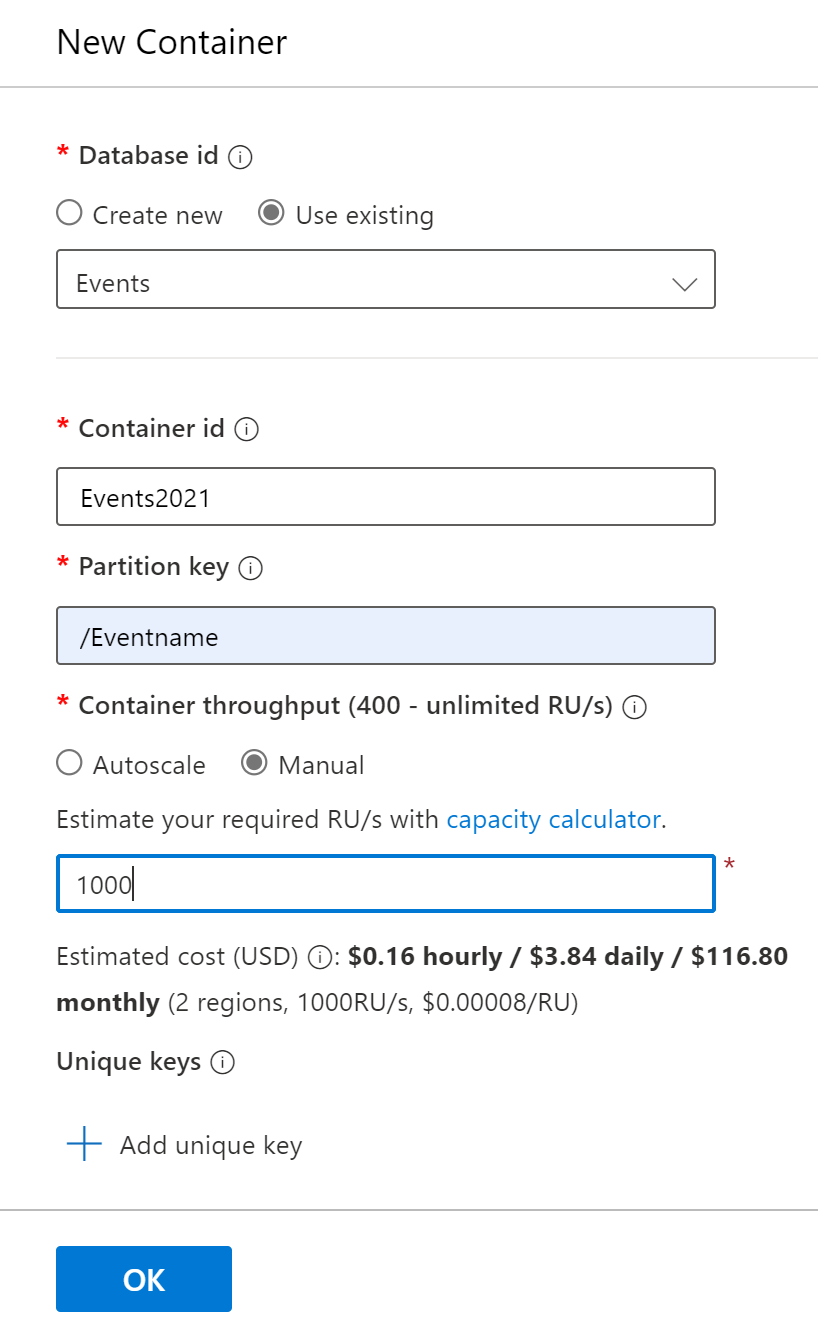
At the container level the partition key is specified, which in our case is /Eventname. We also provision throughput manually and select 1000 RU as a starting point. You can always change the amount of RU provisioned, or switch to autoscale at any moment in time. This doesn’t cause any downtime. For more information, see How to choose between manual and autoscale on Azure Cosmos DB.
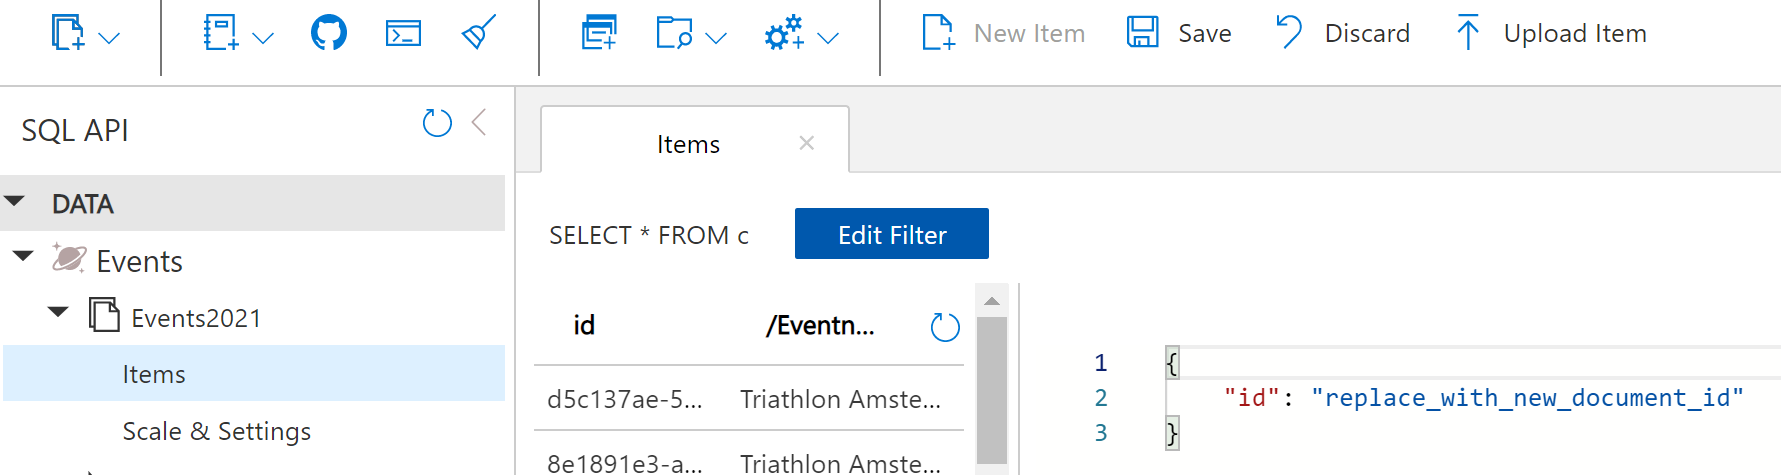
Once the container is created, we can add a few documents by selecting items and clicking new item.
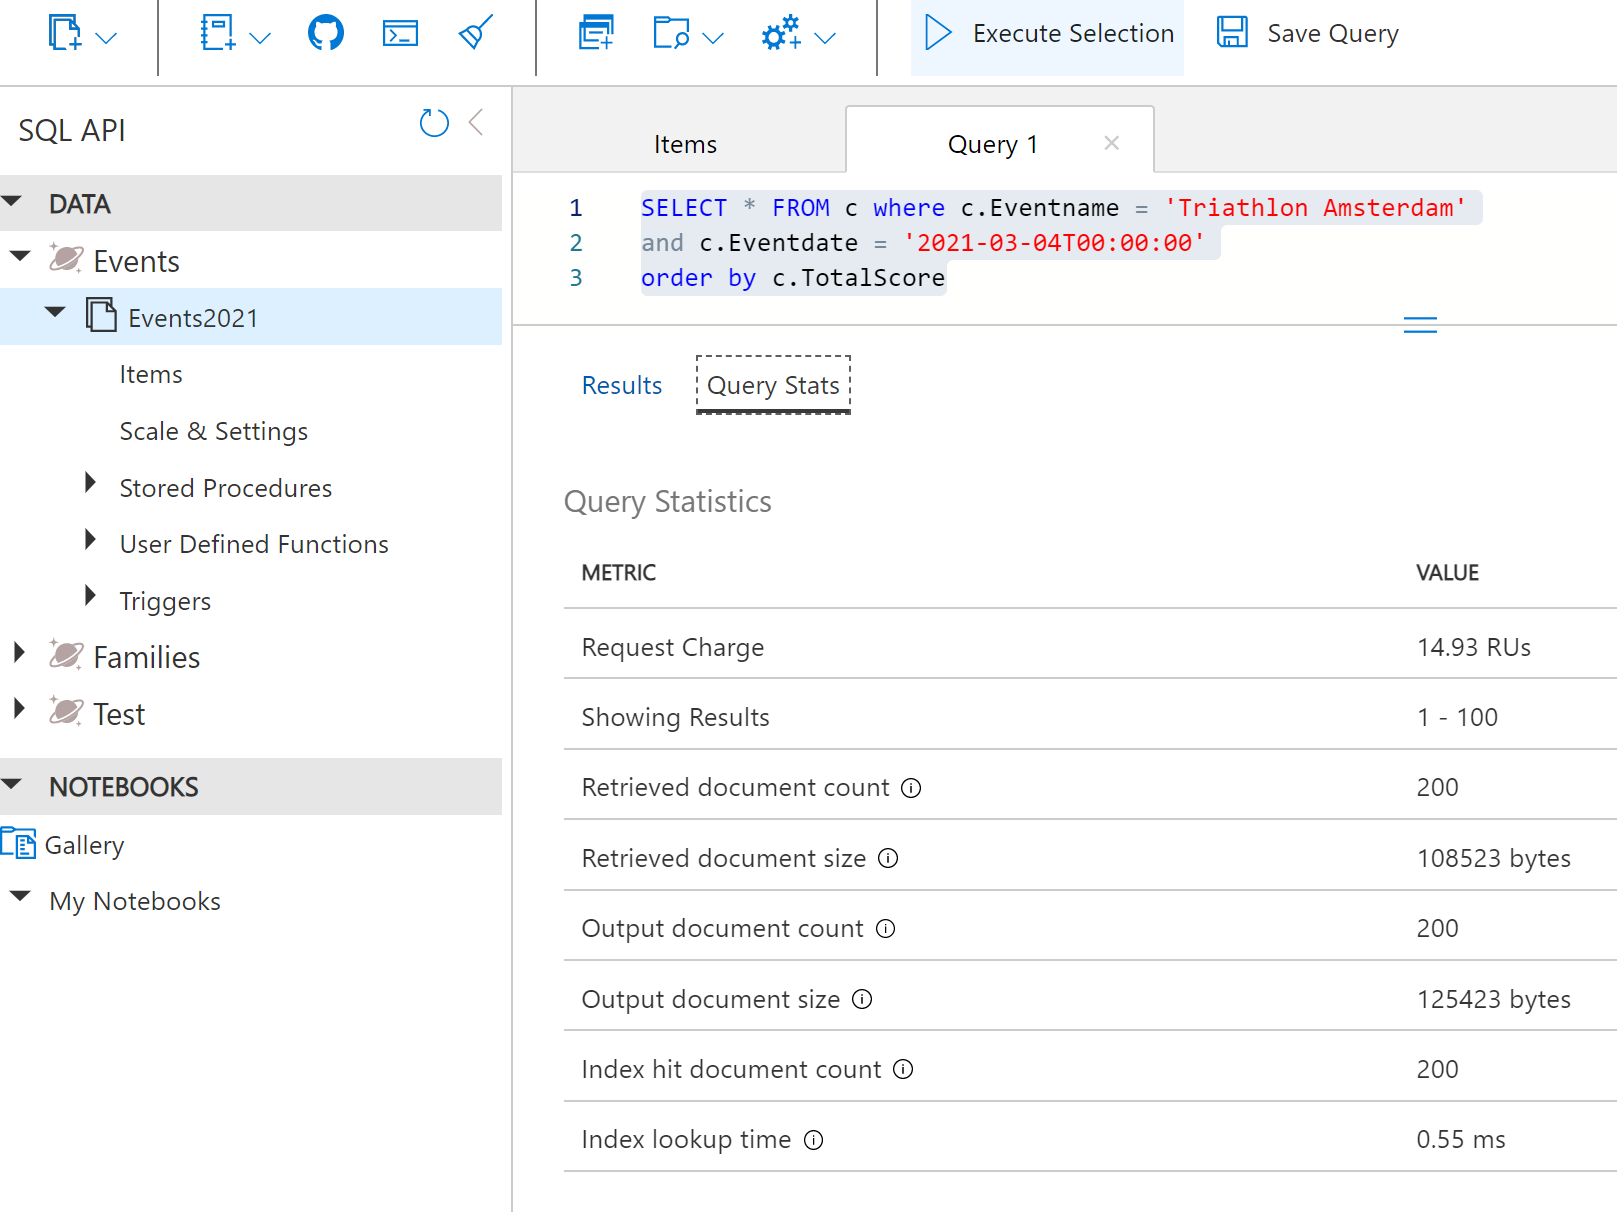
Now we have added a few documents, we click the Query button and test one of our main queries. When clicking on Query Stats we see useful information about the RU consumption and the efficiency of our query. When writing queries for Azure Cosmos DB always validate how efficient your queries are. For more information, see Troubleshoot query issues when using Azure Cosmos DB
Using the Client SDK
Now our data model is defined and our Azure Cosmos DB instance is configured we will create the first version of our application using the Client SDK. The Client SDK is available for multiple languages, but for our scenario we will choose the latest stable .NET client library. For more information, see Quickstart – Build a .NET console app to manage Azure Cosmos DB SQL API resources
It is highly recommended to use a singleton Azure Cosmos DB client for the lifetime of your application. The reason for this is that initiating the client object is an expensive operation. Once initialized the client object addresses connection management and caching. For more information, see Azure Cosmos DB performance tips for .NET SDK v3
Writing data
Adding an item using the Client SDK is straightforward:
ItemResponse<dynamic> response = await _container.CreateItemAsync<dynamic>(item, new PartitionKey(partitionKeyValue));
The ItemResponse object has a property called RequestCharge. This property displays the RU’s being used to perform the insert operation. It is recommended to log this value for troubleshooting purposes. For more information, see Find request unit (RU) charge for a SQL query in Azure Cosmos DB
In our case the Insert operation consumes 9 RU.
Selecting data
To prepare and parameterize a query we will use the QueryDefinition object. For creating a query we can use the GetQueryItemIterator method:
            List<dynamic> list = new List<dynamic>();

            QueryDefinition query = new QueryDefinition("SELECT c.TotalScore FROM c WHERE c.Eventname = @Eventname AND c.Eventdate = @Eventdate ORDER BY c.TotalScore ASC")
                .WithParameter("@Eventname", eventName)
                .WithParameter("@Eventdate", eventDate);

            using (FeedIterator<dynamic> resultset = _container.GetItemQueryIterator<dynamic>(query))
            {
                while (resultset.HasMoreResults)
                {
                    FeedResponse<dynamic> response = await resultset.ReadNextAsync();
                    Console.WriteLine("Q1 took {0} ms. RU consumed: {1}, Number of items : {2}", response.Diagnostics.GetClientElapsedTime().TotalMilliseconds, response.RequestCharge, response.Count);

                    foreach (var item in response)
                    {
                        list.Add(item);
                    }
                }
            }
The GetQueryItemIterator returns a FeedIterator object. With this object, we can loop through the items. You will notice that the SDK applies query pagination. By default, a maximum of 1000 items are returned at once. This can be changed by adjusting the MaxItemCount of the QueryRequestOptions object. Using the method ReadNextAsync() method we can iterate through the entire result set. It is important to understand each iteration consumes RUs.
The table below shows the RUs consumed for each query.
| Query | # Iterations | Items returned | RU consumption |
| 1 | 6 | 5001 | 208 |
| 2 | 1 | 10 | 3 |
| 3 | 6 | 5002 | 191 |
| 4 | 1 | 1 | 3 |
In part 2, we will focus on optimizing our queries.
Get started
- Find out more about Azure Cosmos DB and get started free
- Four ways to dev/test free with Azure Cosmos DB
- Find the code used in this example on GitHub
 Light
Light Dark
Dark
4 comments
Hello, I wasn’t expecting this end-to-end.
Do you have a real life application that you can show?
Hi,
is there part 2 yet?
I hope you saw part 2 when it came out on September 14th. https://devblogs.microsoft.com/cosmosdb/getting-started-end-to-end-example-2/
It was fantastic to read the above lines and one thing which impressed was:
List list = new List();

            QueryDefinition query = new QueryDefinition("SELECT c.TotalScore FROM c WHERE c.Eventname = @Eventname AND c.Eventdate = @Eventdate ORDER BY c.TotalScore ASC")
                .WithParameter("@Eventname", eventName)
                .WithParameter("@Eventdate", eventDate);

            using (FeedIterator resultset = _container.GetItemQueryIterator(query))
            {
                while (resultset.HasMoreResults)
                {
                    FeedResponse response = await resultset.ReadNextAsync();
                    Console.WriteLine("Q1 took {0} ms. RU consumed: {1}, Number of items : {2}", response.Diagnostics.GetClientElapsedTime().TotalMilliseconds, response.RequestCharge, kinemasterproapk response.Count);

                    foreach (var item in response)
                    {
                        list.Add(item);
                    }
                }
            }
Now Moving towards part 2:
https://devblogs.microsoft.com/cosmosdb/getting-started-end-to-end-example-2/
Thanks for sharing it.