
Two Lesser Known Tools for Local Azure Development
If you’re developing applications that target Azure services (e.g. Web Apps, Functions, Storage), you’ll want to know about two powerful tools that come with Visual Studio 2017 and the Azure development workload: * Cloud Explorer is a tool window inside Visual Studio that lets you browse your Azure resources and perform specific tasks – like stop and start app service, view streaming logs, create storage items. * Storage Emulator is a separate application to Visual Studio that provides a local simulation of the Azure storage services. It’s really handy for testing Functions that trigger from queues, blobs or tables. In this blog I’ll show you how you can develop Azure applications entirely locally – including the ability to interact with Azure storage – without ever needing an Azure subscription.
Prerequisites
- If you want to follow along, you’ll need Visual Studio 2017 with Azure development workload installed.
- For the purposes of this blog, we’ve developed a simple one-page web app. Note: You will NOT need an Azure subscription to follow this blog. In fact, that’s the whole point of this blog. 😉
Cloud Explorer
The Cloud Explorer is your window into Azure from within Visual Studio. You can browse the common resources in your Azure subscriptions in one convenient tool window. Each of the various Azure services have different properties and actions.
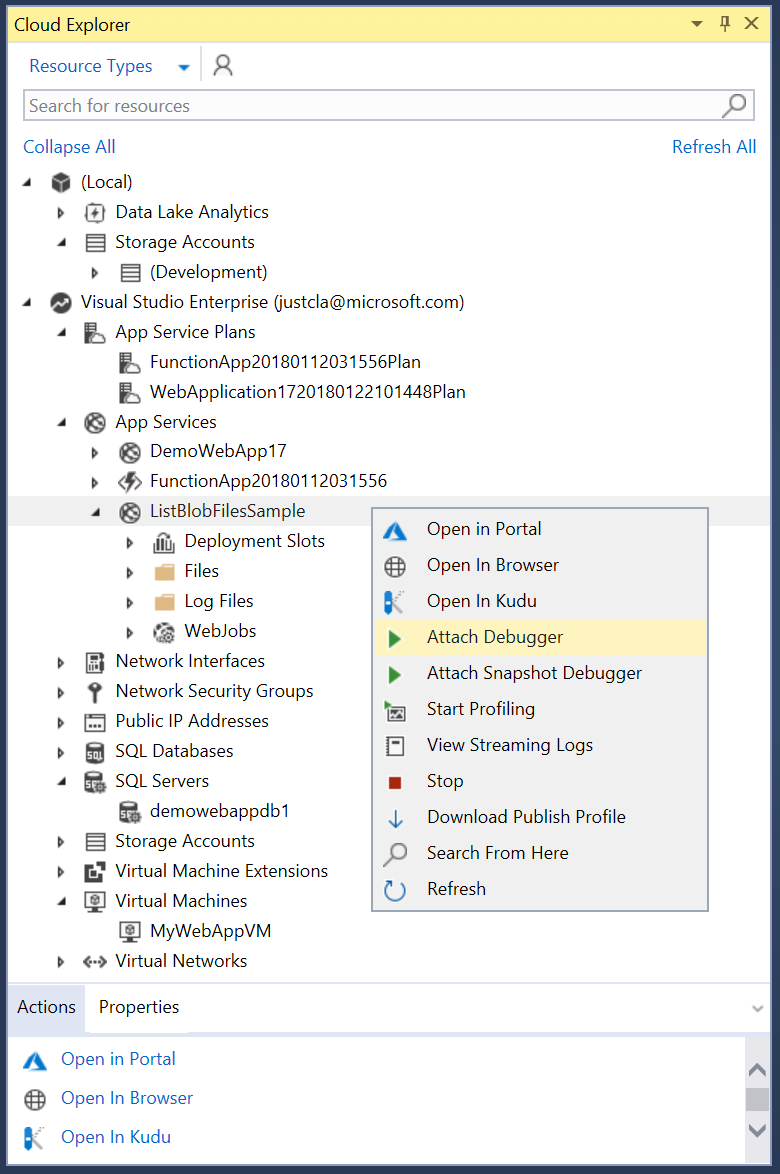
In the picture above, you can see it has listed a variety of resources from my Azure subscription including my App Services, SQL Databases and Virtual Machines, as well as my App Service Plans, Storage Accounts and other network infrastructure assets. I have published the sample app to an App Service called ListBlobFilesSample. You can see it listed under the App Services node.
Each resource has a collection of properties and actions. You can trigger actions by right-clicking on the item of interest. For instance, I can View Streaming Logs to see a running output of my application in the cloud, or I can Attach Debugger to step through the code to diagnose errors. (Note: For more information about diagnosing errors, see Diagnosing Errors on your Cloud Apps.)
In this blog, we’ll be using Cloud Explorer to interact with our Storage Accounts – specifically, with the local (Development) storage account using the Microsoft Azure Storage Emulator.
Sample Code
For this post, we’ll be working with a sample Web App with a single Razor Page file that displays a list of items in a Blob storage container (i.e. list of files in a folder in a storage account). Clone the source from
here and open the ListBlobFiles solution in Visual Studio. The web app consists of: – a single Razor Page file (Index.cshtml), – its code behind file (Index.cshtml.cs), – a utility class for reading items from storage (StorageHelper.cs), – the application’s settings file (appsettings.json), – standard web app startup files (Program.cs and Startup.cs)
Here’s a snippet of the most interesting part – the helper class that returns a list of files stored in a blob storage container.
Using Storage Completely Offline with Storage Emulator
Using the Storage Emulator, you can develop, run, debug and test your applications that use Azure Storage locally without an Azure subscription. The other great thing is, the Storage Emulator is part of the Azure development workload in Visual Studio, so there is no extra installation required.
Start the Storage Emulator * Press the Windows key and type “Storage Emulator”, then select Microsoft Azure Storage Emulator. When the Storage Emulator is running, an icon will appear in the Windows system tray. 
Launch the web app from Visual Studio * Press Ctrl+F5 to build and run the web app locally. A web browser will launch an open the Index page of the app. The page renders and shows there are no files in the Blob container. 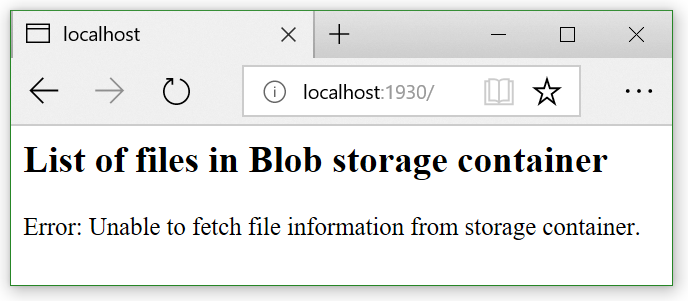
Let’s add some files to a local storage container and see if they show up when we refresh the page.
Create local Blob Storage (using Storage Emulator and Cloud Explorer) * Open Cloud Explorer * Expand to Blob Containers under (Local)->Storage Accounts->(Development) * Click Create Blob Container in the Actions panel 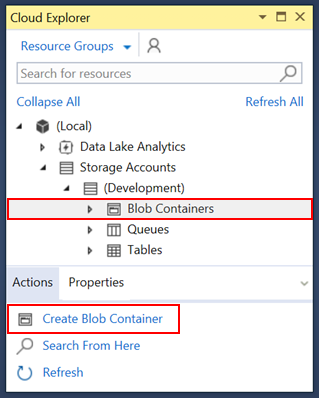 * Enter a name for the local blob storage container (ie. “myfiles”) – Note: must contain only lowercase/numbers/hyphens
Add files to your Blob container * Right-click the new container (myfiles) and select Open. * In the toolbar, click the Upload button. * Browse for a file, then press OK. * Do this repeatedly to add several files to your blob container (storage folder).

You’ll see the files appear in the container window, along with the URL for each item. The Microsoft Azure Activity Log window shows the status of the uploads. 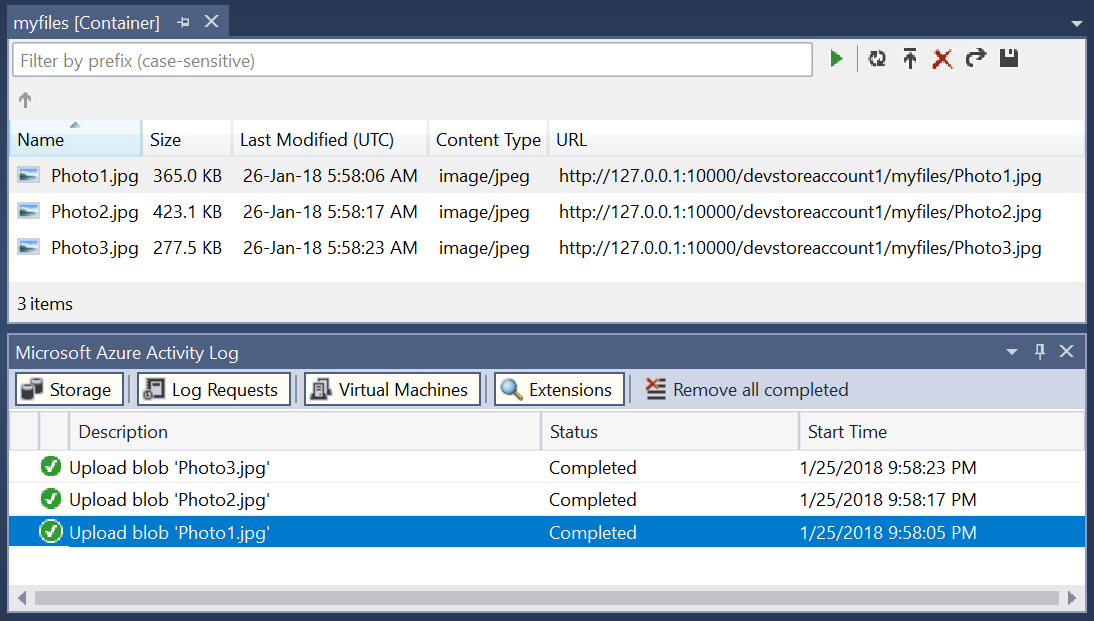
Return to the web browser that is running our local web app and refresh the page. Notice that the page now outputs the URLs of all the files in the container. 
Success! You’re now doing local development of an app that uses Azure storage – without needing any resources on Azure.
Next Steps
Try it on the cloud! When you’re ready, publish your app to Azure App Services and configure it to run with Azure Storage on the cloud. You can continue to use Cloud Explorer within Visual Studio to interact with your storage account on Azure in just the same way you did with local development.
Related Links
- Get started with Azure Blob storage using .NET https://docs.microsoft.com/en-us/azure/storage/blobs/storage-dotnet-how-to-use-blobs
- Use the Azure Storage Emulator for development and testing https://docs.microsoft.com/en-us/azure/storage/common/storage-use-emulator
- Introduction to Razor Pages in ASP.NET Core https://docs.microsoft.com/en-us/aspnet/core/mvc/razor-pages/?tabs=visual-studio
- ASP.NET Core – Simpler ASP.NET MVC Apps with Razor Pages https://msdn.microsoft.com/en-us/magazine/mt842512.aspx
- Azure Article : Azure Blob Storage Photo Gallery Web Application https://azure.microsoft.com/en-us/resources/samples/storage-blobs-dotnet-webapp/
- Related sample on GitHub: Image Resizer Web App https://github.com/Azure-Samples/storage-blob-upload-from-webapp
- Upload image data in the cloud with Azure Storage https://docs.microsoft.com/en-us/azure/storage/blobs/storage-upload-process-images
- Azure Blob Storage Samples for .NET https://github.com/Azure-Samples/storage-blob-dotnet-getting-started
 Light
Light Dark
Dark
0 comments