
Blazor WebAssembly 3.2.0 Preview 2 release now available
A new preview update of Blazor WebAssembly is now available! Here’s what’s new in this release:
- Integration with ASP.NET Core static web assets
- Token-based authentication
- Improved framework caching
- Updated linker configuration
- Build Progressive Web Apps
Get started
To get started with Blazor WebAssembly 3.2.0 Preview 2 install the latest .NET Core 3.1 SDK.
NOTE: Version 3.1.102 or later of the .NET Core SDK is required to use this Blazor WebAssembly release! Make sure you have the correct .NET Core SDK version by running
dotnet --versionfrom a command prompt.
Once you have the appropriate .NET Core SDK installed, run the following command to install the update Blazor WebAssembly template:
dotnet new -i Microsoft.AspNetCore.Components.WebAssembly.Templates::3.2.0-preview2.20160.5
That’s it! You can find additional docs and samples on https://blazor.net.
Upgrade an existing project
To upgrade an existing Blazor WebAssembly app from 3.2.0 Preview 1 to 3.2.0 Preview 2:
- Update your package references and namespaces as described below:
- Microsoft.AspNetCore.Blazor -> Microsoft.AspNetCore.Components.WebAssembly
- Microsoft.AspNetCore.Blazor.Build -> Microsoft.AspNetCore.Components.WebAssembly.Build
- Microsoft.AspNetCore.Blazor.DevServer -> Microsoft.AspNetCore.Components.WebAssembly.DevServer
- Microsoft.AspNetCore.Blazor.Server -> Microsoft.AspNetCore.Components.WebAssembly.Server
- Microsoft.AspNetCore.Blazor.HttpClient -> Microsoft.AspNetCore.Blazor.HttpClient (unchanged)
- Microsoft.AspNetCore.Blazor.DataAnnotations.Validation -> Microsoft.AspNetCore.Components.DataAnnotations.Validation
- Microsoft.AspNetCore.Blazor.Mono -> Microsoft.AspNetCore.Components.WebAssembly.Runtime
- Mono.WebAssembly.Interop -> Microsoft.JSInterop.WebAssembly
- Update all Microsoft.AspNetCore.Components.WebAssembly.* package references to version 3.2.0-preview2.20160.5.
- In Program.cs add a call to
builder.Services.AddBaseAddressHttpClient(). - Rename
BlazorLinkOnBuildin your project files toBlazorWebAssemblyEnableLinking. - If your Blazor WebAssembly app is hosted using ASP.NET Core, make the following updates in Startup.cs in your Server project:
- Rename
UseBlazorDebuggingtoUseWebAssemblyDebugging. - Remove the calls to
services.AddResponseCompressionandapp.UseResponseCompression()(response compression is now handled by the Blazor framework). - Replace the call to
app.UseClientSideBlazorFiles<Client.Program>()withapp.UseBlazorFrameworkFiles(). - Replace the call to
endpoints.MapFallbackToClientSideBlazor<Client.Program>("index.html")withendpoints.MapFallbackToFile("index.html").
- Rename
Hopefully that wasn’t too painful!
NOTE: The structure of a published Blazor WebAssembly app has also changed as part of this release, which may require you to update how you deploy your apps. See the “Integration with ASP.NET Core static web assets” section below for details.
Integration with ASP.NET Core static web assets
Blazor WebAssembly apps now integrate seamlessly with how ASP.NET Core handles static web assets. Blazor WebAssembly apps can use the standard ASP.NET Core convention for consuming static web assets from referenced projects and packages: _content/{LIBRARY NAME}/{path}. This allows you to easily pick up static assets from referenced component libraries and JavaScript interop libraries just like you can in a Blazor Server app or any other ASP.NET Core web app.
Blazor WebAssembly apps are also now hosted in ASP.NET Core web apps using the same static web assets infrastructure. After all, a Blazor WebAssembly app is just a bunch of static files!
This integration simplifies the startup code for ASP.NET Core hosted Blazor WebAssembly apps and removes the need to have an assembly reference from the server project to the client project. Only the project reference is needed, so setting ReferenceOutputAssembly to false for the client project reference is now supported.
Building on the static web assets support in ASP.NET Core also enables new scenarios like hosting ASP.NET Core hosted Blazor WebAssembly apps in Docker containers. In Visual Studio you can add docker support to your Blazor WebAssembly app by right-clicking on the Server project and selecting Add > Docker support.
As a result of this change, the structure of the published output of a Blazor WebAssembly app is now more consistent with other ASP.NET Core apps. A Blazor WebAssembly app is now published to the /bin/Release/netstandard2.1/publish/wwwroot folder (a dist folder is no longer generated). To publish a standalone Blazor WebAssembly app as a static site, copy the contents of the published wwwroot folder to your static site host. If the Blazor WebAssembly app is hosted in an ASP.NET Core app, the client Blazor WebAssembly app is published into the wwwroot folder of the published server app just like any other static web asset.
Token-based authentication
Blazor WebAssembly now has built-in support for token-based authentication.
Blazor WebAssembly apps are secured in the same manner as Single Page Applications (SPAs). There are several approaches for authenticating users to SPAs, but the most common and comprehensive approach is to use an implementation based on the OAuth 2.0 protocol, such as OpenID Connect (OIDC). OIDC allows client apps, like a Blazor WebAssembly app, to verify the user identity and obtain basic profile information using a trusted provider.
Using the Blazor WebAssembly project template you can now quickly create apps setup for authentication using:
- ASP.NET Core Identity and IdentityServer
- An existing OpenID Connect provider
- Azure Active Directory
Authenticate using ASP.NET Core Identity and IdentityServer
Authentication for Blazor WebAssembly apps can be handled using ASP.NET Core Identity and IdentityServer. ASP.NET Core Identity handles authenticating users while IdentityServer handles the necessary protocol endpoints.
To create a Blazor WebAssembly app setup with authentication using ASP.NET Core Identity and IdentityServer run the following command:
dotnet new blazorwasm --hosted --auth Individual -o BlazorAppWithAuth1
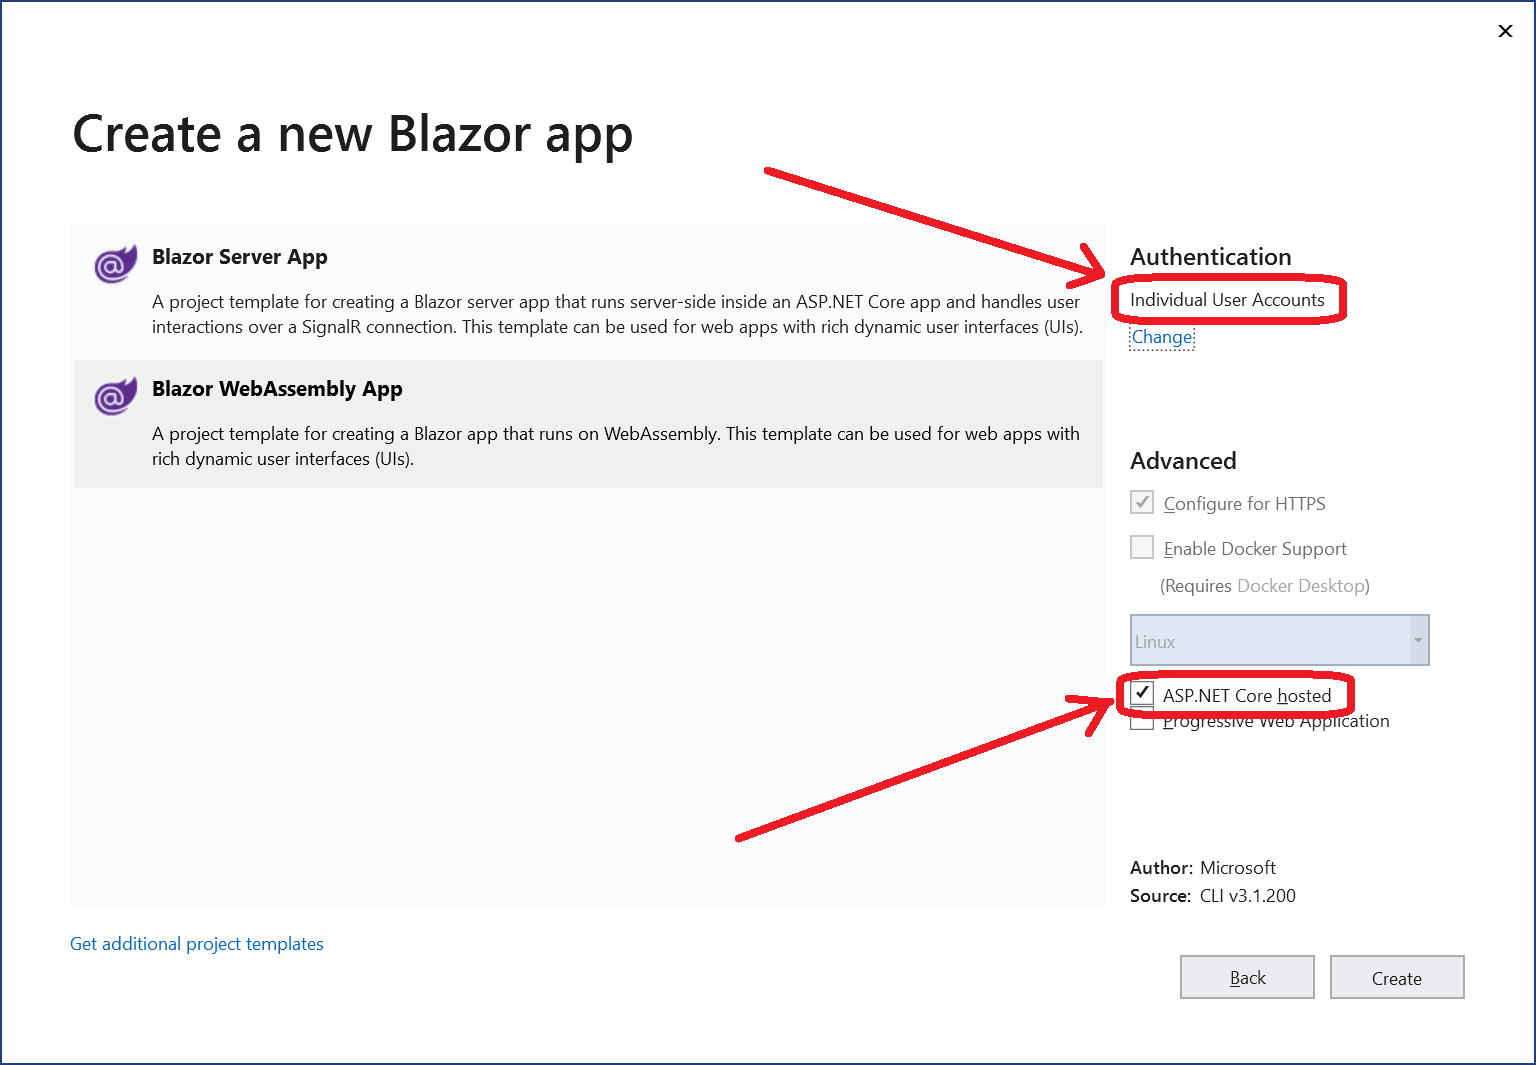
If you’re using Visual Studio, you can create the project by selecting the “ASP.NET Core hosted” option and the selecting “Change Authentication” > “Individual user accounts”.
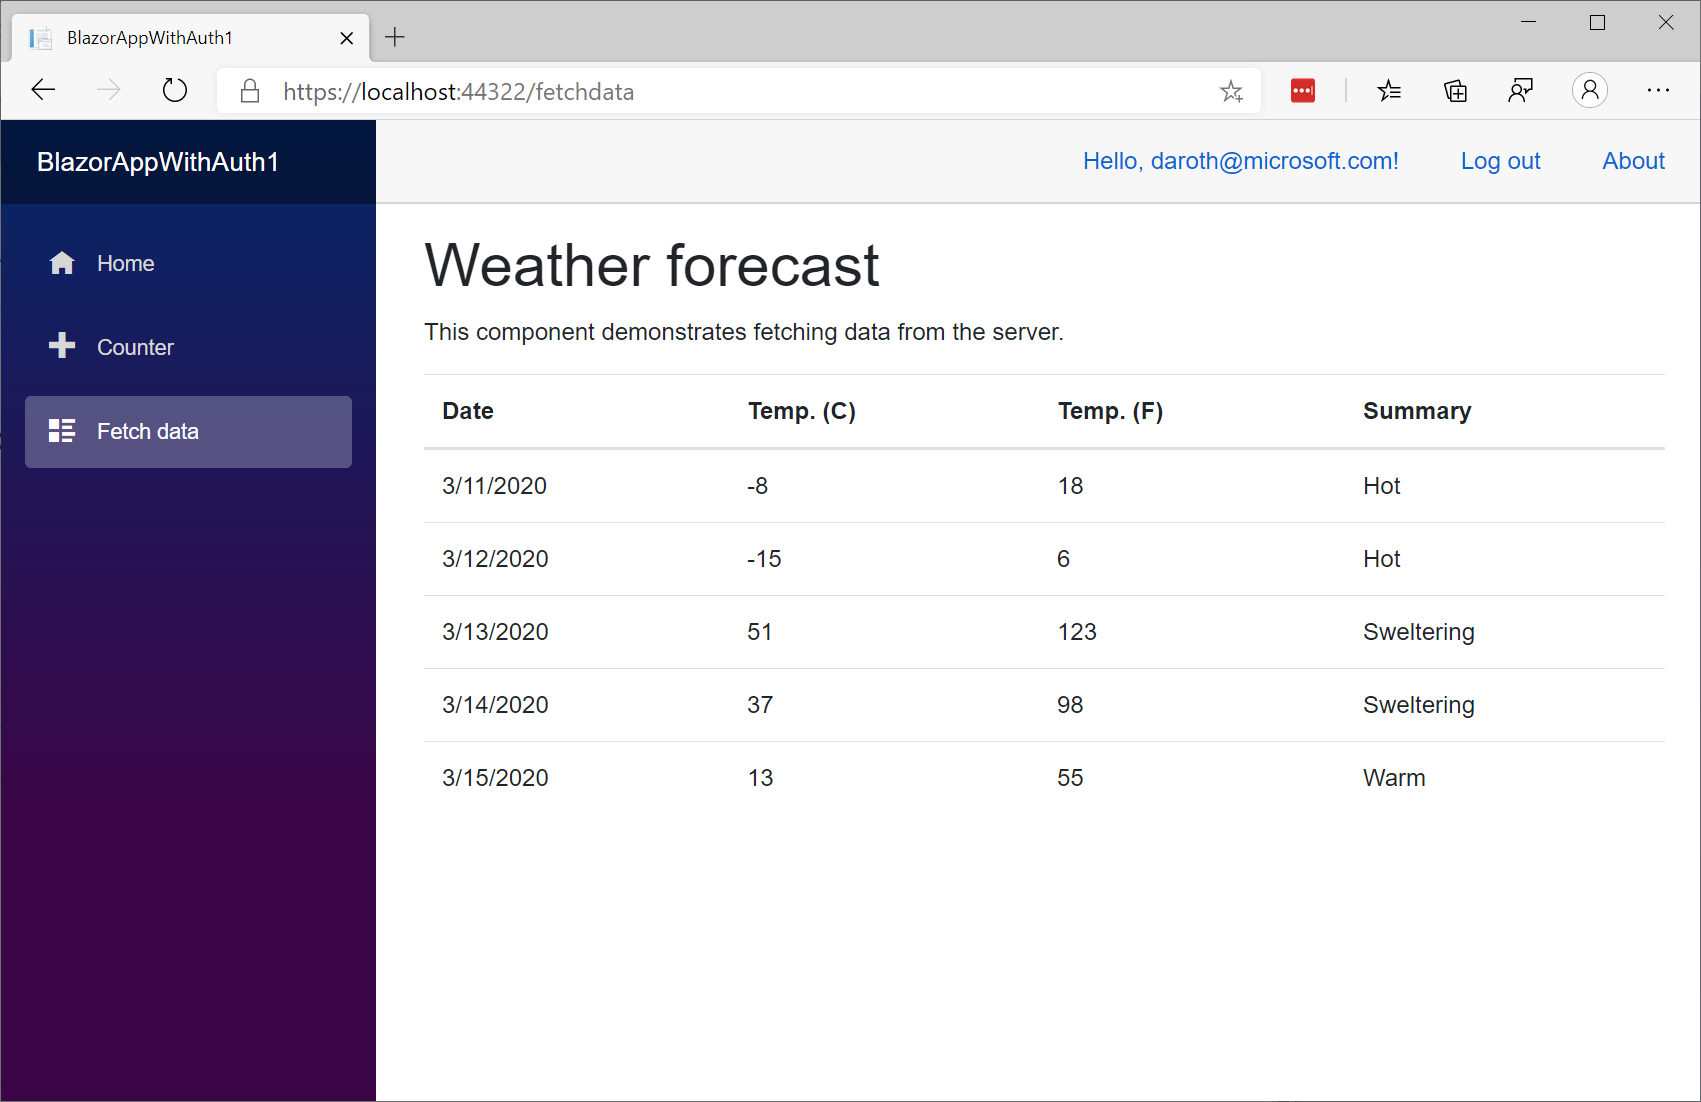
Run the app and try to access the Fetch Data page. You’ll get redirected to the login page.

Register a new user and log in. You can now access the Fetch Data page.
The Server project is configured to use the default ASP.NET Core Identity UI, as well as IdentityServer, and JWT authentication:
// Add the default ASP.NET Core Identity UI
services.AddDefaultIdentity<ApplicationUser>(options => options.SignIn.RequireConfirmedAccount = true)
    .AddEntityFrameworkStores<ApplicationDbContext>();

// Add IdentityServer with support for API authorization
services.AddIdentityServer()
    .AddApiAuthorization<ApplicationUser, ApplicationDbContext>();

// Add JWT authentication
services.AddAuthentication()
    .AddIdentityServerJwt();
The Client app is registered with IdentityServer in the appsettings.json file:
"IdentityServer": {
  "Clients": {
    "BlazorAppWithAuth1.Client": {
      "Profile": "IdentityServerSPA"
    }
  }
},
In the Client project, the services needed for API authorization are added in Program.cs:
builder.Services.AddApiAuthorization();
In FetchData.razor the IAccessTokenProvider service is used to acquire an access token from the server. The token may be cached or acquired without the need of user interaction. If acquiring the token succeeds, it is then applied to the request for weather forecast data using the standard HTTP Authorization header. If acquiring the token silently fails, the user is redirected to the login page:
protected override async Task OnInitializedAsync()
{
    var httpClient = new HttpClient();
    httpClient.BaseAddress = new Uri(Navigation.BaseUri);

    var tokenResult = await AuthenticationService.RequestAccessToken();

    if (tokenResult.TryGetToken(out var token))
    {
        httpClient.DefaultRequestHeaders.Add("Authorization", $"Bearer {token.Value}");
        forecasts = await httpClient.GetJsonAsync<WeatherForecast[]>("WeatherForecast");
    }
    else
    {
        Navigation.NavigateTo(tokenResult.RedirectUrl);
    }
}
For additional details on using Blazor WebAssembly with ASP.NET Core Identity and IdentityServer see Secure an ASP.NET Core Blazor WebAssembly hosted app with Identity Server
Authenticate using an existing OpenID Connect provider
You can setup authentication for a standalone Blazor WebAssembly using any valid OIDC provider. Once you’ve registered your app with the OIDC provider you configure the Blazor WebAssembly app to use that provider by calling AddOidcAuthentication in Program.cs:
builder.Services.AddOidcAuthentication(options =>
{
    options.ProviderOptions.Authority = "{AUTHORITY}";
    options.ProviderOptions.ClientId = "{CLIENT ID}";
});
You can create a standalone Blazor WebAssembly app that uses a specific OIDC provider for authentication using the following command:
dotnet new blazorwasm --auth Individual --client-id "{CLIENT ID}" --authority "{AUTHORITY}"
For more details on configuring authentication for a standalone Blazor WebAssembly app see Secure an ASP.NET Core Blazor WebAssembly standalone app with the Authentication library
Authenticate using Azure AD & Azure AD B2C
You can also setup Blazor WebAssembly apps to use Azure Active Directory (Azure AD) or Azure Active Directory Business-to-Customer (Azure AD B2C) for authentication. When authenticating using Azure AD or Azure AD B2C authentication is handled using the new Microsoft.Authentication.WebAssembly.Msal library, which is based on the Microsoft Authentication Library (MSAL.js).
To learn how to setup authentication for Blazor WebAssembly app using Azure AD or Azure AD B2C see:
- Secure an ASP.NET Core Blazor WebAssembly hosted app with Azure Active Directory
- Secure an ASP.NET Core Blazor WebAssembly hosted app with Azure Active Directory B2C
Additional authentication resources
This is just a sampling of the new authentication capabilities in Blazor WebAssembly. To learn more about how Blazor WebAssembly supports authentication see Secure ASP.NET Core Blazor WebAssembly.
Improved framework caching
If you look at the network trace of what’s being download for a Blazor WebAssembly app after it’s initially loaded, you might think that Blazor WebAssembly has been put on some sort of extreme diet:
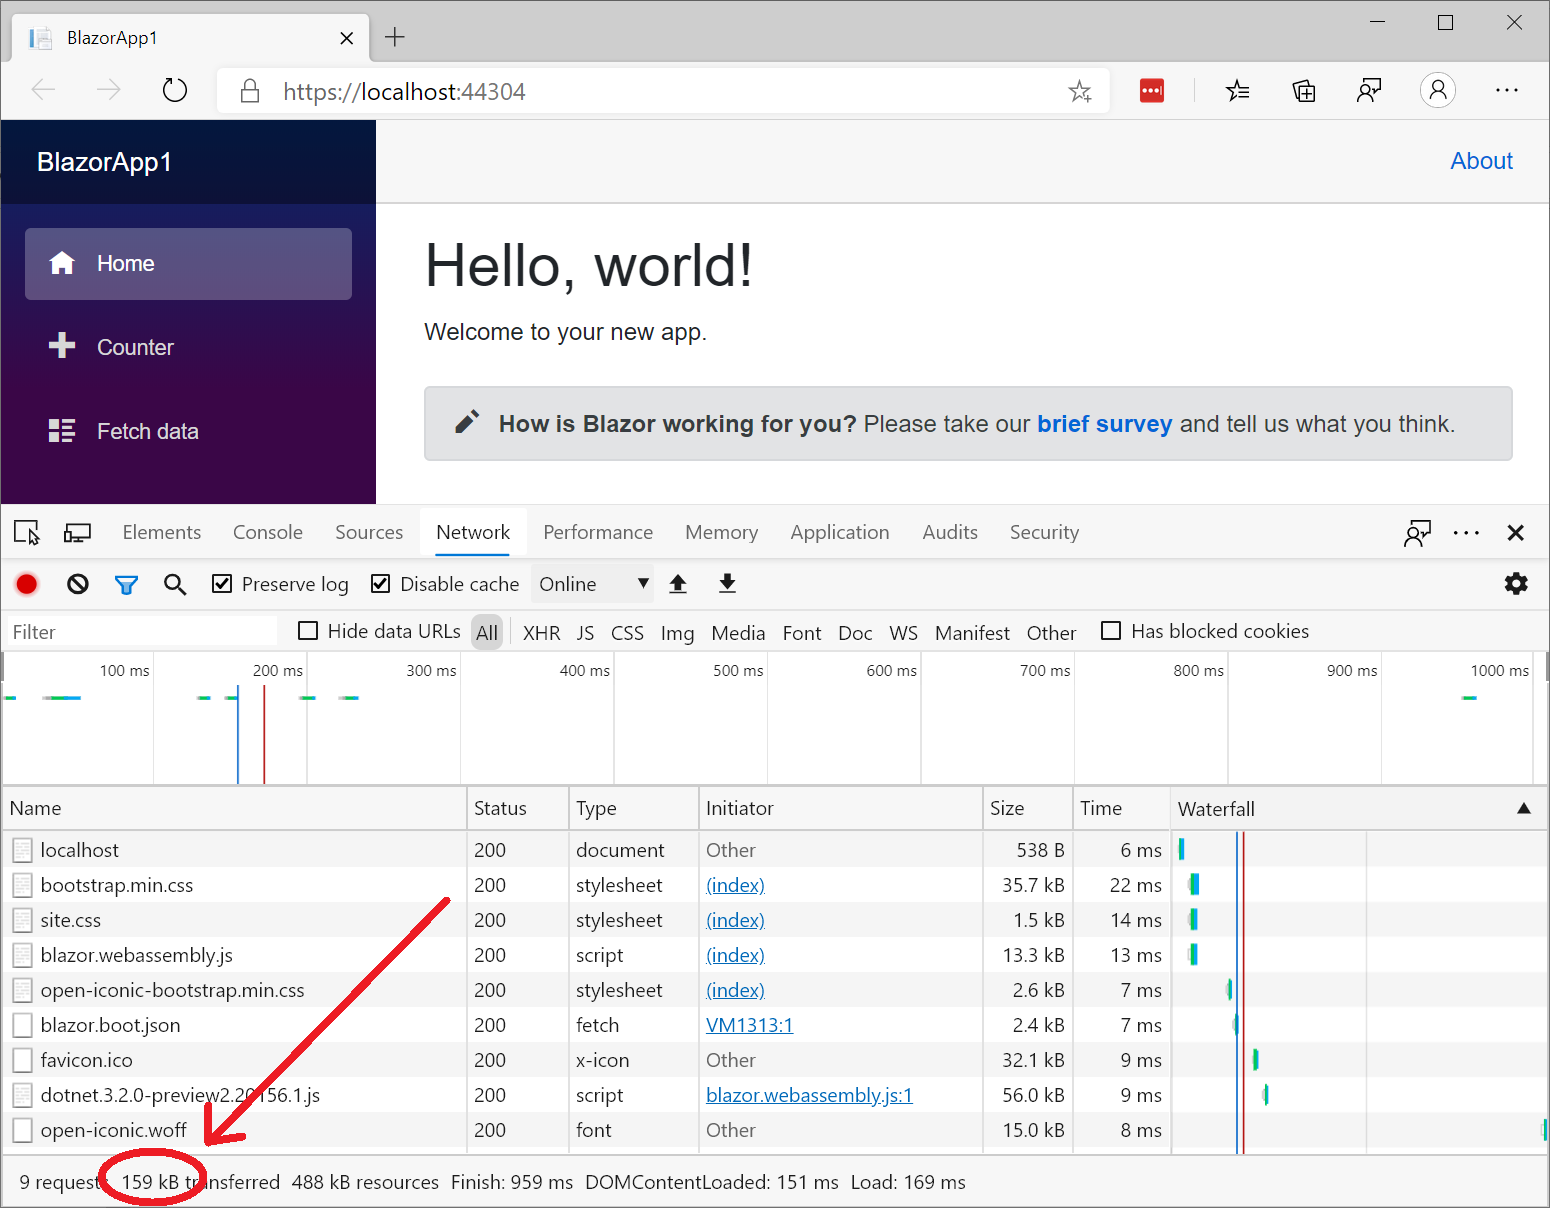
Whoa! Only 159kB? What’s going on here?
When a Blazor WebAssembly app is initially loaded, the runtime and framework files are now stored in the browser cache storage:

When the app loads, it first uses the contents of the blazor.boot.json to check if it already has all of the runtime and framework files it needs in the cache. If it does, then no additional network requests are necessary.
You can still see what the true size of the app is during development by checking the browser console:

Updated linker configuration
You may notice with this preview release that the download size of the app during development is now a bit larger, but build times are faster. This is because we no longer run the .NET IL linker during development to remove unused code. In previous Blazor previews we ran the linker on every build, which slowed down development. Now we only run the linker for release builds, which are typically done as part of publishing the app. When publishing the app with a release build (dotnet publish -c Release), the linker removes any unnecessary code and the download size is much more reasonable (~2MB for the default template).
If you prefer to still run the .NET IL linker on each build during development, you can turn it on by adding <BlazorWebAssemblyEnableLinking>true</BlazorWebAssemblyEnableLinking> to your project file.
Build Progressive Web Apps with Blazor
A Progressive Web App (PWA) is a web-based app that uses modern browser APIs and capabilities to behave like a native app. These capabilities can include:
- Working offline and always loading instantly, independently of network speed
- Being able to run in its own app window, not just a browser window
- Being launched from the host operating system (OS) start menu, dock, or home screen
- Receiving push notifications from a backend server, even while the user is not using the app
- Automatically updating in the background
A user might first discover and use the app within their web browser like any other single-page app (SPA), then later progress to installing it in their OS and enabling push notifications.
Blazor WebAssembly is a true standards-based client-side web app platform, so it can use any browser API, including the APIs needed for PWA functionality.
Using the PWA template
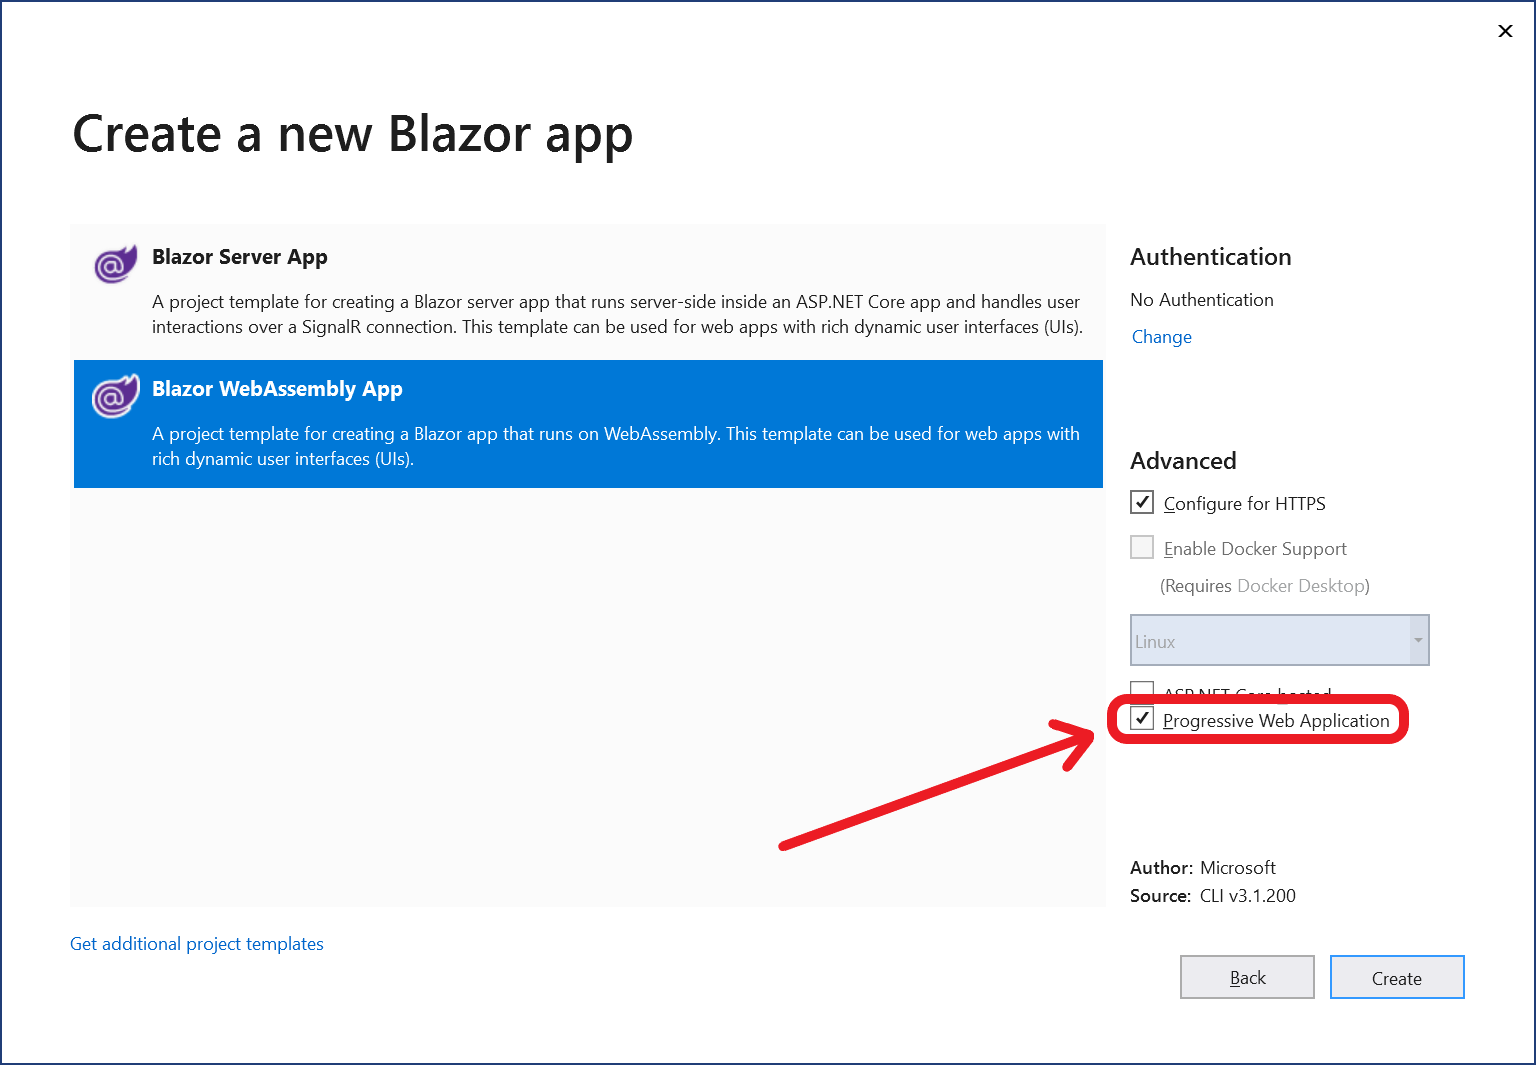
When creating a new Blazor WebAssembly app, you’re offered the option to add PWA features. In Visual Studio, the option is given as a checkbox in the project creation dialog:
If you’re creating the project on the command line, you can use the --pwa flag. For example,
dotnet new blazorwasm --pwa -o MyNewProject
In both cases, you’re free to also use the “ASP.NET Core hosted” option if you wish, but don’t have to do so. PWA features are independent of how the app is hosted.
Installation and app manifest
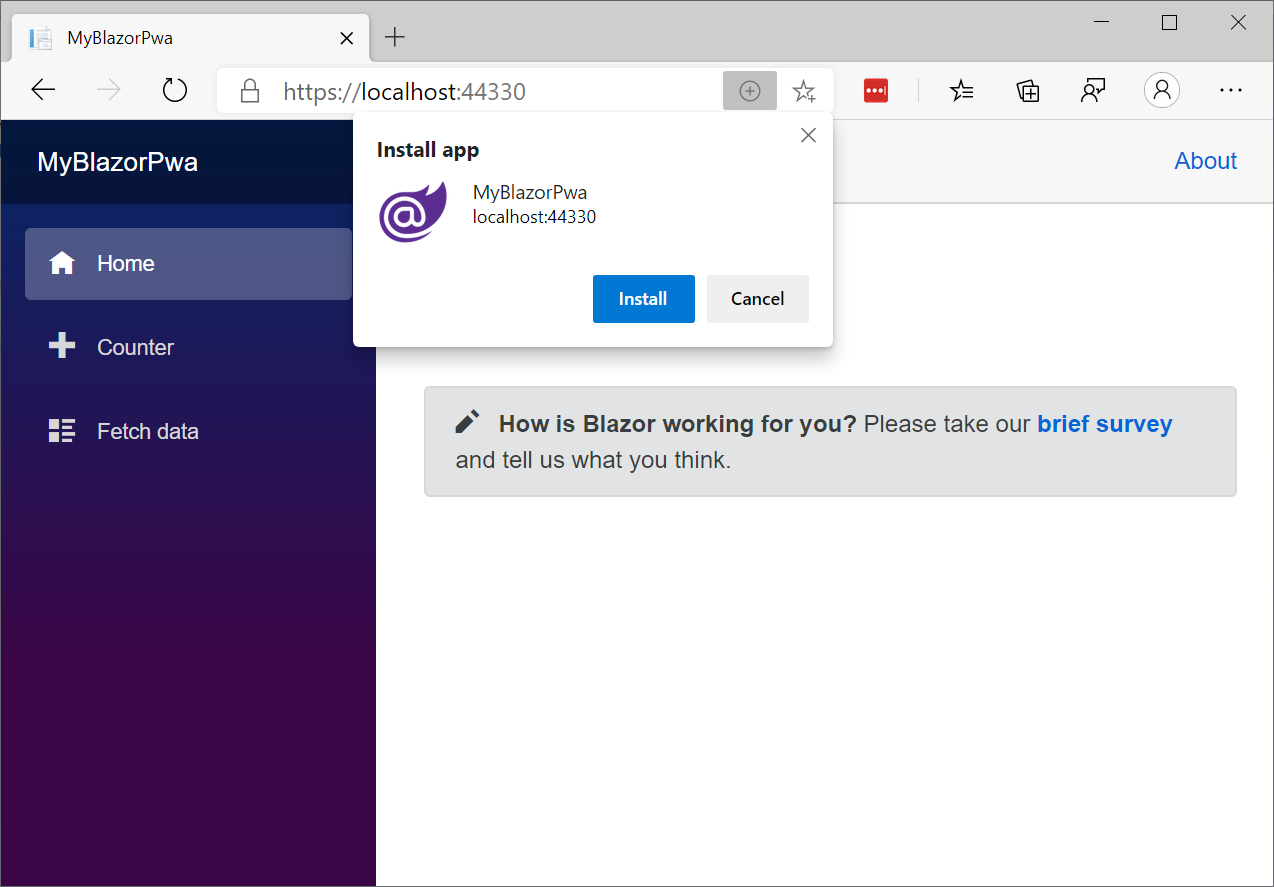
When visiting an app created using the PWA template option, users have the option to install the app into their OS’s start menu, dock, or home screen.
The way this option is presented depends on the user’s browser. For example, when using desktop Chromium-based browsers such as Edge or Chrome, an Add button appears within the address bar:
On iOS, visitors can install the PWA using Safari’s Share button and its Add to Homescreen option. On Chrome for Android, users should tap the Menu button in the upper-right corner, then choose Add to Home screen.
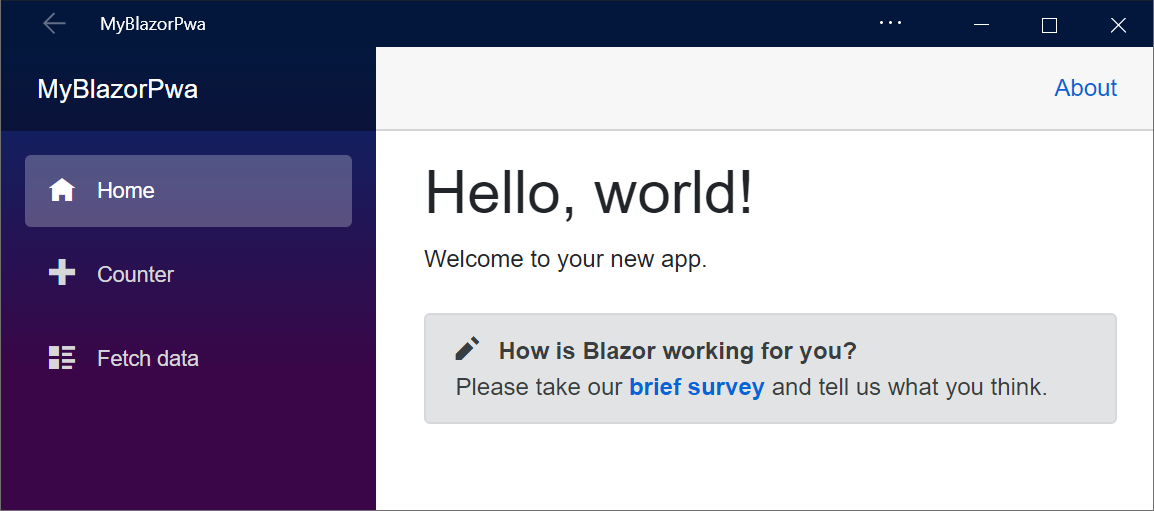
Once installed, the app appears in its own window, without any address bar.
To customize the window’s title, color scheme, icon, or other details, see the file manifest.json in your project’s wwwroot directory. The schema of this file is defined by web standards. For detailed documentation, see https://developer.mozilla.org/en-US/docs/Web/Manifest.
Offline support
By default, apps created using the PWA template option have support for running offline. A user must first visit the app while they are online, then the browser will automatically download and cache all the resources needed to operate offline.
Important: Offline support is only enabled for published apps. It is not enabled during development. This is because it would interfere with the usual development cycle of making changes and testing them.
Warning: If you intend to ship an offline-enabled PWA, there are several important warnings and caveats you need to understand. These are inherent to offline PWAs, and not specific to Blazor. Be sure to read and understand these caveats before making assumptions about how your offline-enabled app will work.
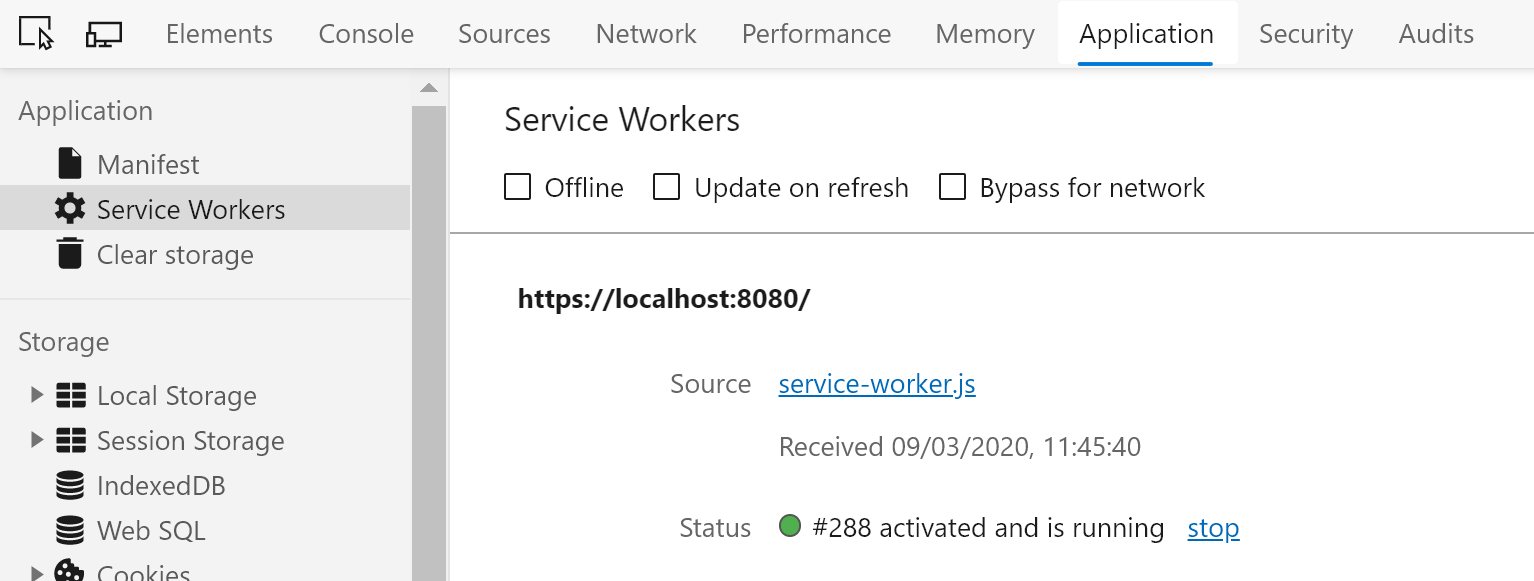
To see how offline support works, first publish your app, and host it on a server supporting HTTPS. When you visit the app, you should be able to open the browser’s dev tools and verify that a Service Worker is registered for your host:
Additionally, if you reload the page, then on the Network tab you should see that all resources needed to load your page are being retrieved from the Service Worker or Memory Cache:
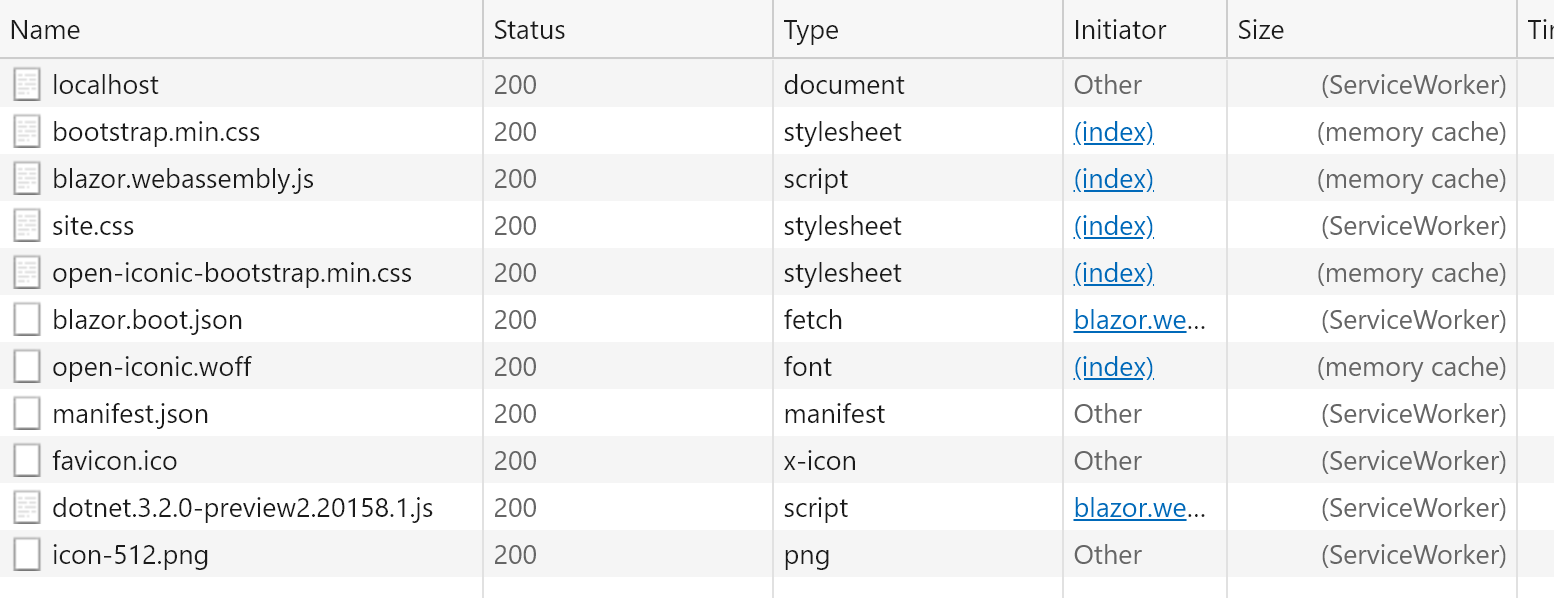
This shows that the browser is not dependent on network access to load your app. To verify this, you can either shut down your web server, or instruct the browser to simulate offline mode:
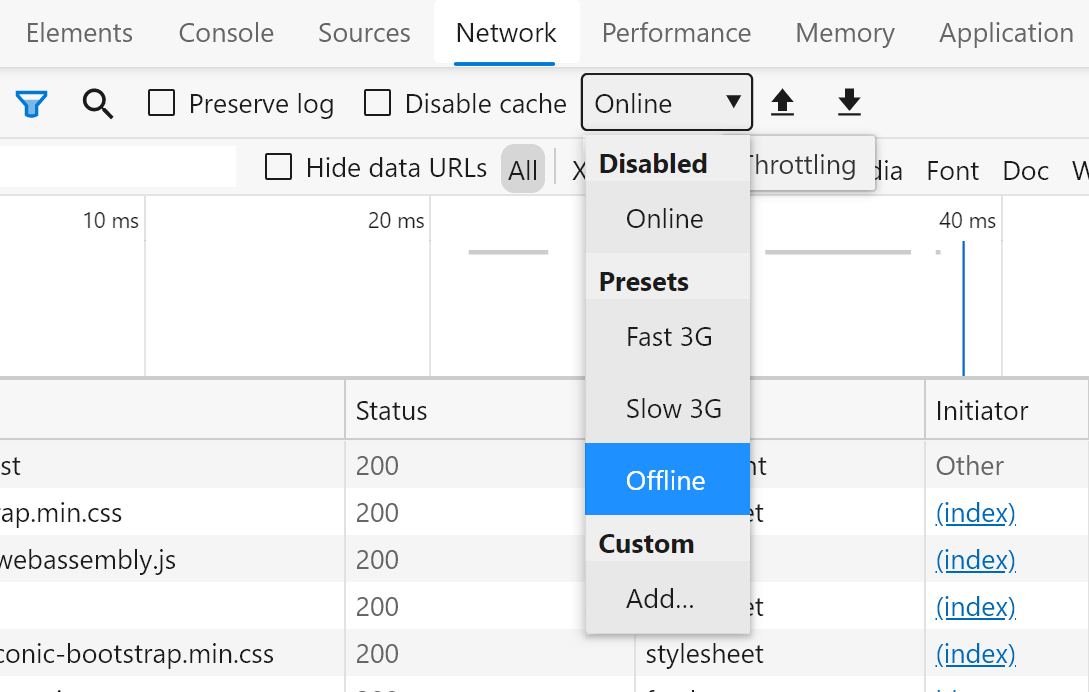
Now, even without access to your web server, you should be able to reload the page and see that your app still loads and runs. Likewise, even if you simulate a very slow network connection, your page will still load almost immediately since it’s loaded independently of the network.
To learn more about building PWAs with Blazor, check out the documentation.
Known issues
There are a few known issues with this release that you may run into:
-
When building a Blazor WebAssembly app using an older .NET Core SDK you may see the following build error:
error MSB4018: The "ResolveBlazorRuntimeDependencies" task failed unexpectedly.
error MSB4018: System.IO.FileNotFoundException: Could not load file or assembly '\BlazorApp1\obj\Debug\netstandard2.1\BlazorApp1.dll'. The system cannot find the file specified.
error MSB4018: File name: '\BlazorApp1\obj\Debug\netstandard2.1\BlazorApp1.dll'
error MSB4018:    at System.Reflection.AssemblyName.nGetFileInformation(String s)
error MSB4018:    at System.Reflection.AssemblyName.GetAssemblyName(String assemblyFile)
error MSB4018:    at Microsoft.AspNetCore.Components.WebAssembly.Build.ResolveBlazorRuntimeDependencies.GetAssemblyName(String assemblyPath)
error MSB4018:    at Microsoft.AspNetCore.Components.WebAssembly.Build.ResolveBlazorRuntimeDependencies.ResolveRuntimeDependenciesCore(String entryPoint, IEnumerable`1 applicationDependencies, IEnumerable`1 monoBclAssemblies)
error MSB4018:    at Microsoft.AspNetCore.Components.WebAssembly.Build.ResolveBlazorRuntimeDependencies.Execute()
error MSB4018:    at Microsoft.Build.BackEnd.TaskExecutionHost.Microsoft.Build.BackEnd.ITaskExecutionHost.Execute()
error MSB4018:    at Microsoft.Build.BackEnd.TaskBuilder.ExecuteInstantiatedTask(ITaskExecutionHost taskExecutionHost, TaskLoggingContext taskLoggingContext, TaskHost taskHost, ItemBucket bucket, TaskExecutionMode howToExecuteTask)
To address this issue, upgrade to version 3.1.102 or later of the .NET Core 3.1 SDK.
-
You may see the following warning when building from the command-line:
CSC : warning CS8034: Unable to load Analyzer assembly C:\Users\user\.nuget\packages\microsoft.aspnetcore.components.analyzers\3.1.0\analyzers\dotnet\cs\Microsoft.AspNetCore.Components.Analyzers.dll : Assembly with same name is already loadedThis issue will be fixed in a future update to the .NET Core SDK. To workaround this issue, add the
<DisableImplicitComponentsAnalyzers>true</DisableImplicitComponentsAnalyzers>property to the project file. -
The following error may occur when publishing an ASP.NET Core hosted Blazor app with the .NET IL linker disabled:
An assembly specified in the application dependencies manifest (BlazorApp1.Server.deps.json) was not foundThis error occurs when assemblies shared by the server and Blazor client project get removed during publish (see https://github.com/dotnet/aspnetcore/issues/19926).
To workaround this issue, ensure that you publish with the .NET IL linker enabled. To publish with the linker enabled:
- Publish using a Release build configuration:
dotnet publish -c Release. The .NET IL linker is automatically run for Release builds, but not for Debug builds. - Don’t set
BlazorWebAssemblyEnableLinkingtofalsein your client project file.
If you’re hitting issues running with the linker disabled, you may need to configure the linker to preserve code that is being called using reflection. See https://docs.microsoft.com/aspnet/core/host-and-deploy/blazor/configure-linker for details.
- Publish using a Release build configuration:
Feedback
We hope you enjoy the new features in this preview release of Blazor WebAssembly! Please let us know what you think by filing issues on GitHub.
Thanks for trying out Blazor!
 Light
Light Dark
Dark
146 comments
I understand that you’re maintaining several SPA templates at this point and the Razor pages approach allows for a one size fits all solution, but is there any chance of a template with an individual accounts authentication UI implemented entirely in Blazor?
Unfortunately no, we don’t have any plans to do this. While this isn’t always idea, having multiple implementations of the default Identity UI would be very expensive for us to maintain.
I wanted to spin up the PWA option out of the box using the default counter/weather data app. The PWA checkbox option is there, so I assume all’s good with the latest SDK, but the ‘add’ button doesn’t appear in the URL. What am I doing wrong? Thank you.
…ah, Edge is in dark mode and the add ‘+’ button, just like the favourites star, is far right of the address bar and difficult to see! All good now.
Cool, glad you got it working. Thanks for trying out the preview!
I published the application and when accessing it is showing the following error.
HTTP Error 500.31 – ANCM Failed to Find Native Dependencies
Common solutions to this issue:
The specified version of Microsoft.NetCore.App or Microsoft.AspNetCore.App was not found.
Troubleshooting steps:
Check the system event log for error messages
Enable logging the application process’ stdout messages
Attach a debugger to the application process and inspect
In the event viewer i found the description:
Could not find ‘aspnetcorev2_inprocess.dll’. Exception message: Error: An assembly specified in the application dependencies manifest (DVCE.Server.deps.json) was not found: package: ‘Blazored.Modal’, version: ‘3.1.2’ path: ‘lib/netstandard2.0/Blazored.Modal.dll’
Process Id: 11560.
File Version: 13.1.20018.2. Description: IIS ASP.NET Core Module V2. Commit: c3acdcac86dad91c3d3fbc3b93ecc6b7ba494bdc
Hi Marcius. Can you share with us how you are publishing your app to your IIS server? Also, have you installed .NET Core 3.1.2 on your IIS server?
Daniel,
I’d like to add that we are having the same issue. At first we thought it was an IIS issue but it is not.
Steps to Reproduce:
Create a WebAssembly app with ASP.Net Core hosting (generates the .Client, .Server, .Shared)
Add a reference (e.g., Blazored.Modal) to the .Client project
Run dotnet publish -c Release
Go to the publish folder and run the .Server.exe
Error immediately occurs that it is unable to find the assembly (looking in /lib/netstandard2.0/Blazored.Modal.dll)
I also attempted PublishWithAspNetCoreTargetManifest = false with no effect
Hi Daniel,
I too have hit this problem. The third party dependency Blazored.Modal’.dll is missing, as well as several others (list is not complete):
Google.Protobuf
Grpc.Core.Api
Grpc.Net.Client.Web
Grpc.Net.Client
Grpc.Net.Common
Microsoft.AspNetCore.Components.WebAssembly
…
I publish with dotnet publish, followed by Compress-Archive and Publish-AzWebapp.
In my case the cause is that dotnet publish -c Debug omits these dependencies while including others, whereas dotnet publish -c Release adds all of them correctly to the publish folder. I do not see a reason for this different behavior, but with the latter option the deployment to AppService works fine.
Hi Marcius, Craig, Michael. We think we’ve identified this issue and we’re tracking addressing it for Preview 3 here: https://github.com/dotnet/aspnetcore/issues/19926. Thank you for your patience on this one!
Really enjoying the previews for Blazor WASM! I swapped out my service-worker.js with the one created through the template, and all was working quite well until I went to publish. The onInstall function in service-worker-published.js doesn’t seem to like the { integrity: asset.hash } aspect of the Request. All of my dlls in the service-worker-assets.js file produce a SHA-256 mismatch and Chrome denies loading of the resource.
.map(asset => new Request(asset.url, { integrity: asset.hash }));If I change to the following it works fine, but then I lose the integrity check.
example error: Failed to find a valid digest in the ‘integrity’ attribute for resource ‘https://foo.bar/_framework/_bin/Microsoft.AspNetCore.Components.Web.dll’ with computed SHA-256 integrity ‘vCEa3gqoQS5aAN0wq+fGIjUUcKKPTh068Y8QMy0/Y1g=’. The resource has been blocked.
Am I completely overlooking something simple?
Hi Zach. To help us figure out what might be going wrong here, can you share some details on what process you used to publish the app and what sort of environment you published the app to?
So I figured out my problem and I’m not sure if it’s a bug or expected:
The publish settings need to be set to Target Runtime: Portable (or remove the RuntimeIdentifier from the pubxml). I was using the server/client template to have an API and was using win-x64 as my runtime since I was deploying to an IIS server I control and it was producing a different SHA-256 hash for each dll than what was in the service-worker-assets.js
Once I switched to portable the hashes matched. using WSL I was able to run “openssl dgst -sha256 -binary Microsoft.AspNetCore.WebUtilities.dll | openssl base64 -A” and the result matched the assets file
Hmm, sounds like something we might need to investigate. Could you please open a GitHub issue with details on how we can reproduce the problem? https://github.com/dotnet/aspnetcore/issues.
Done. Thanks for the quick replies!
I’ve updated my current web assembly project as instructed and i’m getting this build error:
System.InvalidOperationException: Unable to resolve service for type ‘Microsoft.AspNetCore.ResponseCompression.IResponseCompressionProvider’ while attempting to activate ‘Microsoft.AspNetCore.ResponseCompression.ResponseCompressionMiddleware’.
at Microsoft.Extensions.Internal.ActivatorUtilities.ConstructorMatcher.CreateInstance(IServiceProvider provider)
at Microsoft.Extensions.Internal.ActivatorUtilities.CreateInstance(IServiceProvider provider, Type instanceType, Object[] parameters)
at Microsoft.AspNetCore.Builder.UseMiddlewareExtensions.c__DisplayClass4_0.b__0(RequestDelegate next)
at Microsoft.AspNetCore.Builder.ApplicationBuilder.Build()
at Microsoft.AspNetCore.Hosting.GenericWebHostService.StartAsync(CancellationToken cancellationToken)
The thread 0xc85c has exited with code 0 (0x0).
Exception thrown: ‘System.InvalidOperationException’ in System.Private.CoreLib.dll
An unhandled exception of type ‘System.InvalidOperationException’ occurred in System.Private.CoreLib.dll
Unable to resolve service for type ‘Microsoft.AspNetCore.ResponseCompression.IResponseCompressionProvider’ while attempting to activate ‘Microsoft.AspNetCore.ResponseCompression.ResponseCompressionMiddleware’.
Any help would be greatly appreciated
Hi Daniel. I think the migration steps were originally missing a step. You need to remove both services.AddResponseCompression and app.UseResponseCompression() from your Startup class in the Server project. The blog posts has been updated to reflect this.
Great job guys. Love my experience with Blazor so far.
I noticed the disappearance of startup.cs from the client project and I was wondering how to get access to IServiceCollection and services.AddScoped<>() client side?
Found it! It’s been moved to program.cs:
builder.Services.AddScoped<>();
Yup, the startup code for Blazor WebAssembly was revised in the 3.2 Preview 1 release: https://devblogs.microsoft.com/aspnet/blazor-webassembly-3-2-0-preview-1-release-now-available/.
Hey Dan. I have updated all packages as recommended above. However, I am receiving the following error message. I’ve tried repairing, restarting, everything with no luck.
Package Microsoft.AspNetCore.Components.WebAssembly.Server 3.2.0-preview2.20160.5 is not compatible with netstandard2.1 (.NETStandard,Version=v2.1). Package Microsoft.AspNetCore.Components.WebAssembly.Server 3.2.0-preview2.20160.5 supports: netcoreapp3.1 (.NETCoreApp,Version=v3.1)
Hi Yadel. It sounds like you’re referencing the Microsoft.AspNetCore.Components.WebAssembly.Server package from your client Blazor WebAssembly project. Blazor WebAssembly projects target .NET Standard 2.1. But this package should only be referenced from an ASP.NET Core project that targets .NET Core 3.1. The package is used to integrate Blazor WebAssembly into an ASP.NET Core app. We often call this setup an ASP.NET Core hosted Blazor WebAssembly app. If you’re trying to host a Blazor WebAssembly app in ASP.NET Core then move this package reference to your Server project. If you just want a standalone Blazor WebAssembly app that you intend to deploy as a static site, you can just remove this package reference. I hope this helps!
fair enough. Thank you
Some observations while upgrading from Preview 1 to Preview 2
– var builder = WebAssemblyHostBuilder.CreateDefault(args); was throwing an error after upgrading the references
-> I had to change the namespace to using Microsoft.AspNetCore.Components.WebAssembly.Hosting; that I was using in Program.cs
– UseWebAssemblyDebugging and UseBlazorFrameworkFiles were throwing an error
-> because it wasn’t mentioned to upgrade server references to
PackageReference Include=”Microsoft.AspNetCore.Components.WebAssembly.Server” Version=”3.2.0-preview2.20160.5″
Fantastic step forward!
The only issue remaining…
If compiling/loading changes to .wasm instead of *.dll files so evil evil antivirus (and dumb corporate firewall rules) stop being an issue, we’re 100% in business!
Great work and the migration instructions are on point through the last two versions, which is HIGHLY apprecaited!
Hi Kurt. If you’re seeing issues with the downloaded .dlls being dropped, you can try renaming the files as a workaround. We made some changes in this release to make renaming the files easier to do. See https://github.com/dotnet/aspnetcore/issues/5477#issuecomment-599148931 for instructions on how to do this. Could you give this approach a try and let us know on the GitHub issue if you’re still seeing issues? Thanks!
Hi Daniel,
That’s a heck of a quick reply. I got an email (I’m following that issue) and I came here to express joy that it was updated and lo and behold you’ve made a comment here as well. I ran the script (I develop on Windows, but I deploy from a Linux environment to another Linux environment, so I used the Linux script provided) and it deployed with the new names, and when loading the page it seems to be loading the files with the new extensions fine, and the app works. I will follow up on the github issues once I get a test done on a machine with the AV and the machine with the firewall issue. The AV machine will be easy enough, but the “dumb corporate firewall” will be an issue because their office is on hiatus due to the pandemic situation, so I’ll follow up on that once they figure out what’s up and settle in.
Thanks a trillion for the speedy speedy reply!
Thank you for trying this solution out! We’ll be very interested to hear how it goes once you’ve had to try it out in your corporate environment.
Is there a way to aurtize whole wasm app instead of single component, plus it should redirect login pages instead of loading then checking login state….